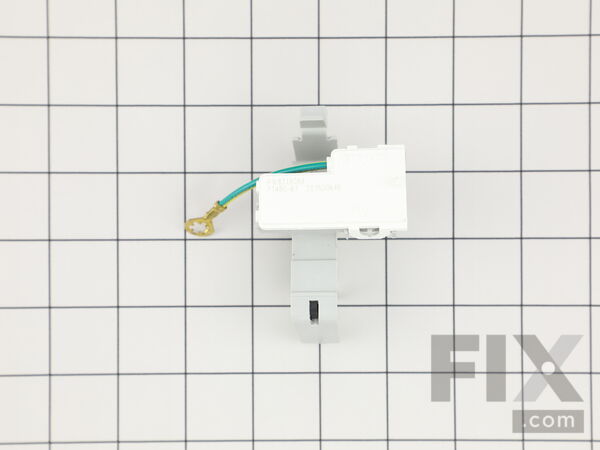
Part Location Diagram of WP8318084 Whirlpool Washer Lid Switch
See part 9 in the diagram
Replacing your Whirlpool Washer Washer Lid Switch
( Grid squares measure 1x1 inch )

Washer Lid Switch

Works With Model 1CWTW5300VW0!
★★★★★
★★★★★
6 Reviews

Rated by 13 customers 

?

Really Easy 

15 - 30 mins 

Ratings submitted by customers like you who bought this part.

?
$45.97
In Stock
Fix Number:
FIX11745957
Manufacturer #:
WP8318084
Manufactured by:
Whirlpool
Works With Model 1CWTW5300VW0!

Product Description

On the lid on your washing machine there is a pin that engages with the lid switch. This works by telling the machine that the lid is closed which then allows for the washer to start. If your washer is not starting, or does not advance through the different cycles, there may be a problem with your lid switch. This part can wear out or become damaged over time and will need to be replaced so your machine can operate. Replacing this genuine OEM part is an easy job that requires the use of a Philips screwdriver along with a 5/16-inch nut driver. You will need to disconnect the power to your washer before beginning this repair and pull the machine away from the wall so you can easily access the back panel. Since the lid switch is found underneath the control panel, you will need to unscrew and lift the panel back to gain access. In order to remove the old switch, you first disconnect the wire harness, and remove the screw holding the grounding wire in place. The lid of the washer needs to be lifted, as the pin will be engaged with the switch if the lid is in the closed position. With the lid still open, the new switch can be put in place, install the screw for the grounding wire, and reattached the wire harness. The control panel can then be lowered back down, ensuring the locking tabs are engaged.

Videos For installing this part.

Replacing your Washer Lid Switch

Replacing your Washer Lid Switch

Questions and Answers

We're sorry, but our Q&A experts are temporarily unavailable.
Please check back later if you still haven't found the answer you need.

4 questions answered by our experts.
  • 1
Sort by:
Sorry, we couldn't find any existing answers that matched.
Try using some different or simpler keywords, or submit your new question by using the "Ask a Question" button above!
Justin
August 4, 2023
Washer will continue running with the lid open. Is this the expected fix for that problem?
For model number RTW4340SQ0
Fix.com logo
Hello Justin, thank you for your inquiry. If your washing machine does not stop operating when you open the lid, the lid switch, part number FIX11745957, is likely faulty. We hope that helps!

1 person found this helpful.

Was this helpful?
Thank you for voting!
Bill
July 26, 2022
How to access lid switch?
For model number Kenmore 110.25852400
Fix.com logo
Hello Bill, thank you for your question. After keying in the part number FIX11745957 on our site, you will see a video that should tell you.

Was this helpful?
Thank you for voting!
Kathy
November 16, 2022
Washer stopped working, wouldn't drain, agitate, or anything, so we brought a washer lid switch we thought it was working, so I put some pants in and I'm Almost positive it was agitating but it stops when you open the lid? But it's definitely not spinning the water out of the clothes. Any idea? Thank you, Kathy French
For model number MVWC300VW1
Fix.com logo
Hi Kathy, thank you for reaching out. According to our research, you need to check the following parts to fix the issue: Transmission, part number FIX341974, Basket Drive Assembly, part number FIX11723156, and Clutch Assembly, part number FIX11745785. Please check you install the lid switch correctly, we have attached a relevant video to help you. We hope this helps! If you need help placing an order, customer service is open 7 days a week. Thanks again for your great question.

Was this helpful?
Thank you for voting!
Related Parts:
Richard
February 18, 2023
how to replace Kenmore Elite washer lid switch
For model number 11024942301
Fix.com logo
Hello Richard, thank you for reaching out. This part can be easily replaced with the help of a Philips screwdriver and a 5/16-inch nut driver. Before starting this repair, you will need to turn off the electricity of the washer and pull it away from the wall so you can easily access the rear panel. You must detach and lift the control panel back in order to access the lid switch because it is located underneath the panel. You must first unplug the wire harness from the old switch and remove the screw keeping the grounding wire in place. The lid of the washer needs to be lifted, as the pin will be engaged with the switch if the lid is in the closed position. With the lid still open, the new switch can be put in place, install the screw for the grounding wire, and reattached the wire harness. The control panel can then be lowered back down, ensuring the locking tabs are engaged. We hope this helps, good luck with the repair!

Was this helpful?
Thank you for voting!

Installation Instructions Provided by Fix customers like you.

Average Repair Rating: 4.3 / 5.0, 13 reviews.
  • 1
  • 2
Sort by:
Sorry, we couldn't find any existing installation instruction that matched.
Customer:
Paul from Mobile, AL
Parts Used:
285753A, WP8318084, 388253A, WP358237, WP3392519, 285785, 3360629, 279838
Difficulty Level:
Very Easy
Total Repair Time:
30 - 60 mins
Tools:
Nutdriver, Screw drivers, Socket set, Wrench (Adjustable)
would not spin
well i replaced a lot of parts..but i think it was the the lid switch. but now its brand new..Thanks
16 of 19 people found this instruction helpful.
Was this instruction helpful to you?
Thank you for voting!
Customer:
SANDRA from ALBURG, VT
Parts Used:
WP8318084
Difficulty Level:
Really Easy
Total Repair Time:
15 - 30 mins
Tools:
Screw drivers, Socket set
Washer would not do anything. Stopped in the middle of a load of wash.I noticed a few times that I had to open and reclose the lid to get it to start, so I thought it was the lip switch.
Looked at other peoples instructions and did the same, but I had 5 screws not 2. 3 needed wrenches and 2 needed a screw driver. I'm a 67 year old woman I I did it . It was easy!
15 of 19 people found this instruction helpful.
Was this instruction helpful to you?
Thank you for voting!
Customer:
Lawrence from Aliquippa, PA
Parts Used:
WP8318084
Difficulty Level:
Really Easy
Total Repair Time:
15 - 30 mins
Tools:
Nutdriver, Screw drivers
Washer would fill with water and then not do anything.
Watched a you tube video for the make and model of the washer and proceeded as outlined on the video. Very easy repair.
3 of 3 people found this instruction helpful.
Was this instruction helpful to you?
Thank you for voting!
Customer:
Gary from LaSalle, IL
Parts Used:
WP8318084
Difficulty Level:
Really Easy
Total Repair Time:
Less than 15 mins
Tools:
Nutdriver
Washer would fill but then not cycle
Remove 2 screws behind end panels, also use nut driver to remove 2 screws hold plastic retraining straps . Lift control panel out of the way . Open lid, lid switch is on back left side of lid . Disconnect ground wire and squeeze back side of clip on lid switch . Tilt froward carefully and remove . Reverse proces and gather up dirty clothe s and you are ready to wash. Takes less than 15mins and saves you a ton of cash . It's really that simple.
3 of 3 people found this instruction helpful.
Was this instruction helpful to you?
Thank you for voting!
Customer:
Nobel from LA PUENTE, CA
Parts Used:
WP8318084
Difficulty Level:
Really Easy
Total Repair Time:
30 - 60 mins
washer intermittently doesn't start
- unplug electrical chord from the wall
- move the washer forward to have access of the back panel of the washer
- just follow the video
2 of 2 people found this instruction helpful.
Was this instruction helpful to you?
Thank you for voting!
Customer:
Pamela from Bellflower, CA
Parts Used:
WP8318084
Difficulty Level:
Really Easy
Total Repair Time:
15 - 30 mins
Tools:
Nutdriver, Screw drivers
Washer would not work after filling with water
My son
2 of 2 people found this instruction helpful.
Was this instruction helpful to you?
Thank you for voting!
Customer:
connie from Galena, MO
Parts Used:
3957014, WP8318084
Difficulty Level:
Easy
Total Repair Time:
1- 2 hours
Tools:
Pliers, Screw drivers, Socket set, Wrench (Adjustable)
Lid switch had overheated and was fused to wiring harness
REmoved lid switch fist and replaced it. Then replaced the wiring harness one plug at a time following the original exactly . Too bad we could not find any instructions for replacing the wiring harness.Do not remove the entire wiring harness and then try to replace it---you'll be sorry.
2 of 3 people found this instruction helpful.
Was this instruction helpful to you?
Thank you for voting!
Customer:
Reed from Mesa, AZ
Parts Used:
WP8318084
Difficulty Level:
Very Easy
Total Repair Time:
Less than 15 mins
Tools:
Nutdriver, Screw drivers
washer did not start
read how others did it
2 of 5 people found this instruction helpful.
Was this instruction helpful to you?
Thank you for voting!
Customer:
Andrew from Yuma, AZ
Parts Used:
WP8318084
Difficulty Level:
Easy
Total Repair Time:
15 - 30 mins
Tools:
Nutdriver, Screw drivers, Socket set, Wrench (Adjustable)
Washer not draining or spinning.
Washer had been acting up. Didnt want to run spin cycle and would randomly start working again. Finally it stopped completely (with full load in of course). I suspected the lid switch. I used multimeter to confirm it had failed. The new lid switch was a 1 minute install. Just remember to keep the lid up when installing. I did a qui ck spin cycle test to confrim it was working before reassembly. It was good to go.
1 of 3 people found this instruction helpful.
Was this instruction helpful to you?
Thank you for voting!
Customer:
Jimmie from Humble, TX
Parts Used:
WP8318084
Difficulty Level:
Very Easy
Total Repair Time:
Less than 15 mins
Tools:
Nutdriver, Screw drivers
Washer won't start
Used a flat blade screwdriver to open control panel nut driver to take off ground wire very easy found a video on you tube that showed how-to do it took less than 5 minutes
1 person found this instruction helpful.
Was this instruction helpful to you?
Thank you for voting!
  • 1
  • 2
Customer Reviews
Average Rating: (6 Reviews)
5.0
★★★★★
★★★★★
Filter By Rating:
  • 5
    6
  • 4
    0
  • 3
    0
  • 2
    0
  • 1
    0
  • 1
Sort by:
Sorry, we couldn't find any existing reviews that matched. Try using some different or simpler keywords.

Model Compatibility

This part works with the following models:
Fix Number: FIX11745957
Manufacturer Part Number: WP8318084
Brand
Model Number
Description
Kenmore
11015942401
Washer
Kenmore
11015944401
Washer
Kenmore
11015952401
Washer
Kenmore
11015954401
Washer
Kenmore
11015962401
Washer
Kenmore
11015964401
Washer
Kenmore
11016102500
Washer
Kenmore
11016102501
Washer
Kenmore
11016102502
Washer
Kenmore
11016212500
Washer
Kenmore
11016212501
Washer
Kenmore
11016212502
Washer
Kenmore
11016212503
Washer
Kenmore
11016732500
Washer
Kenmore
11016812500
Washer
Kenmore
11016812501
Washer
Kenmore
11016812502
Washer
Kenmore
11016812503
Washer
Kenmore
11016852500
Washer
Kenmore
11016852501
Washer
Kenmore
11016852502
Washer
Kenmore
11016852503
Washer
Kenmore
11016862500
Washer
Kenmore
11016862501
Washer
Kenmore
11016862502
Washer
Kenmore
11016862503
Washer
Kenmore
11016882500
Washer
Kenmore
11016882501
Washer
Kenmore
11016882502
Washer
Kenmore
11016882503
Washer