Part Location Diagram of WP37001298 Whirlpool Drum Glide
See part 3 in the diagram
Replacing your Amana Dryer Drum Glide
( Grid squares measure 1x1 inch )

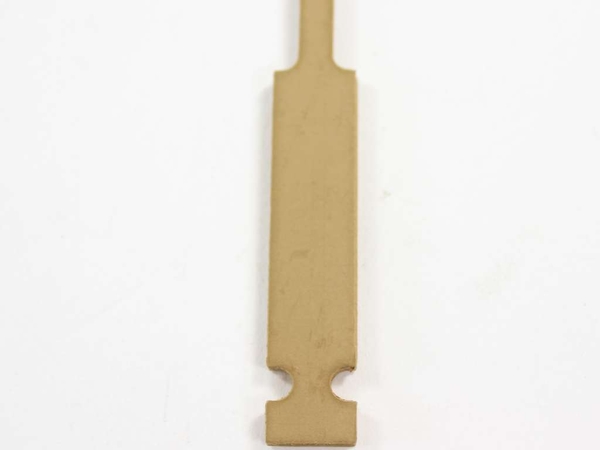
Drum Glide

Works With Model MDE5806AZW!

Rated by 17 customers 

?

Easy 

1- 2 hours 

Ratings submitted by customers like you who bought this part.

?
$14.17
In Stock
Fix Number:
FIX11741931
Manufacturer #:
WP37001298
Manufactured by:
Whirlpool
Works With Model MDE5806AZW!

Product Description

Located in the front bulkhead of your dryer are two drum glides, which help to ensure that the drum rotates smoothly and quietly while the dryer is operating. When the glides wear down, it can cause a metal-on-metal noise while the machine is tumbling. If you notice that your dryer is excessively noisy, is not tumbling, or is leaving marks on your clothes, it may be time to replace the glides. This genuine OEM part is sold individually, however we recommend replacing both glides at the same time to ensure even wear. Please be sure to disconnect the power supply to the dryer before beginning this repair.

Videos For installing this part.

Replacing your Drum Glide

Replacing your Drum Glide

Questions and Answers

We're sorry, but our Q&A experts are temporarily unavailable.
Please check back later if you still haven't found the answer you need.

1 question answered by our experts.
  • 1
Sort by:
Sorry, we couldn't find any existing answers that matched.
Try using some different or simpler keywords, or submit your new question by using the "Ask a Question" button above!
Glenn
March 14, 2022
Is this one or two parts?
Fix.com logo
Hello Glenn, Thank you for the question. This genuine OEM part is sold individually, however we recommend replacing both glides at the same time to ensure even wear. If you need help placing an order, customer service is open 7 days a week. Please feel free to give us a call. We look forward to hearing from you!

1 person found this helpful.

Was this helpful?
Thank you for voting!

Installation Instructions Provided by Fix customers like you.

Average Repair Rating: 3.1 / 5.0, 17 reviews.
  • 1
  • 2
Sort by:
Sorry, we couldn't find any existing installation instruction that matched.
Customer:
Rachel from Berrien Center, MI
Parts Used:
WP40111201, WP37001298, WP37001287, WP37001042
Difficulty Level:
Really Easy
Total Repair Time:
30 - 60 mins
Tools:
Screw drivers, Socket set, Wrench (Adjustable)
Drum was not working properly
It was very easy to installed new parts.
13 of 13 people found this instruction helpful.
Was this instruction helpful to you?
Thank you for voting!
Customer:
Scott from Beaumont, TX
Parts Used:
WP40111201, WP37001298, WP37001287, WP37001042
Difficulty Level:
Easy
Total Repair Time:
1- 2 hours
Tools:
Nutdriver, Pliers, Socket set, Wrench set
High-Pitched squeak during first 2-3 minutes of drying
I knew right away that some rollers were bad. So, I decided to do a total "rebuild" while I had the dryer apart. I.e., any part pertaining to movement of the drum. So, I replaced the 2 rear rollers, idler pulley, front glides and drum drive belt. Why not? You're already in there - just do it all, and you're good for maybe another 10 years . One thing they don't tell you in the videos, but you really should do; add some grease to the shafts for the rear rollers and on the shoulder bolt that holds the idler pulley in place. Don't "slather" it in there; I used a wooden toothpick to put a small amount for the roller shafts and shoulder bolt. It's best to use something that can stand high heat. I used STL Pipe Thread grease; but any good, high-heat grease will do. Also, take the time to vacuum out the inside of the dryer, and ALL air paths. Especially the front Lint Duct Assembly. Mine was so full of lint, it was almost blocking the blower wheel. It was so packed, it was mostly blocking the thermal limit switch!!. That could cause the dryer to over heat, and catch all that lint on fire. Clean it good, and it'll take less running time to dry your clothes. I could tell the difference.
7 of 8 people found this instruction helpful.
Was this instruction helpful to you?
Thank you for voting!
Customer:
Daniel from Manchester, NH
Parts Used:
WP40111201, WP37001298, WP37001287, WP37001042, WP500121
Difficulty Level:
A Bit Difficult
Total Repair Time:
More than 2 hours
Tools:
Nutdriver, Pliers, Screw drivers, Socket set, Wrench set
very noisy when turning
Idler Lever was obviously totally gone and causing most of the noise. Videos are excellent. Just follow them carefully.
6 of 6 people found this instruction helpful.
Was this instruction helpful to you?
Thank you for voting!
Customer:
Gerald from LaPorte, IN
Parts Used:
56000, WP37001298
Difficulty Level:
A Bit Difficult
Total Repair Time:
More than 2 hours
Tools:
Nutdriver, Screw drivers, Wrench set
Building Noise as unit Heated up .
After replacing everything but the Fan , I replaced it ! How did I find out? I run the unit with the Gas valve unhooked . The heat was Warping the Fan throwing it out of balance ..Thats why as it got Hot the noise got louder . Replacing the fan salved the problem . That was my sons Dryer . Well I have one just like it at the same age . I' ve got all of the spare parts to fix it , motor included !
2 of 2 people found this instruction helpful.
Was this instruction helpful to you?
Thank you for voting!
Customer:
Doug from GRIFFIN, GA
Parts Used:
WPY54414, WP40111201, WP37001298, WP37001042
Difficulty Level:
Really Easy
Total Repair Time:
30 - 60 mins
Tools:
Nutdriver, Pliers
Noisy
I wanted a video to complete the repair
1 person found this instruction helpful.
Was this instruction helpful to you?
Thank you for voting!
Customer:
Joseph from Tucson, AZ
Parts Used:
WP500092, WP40111201, WP37001298, WP37001042, WP23748, WP233520
Difficulty Level:
Easy
Total Repair Time:
30 - 60 mins
Tools:
Nutdriver
Noisy dryer from an obvious part(s) failure.
Removed eight ?" screws (8A X 3/8 Hex Washer Head Tapping) starting with two at bottom kick panel, then two at dryer door panel; disconnect electrical connectors to release door panel from dryer body; remove four screws from dryer opening bulkhead to expose drum and blower impeller; remove two screws securing top dryer panel to side panel s; reach inside right lower access to release dryer belt from idler wheel; lift top panel a little while pulling out bulky drum. Vacuum the heck out of the inside. Even better, do all this outside and take compressed air to the inside. Because this dryer was 19 years old, all three rollers (drum, idler wheel), guides (2), felts(2), and belt were replaced. The noise was caused by seized rollers but all rubber on rollers and belt was cracking, so best to change such old worn out parts. Don't forget to lube all shafts with oil (plumbers silicone best), then reassemble...js
0 of 1 people found this instruction helpful.
Was this instruction helpful to you?
Thank you for voting!
Customer:
Larry from Ocala, FL
Parts Used:
WP40111201, WP37001298, WP37001042
Difficulty Level:
Really Easy
Total Repair Time:
15 - 30 mins
Noise
Best thing was to tape belt in place on the drum prior to putting back in place, after belt pulley was connected tape was removed. Much easier than trying to install the belt after drum installed.
0 of 1 people found this instruction helpful.
Was this instruction helpful to you?
Thank you for voting!
Customer:
Michael from Meno Falls, WI
Parts Used:
WP37001298, WP37001042
Difficulty Level:
Really Easy
Total Repair Time:
30 - 60 mins
Tools:
Nutdriver, Pliers
noisy dryer
followed yor videos ,they were perfect ,thank you
0 of 1 people found this instruction helpful.
Was this instruction helpful to you?
Thank you for voting!
Customer:
reginald from mount holly, NJ
Parts Used:
WPY54414, WP40113601, WP40111201, WP37001298, WP37001144, WP37001042, WP500121, WP233520
Difficulty Level:
Easy
Total Repair Time:
1- 2 hours
Tools:
Nutdriver, Socket set
noisy when operating
followed instructions in vidios for belt and idler pulley and tub support rollers model in vidios different but came apart basicly the same way. dryer is 17 yrs old, glad to find parts runs quiet as new idler pulley and shaft not worn replaced anyway only belt and left hand tub support roller and shaft were worn
0 of 1 people found this instruction helpful.
Was this instruction helpful to you?
Thank you for voting!
Customer:
Jake from Eureka, NV
Parts Used:
WP40111201, WP37001298, WP37001287, WP37001042
Difficulty Level:
Really Easy
Total Repair Time:
30 - 60 mins
Tools:
Pliers, Socket set, Wrench (Adjustable)
Noisy dryer and slipping belt
No problems. Only the idler pulley seemed to be the issue but since I had the dryer disassembled and all of the parts, I replaced them all so I don't have to do it again any time soon. Watched all the installation videos before tearing into it - they were very helpful and I didn't have to deviate at all from their instruction.
0 of 1 people found this instruction helpful.
Was this instruction helpful to you?
Thank you for voting!
  • 1
  • 2

Model Compatibility

This part works with the following models:
Fix Number: FIX11741931
Manufacturer Part Number: WP37001298
Brand
Model Number
Description
Admiral
ADE7005AKW
Dryer - Residential
Admiral
ADE7005AYW
Dryer - Residential
Admiral
ADE9005AGW
Dryer - Residential
Admiral
ADG7005AWW
Dryer - Residential
Speed Queen
AEM197
Dryer - Residential, Automatic
Speed Queen
AEM377
Dryer - Residential, Automatic
Speed Queen
AEM397
Dryer - Residential, Automatic
Speed Queen
AEM407L
Dryer - Residential, Automatic
Amana
AEM407L2
Dryer
Speed Queen
AEM407L2-PAEM402L2
Dryer - Speed Queen Dryer Model AEM407L2-PAEM402L2 (AEM407L2PAEM402L2, AEM407L2 PAEM402L2) Parts
Speed Queen
AEM407W
Dryer - Residential, Automatic
Amana
AEM407W2
Dryer
Speed Queen
AEM407W2-PAEM402W2
Dryer - Speed Queen Dryer Model AEM407W2-PAEM402W2 (AEM407W2PAEM402W2, AEM407W2 PAEM402W2) Parts
Amana
AEM427L2
Dryer
Speed Queen
AEM427L2-PAEM427L2
Dryer - Speed Queen Dryer Model AEM427L2-PAEM427L2 (AEM427L2PAEM427L2, AEM427L2 PAEM427L2) Parts
Speed Queen
AEM427W
Dryer - Residential, Automatic
Amana
AEM427W2
Dryer
Speed Queen
AEM427W2-PAEM427W2
Dryer - Speed Queen Dryer Model AEM427W2-PAEM427W2 (AEM427W2PAEM427W2, AEM427W2 PAEM427W2) Parts
Amana
AEM477L2
Dryer
Speed Queen
AEM477L2-PAEM477L2
Dryer - Speed Queen Dryer Model AEM477L2-PAEM477L2 (AEM477L2PAEM477L2, AEM477L2 PAEM477L2) Parts
Speed Queen
AEM477W
Dryer - Residential, Automatic
Amana
AEM477W2
Dryer
Speed Queen
AEM477W2-PAEM477W2
Dryer - Speed Queen Dryer Model AEM477W2-PAEM477W2 (AEM477W2PAEM477W2, AEM477W2 PAEM477W2) Parts
Speed Queen
AEM497L
Dryer - Residential, Automatic
Amana
AEM497L2
Dryer
Speed Queen
AEM497L2-PAEM497L2
Dryer - Speed Queen Dryer Model AEM497L2-PAEM497L2 (AEM497L2PAEM497L2, AEM497L2 PAEM497L2) Parts
Speed Queen
AEM497W
Dryer - Residential, Automatic
Amana
AEM497W2
Dryer
Speed Queen
AEM497W2-PAEM497W2
Dryer - Speed Queen Dryer Model AEM497W2-PAEM497W2 (AEM497W2PAEM497W2, AEM497W2 PAEM497W2) Parts
Speed Queen
AEM677L2
Dryer