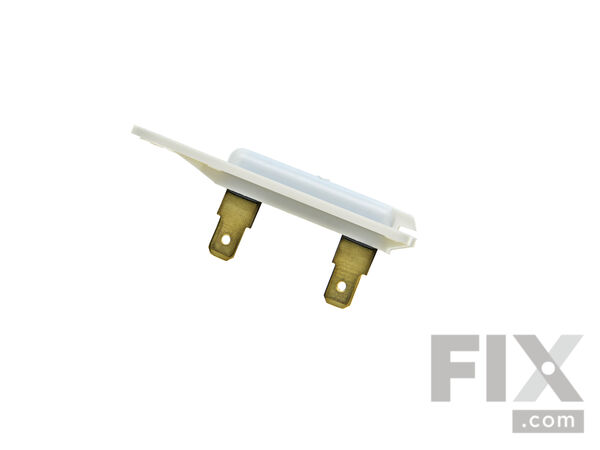
Part Location Diagram of WP3392519 Whirlpool Dryer Thermal Fuse
See part 7 in the diagram
Replacing your Whirlpool Dryer Dryer Thermal Fuse
( Grid squares measure 1x1 inch )

Dryer Thermal Fuse

Works With Model KEYE550VWH0!
★★★★★
★★★★★
15 Reviews

Rated by 166 customers 

?

Really Easy 

30 - 60 mins 

Ratings submitted by customers like you who bought this part.

?
$19.63
In Stock
Fix Number:
FIX11741460
Manufacturer #:
WP3392519
Manufactured by:
Whirlpool
Works With Model KEYE550VWH0!

Product Description

The dryer thermal fuse, also sometimes referred to as the thermal cut off or temperature fuse, is a 2 by 1/2-inch, white, plastic safety mechanism that halts the flow of electricity to the motor circuit when a dryer overheats. If the fuse is missing or broken, your dryer will not start. A thermal fuse fails when the exhaust temperature exceeds the fuse rating, that is when the temperature rises above the temperature that the fuse is intended to manage. This can be caused by the heating element shorting, a regulating thermostat or thermistor failure, or with a partially restricted exhaust vent. The fuse attaches to the blower wheel housing. It must be replaced when there is no longer continuity between the terminals. This is a one-time fuse, meaning it cannot be re-set. The replacement part features two 3/16-inch terminals. While performing this repair, we recommend checking to make sure all vents are cleared and vacuumed. This OEM part is sold individually.

Videos For installing this part.

Replacing your Dryer Thermal Fuse

Replacing your Dryer Thermal Fuse

Questions and Answers

We're sorry, but our Q&A experts are temporarily unavailable.
Please check back later if you still haven't found the answer you need.

4 questions answered by our experts.
  • 1
Sort by:
Sorry, we couldn't find any existing answers that matched.
Try using some different or simpler keywords, or submit your new question by using the "Ask a Question" button above!
James
November 20, 2021
My dryer will not shut off until I manually turn the timer fully to the stop position. Could replacing the Dryer Thermal Fuse fix this problem? the site says it will 55% of the time and also says replacing time is the fix 7% of the time. What are your thoughts for my dryer that will not stop?
For model number MEDC465HW0
Fix.com logo
Hi James, Thank you for your question. If your dryer is not shutting off, the part that fixes the issue most of the time is the thermal fuse. If the thermal fuse is not the issue, there are some other parts that you will need to check to see which one is causing the issue. You will also need to check the heating element, the high limit thermostat, the timer, the door switch, and the drive motor. You will find information on how to test these parts under Free Repair Help and Instant Repairman on our website. We hope this helps! Good luck with the repair!

3 people found this helpful.

Was this helpful?
Thank you for voting!
Related Parts:
Cluet
September 12, 2022
I just change my timer switch now I am getting no heat at all. I don't have a homes tester any suggestion as to what could be the problem. I was getting some heat but not enough due to the length of time the heat stay on, just got a new timer now as stated no heat at this point!
For model number LGR7620LW0
Fix.com logo
Hello Cluet, Thank you for the question. This could be an indication the Dryer Cycling Thermostat, M Series New Style Coil Kit, Thermal Cut-Off Fuse Kit, the Dryer Radiant Flame Sensor or the Igniter Kit is faulty and may need to be replaced. We hope this helps, good luck with this repair!

Was this helpful?
Thank you for voting!
Related Parts:
Howard
December 26, 2022
Had the dryer for over 30 years. Dryer turns on and sometimes after a cycle is finished it won’t turn on again. When I push the start knob there is a buzzing sound. Then I let it cool and it starts again. Sometimes when I push the knob nothing. Then I wait and it starts. Could it be the thermal fuse? Help.
For model number Maytag dryer DE608
Fix.com logo
Hello Howard, thank you for asking. Our research shows that you may need to check the following parts to fix the issue: thermostat, part number FIX11740647, cycling thermostat, part number FIX11743793, blower wheel, part number FIX2200270, and door switch, part number FIX1964648. If you need help placing an order for it, please feel free to give us a call. We look forward to hearing from you!

Was this helpful?
Thank you for voting!
Related Parts:
Stanford
October 6, 2021
What if the heating element does not light and no propane or gas but the dryer still runs?
For model number WGD6200SW1
Fix.com logo
hello Stanford, Thank you for the question. This could be a few parts. We suggest testing the M Series New Style Coil Kit. The coils can be tested using a multi-meter tool. The 2-prong coil read 1,000-1,300 ohms. The 3-prong coil will read 1,300-1,400 ohms across prongs 1 and 2, and 500-600 ohms across prongs 1 and 3. You can also test the Igniter. test anywhere between 50 and 400 ohms of resistance. For the Radiant Flame Sensor, set your multi-meter to the lowest setting and then calibrate it to show zero. Take each probe of your meter and touch one to each of the prongs on your sensor. If the meter continues to show zero or infinite ohms, your sensor is bad and needs to be replaced. We hope this helps!

Was this helpful?
Thank you for voting!
Related Parts:

Installation Instructions Provided by Fix customers like you.

Average Repair Rating: 4.1 / 5.0, 166 reviews.
  • 1
  • 2
  • 3
Sort by:
Sorry, we couldn't find any existing installation instruction that matched.
Customer:
gary from apex, NC
Parts Used:
WP3392519, WP3387134, 279838
Difficulty Level:
Really Easy
Total Repair Time:
15 - 30 mins
Tools:
Nutdriver, Pliers
dryer not heating
Checked the heating element and found a break in the heating coil. Decided to change the thermal fuse and the the cycling thermostat because of the age of the dryer.
136 of 150 people found this instruction helpful.
Was this instruction helpful to you?
Thank you for voting!
Customer:
Dennis from ALISO VIEJO, CA
Parts Used:
WP306604, 4391996, WP3392519, WP3387134, 279834
Difficulty Level:
Really Easy
Total Repair Time:
1- 2 hours
Tools:
Nutdriver, Screw drivers
Dryer ran but did not dry clothing.
Best site I have ever used for repairs. First a list of what parts were needed was provided right from the start, no guessing. I followed all of the video's provided for installation instructions and and that was it. Very easy to make repairs and almost rebuilt my dated dryer to like new condition. Appliance was in very good physical c ondition just needed new components to bring it back. Highly recommend this site to anyone who can turn a wrench.
41 of 48 people found this instruction helpful.
Was this instruction helpful to you?
Thank you for voting!
Customer:
corey from columbus, NE
Parts Used:
WP3392519
Difficulty Level:
Very Easy
Total Repair Time:
Less than 15 mins
Tools:
Socket set
Would not turn on.
According to multiple sources on the internet, there are two fuses that commonly cause this problem. I checked the continuity of both and found my thermal fuse had gone out. Replacing was as simple as opening the back of the dryer and unplugging the old fuse and plugging the new one in (this was disconnected from wall power obviously).
29 of 33 people found this instruction helpful.
Was this instruction helpful to you?
Thank you for voting!
Customer:
Paul from Mobile, AL
Parts Used:
285753A, WP8318084, 388253A, WP358237, WP3392519, 285785, 3360629, 279838
Difficulty Level:
Very Easy
Total Repair Time:
30 - 60 mins
Tools:
Nutdriver, Screw drivers, Socket set, Wrench (Adjustable)
would not spin
well i replaced a lot of parts..but i think it was the the lid switch. but now its brand new..Thanks
16 of 19 people found this instruction helpful.
Was this instruction helpful to you?
Thank you for voting!
Customer:
dave from COLCHESTER, VT
Parts Used:
WP8577274, WP8544771, WP3392519, WP3391914, 279973, 279457
Difficulty Level:
Really Easy
Total Repair Time:
30 - 60 mins
Tools:
Nutdriver, Socket set
no heat
no owners manual fount, local service was weeks out & 100.00 to look at it.Pulled dry out,removed back cover & top, found technical repair manual inside ! found & retrieve codes.Looking for parts stumbled onto your great web site, ordered all possible parts you listed. spent 175.00 fixed,re assemble within 1 hr. HAPPY-HAPPY. HAPPY-WIFEY -HAPPY-LIFEY !!
13 of 13 people found this instruction helpful.
Was this instruction helpful to you?
Thank you for voting!
Customer:
Patrick from Charlotte, NC
Parts Used:
WP3392519, 279838
Difficulty Level:
Really Easy
Total Repair Time:
15 - 30 mins
Tools:
Nutdriver, Pliers
Dryer not heating
Remove back cover. Switch out parts (both plug in and affixed by screws) and test. Put back cover on.
10 of 12 people found this instruction helpful.
Was this instruction helpful to you?
Thank you for voting!
Customer:
Cynthia from Lincoln, CA
Parts Used:
WP3977767, WP3392519, WP3387134, 279838, 279816
Difficulty Level:
Really Easy
Total Repair Time:
30 - 60 mins
Tools:
Pliers, Screw drivers, Socket set
My Stopped having heat
I first watched videos on the problem, then I ordered the parts & proceeded with installing them.
10 of 13 people found this instruction helpful.
Was this instruction helpful to you?
Thank you for voting!
Customer:
Norris from NASHVILLE, TN
Parts Used:
WP3392519, WP3387134
Difficulty Level:
Really Easy
Total Repair Time:
15 - 30 mins
Tools:
Nutdriver
Dryer was not turning on
Replaced thermal fuse
9 of 12 people found this instruction helpful.
Was this instruction helpful to you?
Thank you for voting!
Customer:
MARK from Tucson, AZ
Parts Used:
WP8577274, WP3406653, WP3392519, WP3387223, 279570
Difficulty Level:
Really Easy
Total Repair Time:
30 - 60 mins
Dryer shut off early
Removed front bottom and replaced parts
8 of 15 people found this instruction helpful.
Was this instruction helpful to you?
Thank you for voting!
Customer:
Jena from NILES, MI
Parts Used:
WP3392519
Difficulty Level:
Really Easy
Total Repair Time:
15 - 30 mins
Tools:
Nutdriver
Would not turn on
Turned off Breaker to Dryer
Unplugged dryer and disconnected dryer vent
unscrewed back panel with 1/4 inch nut driver
Took Thermal Fuse off by removing screw
Took electrical leads off by using flat blade screw driver to push them off the post.
put new fuse in the spot. Hook up the electrical leads to the post by j ust pushing them on
Put back plate back on. Hook up dryer vent
Plug back in, flip breaker back on
6 of 6 people found this instruction helpful.
Was this instruction helpful to you?
Thank you for voting!
  • 1
  • 2
  • 3
Customer Reviews
Average Rating: (15 Reviews)
5.0
★★★★★
★★★★★
Filter By Rating:
  • 5
    15
  • 4
    0
  • 3
    0
  • 2
    0
  • 1
    0
  • 1
  • 2
Sort by:
Sorry, we couldn't find any existing reviews that matched. Try using some different or simpler keywords.
  • 1
  • 2

Model Compatibility

This part works with the following models:
Fix Number: FIX11741460
Manufacturer Part Number: WP3392519
Brand
Model Number
Description
Kenmore
10688419100
Dryer
Kenmore
10688419300
Dryer
Kenmore
110088732791
Washer Dryer Combo
Kenmore
11060012000
Dryer
Kenmore
11060012001
Dryer
Kenmore
11060012002
Dryer
Kenmore
11060022010
Dryer
Kenmore
1106012990
Dryer - Kenmore Dryer Model 110.6012990 (1106012990, 110 6012990) Parts
Kenmore
11060172000
Dryer
Kenmore
11060172001
Dryer
Kenmore
11060172002
Dryer
Kenmore
11060202990
Dryer
Kenmore
11060212990
Dryer
Kenmore
11060232000
Dryer
Kenmore
11060232001
Dryer
Kenmore
11060232002
Dryer
Kenmore
11060522900
Dryer
Kenmore
11060602990
Dryer
Kenmore
11060612990
Dryer
Kenmore
1106062110
Dryer
Kenmore
11060622990
Dryer
Kenmore
11060702990
Dryer
Kenmore
11060712990
Dryer
Kenmore
11060722990
Dryer
Kenmore
11060724990
Dryer
Kenmore
11060727990
Dryer
Kenmore
11060802990
Dryer
Kenmore
11060812990
Dryer
Kenmore
11060814990
Dryer
Kenmore
11060817990
Dryer