Ratings submitted by customers like you who bought this part.
?
$95.44
In Stock
Fix Number:
FIX11740783
Manufacturer #:
WP3149400
Manufactured by:
Whirlpool
Works With Model GR395LXGZ1!
Product Description
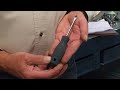
If the large surface burner on your range will not heat up, you may need to replace the switch. This genuine OEM switch is used to control the temperature of the large 8-inch burner, along with turning it on and off. Please be sure to disconnect the power supply to your range before beginning this repair, as you will be working with electrical components. When replacing the switch, the electrical harness features slip-on terminals for easy installation and connections to the switch. You should examine the terminals for signs of arcing or corrosion. If these signs are present, the terminals will need to be replaced as well. The shaft for the burner knob may be longer than the switch you just removed, but you will be able to remove the excess length by using a pair of pliers. If you also need to replace the knob used to turn the switch, it can be purchased separately.
Works with the following brands:
Whirlpool, Kenmore, Roper, Inglis
Works with the following products
Range
Fixes the following symptoms
Element will not heat, Oven is too hot, Will Not Start, Will not program
If the large surface burner on your range will not heat up, you may need to replace the switch. This genuine OEM switch is used to control the temperature of the large 8-inch burner, along with turning it on and off. Please be sure to disconnect the power supply to your range before beginning this repair, as you will be working with electrical components. When replacing the switch, the electrical harness features slip-on terminals for easy installation and connections to the switch. You should examine the terminals for signs of arcing or corrosion. If these signs are present, the terminals will need to be replaced as well. The shaft for the burner knob may be longer than the switch you just removed, but you will be able to remove the excess length by using a pair of pliers. If you also need to replace the knob used to turn the switch, it can be purchased separately.
Works with the following brands:
Whirlpool, Kenmore, Roper, Inglis
Works with the following products:
Range
Fixes the following symptoms:
Element will not heat, Oven is too hot, Will Not Start, Will not program
Part# WP3149400 replaces these:
AP6007666, 310180, 311846, 311858, 311859, 314140
...
Show more, 3148954, 3149400, 99989662, W10295573, WP3149400VP Show less
Videos For installing this part.
Replacing your Surface Burner Element Switch, Large Burner
Questions and Answers
We're sorry, but our Q&A experts are temporarily unavailable.
Please check back later if you still haven't found the answer you need.
1 question answered by our experts.
< Prev
1
Next >
Sort by:
Search filter:
Clear Filter
Your search term must have 3 or more characters.
Keep searches simple. Use keywords, e.g. "leaking", "pump", "broken" or "fit".
Sorry, we couldn't find any existing answers that matched. Try using some different or simpler keywords, or submit your new question by using the "Ask a Question" button above!
Gloria
August 15, 2022
Hot surface light stays ON even though is NO surface heat
For model number 79096020400
Hello Gloria, Thank you for your inquiry. This issue is usually caused by a limit in one of the surface elements or by one of the switches. You can test the elements and switches with a multimeter to see which one is causing the issue. We hope this helps and if you need help placing an order, customer service is open 7 days a week. Please feel free to give us a call. We look forward to hearing from you!
1 person found this helpful.
Was this helpful?
Thank you for voting!
Installation Instructions Provided by Fix customers like you.
Average Repair Rating: 4.5 / 5.0, 12 reviews.
< Prev
1
2
Next >
Sort by:
Search filter:
Clear Filter
Your search term must have 3 or more characters.
Keep searches simple. Use keywords, e.g. "leaking", "pump", "broken" or "fit".
Sorry, we couldn't find any existing installation instruction that matched.
Burner would not heat up and the cook top on light would not turn off.
First turn off breaker. Pull out stove and unplug. There was about 8 screws on the panel on the back side of the control panel. Remove panel. Remove knob on the bad control and there is 2 screws behind knob. Remove those 2 screws and take the new control and remove 1 wire at a time from old switch to new one then put back together.
Turn off power supply then unplug and pull range away from the wall. On the front of the control panel you will find a Phillips head screw on the bottom edge on each end remove those with a stuby screw driver. Then on the backside of the range remove one Phillips head screw on each top corner. Then grab the control panel at the bottom fro
... Read morent and pull out and then up. Pull off knob for bad switch and remove the 2 Phillips head screws. With new switch in hand remove one wire from old to new switch at a time then reassemble.
Could not regulate temperature on both 8" burners.
Turn off breaker, remove panel on back of range. Remove knobs from switches, remove two screws from front of control panel to release switch. Leave wires attached to old switch to make it easier to see where they connect to new switch. Follow instructions included with new switches regarding length of stem. Install new switch, transfe
... Read morer wires from old switch to new switch. Test all switches for correct operation. Reinstall rear panel.
surface eye went to glowing red when turned on and had no adjustment.
Replaced switch on range hood. ( first REMOVE POWER PLUG FROM ELECTRICAL SOURSE) I removed screws from back of range hood with nut driver . Removed control know from range hood exposing the two screws holding the switch in, removed screws with Phillips screw driver, removed switch from rear, unplugged the five wires and attached to new s
... Read morewitch, installed in reverse order. THIS FIXED PROBLEM. took about 15 minutes.
8" stove top burner (right front) went to red hot at any setting
I followed the basic instructions provided with the switch, which were minimal, and viewed several videos, which were better than the instructions, prior to starting. Turned off the breaker to the range/oven and also pulled the plug. The control panel did not remove as indicated on the Youtube videos, rather I had to remove the back pla
... Read morete on the oven which was held by about 8 screws. This was no big deal. The infinite switch I purchased looked identical to the one that failed - a good sign. However, the connectors were not similar at all. I was able to remove them which took a bit of force in addition to the screwdriver tactic described in the videos. In so doing, it is important to keep track of which wire goes where so the new switch is wired correctly. I had to shorten the stem of the new switch but this was no problem and went as described in the on-line videos. You will find that the knob can go on two ways and you have to orient the spring clip on the shaft of the new switch so that "OFF" is in the orientation similar to the other switches, which in my case was the 12 o'clock position. This may require re-positioning the spring clip on the shaft of the new switch which was not a problem. Reassembly of the backplate went easily. The thing that took the most time was vacuuming and washing the floor underneath the oven and cleaning the sides of the oven and cabinets of dirt and grease that had accumulated over the years. Everything tested out once the plug was in and the breaker put in the energized position. Another lesson: always make sure you have the right number of coils on your burner elements to avoid burning out a switch. My 8" burners require 5 coils and the 6" burners requires 4 coils. This is critical to keeping amperage through the switch within it's rating.
8" burner was either off or full cherry red on - no regulation from burner switch
Remove bottom drawer (optional) to reach in and unplug range. Pull up on front at bottom to unstick feet from the floor! Pull range away from the wall. Remove two white screws on underside of front of console at either end. Look on back of range and note how console fits into metal back. Remove two screws in top corners of the back o
... Read moref range. Pull bottom of console out and lift up to remove. Pull dial off of bad burner switch. Remove two screws holding switch onto console. Pull switch out of console from the rear. Use a flat-bladed screwdriver to pop plastic electrical connections off of the bad burner switch. On the new switch, make sure that the little metal piece included as an option is NOT rattling around inside switch. If it is, it will short things out in there. You don't need that little sucker. Find it and throw it away! Use needle-nosed pliers to pry clip off of stem of new switch, then use the pliers to break off the tip. Reinstall the clip, making sure it's not bent from removal. Reassemble in reverse order!
But would only go to high then left front burner did same thing. Note if burner works at all it is the burner control itself Pull out stove unplug remove two Philips screws at top then go to front with stubby screw driver remove two screws under control tower remove knobs remove securing screws take flat screw driver to pry off plugs inst
... Read moreall in reverse order.
Remove back plate(4 short screws & 4 longer screws). remove switch(2 screws). Snap off two connections. Need to check new part well. I found a new unused wire connector in the switch which had no purpose which fell out when inspected(could have shorted switch).. New switch (spring clip removed, stem to proper length, spring clip replaced
... Read more, ready for installation.)
Left Front Burner Lost Temperature Control Element Burning Red
Moved range out, removed back panel, removed left switch front knob, unsrewed 2 screws, moved switch to the back, disconnected two modular connectors from switch, inspected removed switch visible burn marks. Reconnect new switch to modular connectors,secure switch from front 2 screws, break off 1 part of switch stem. Place knob back. R
... Read moreemount back panel. But range to its normal location.
Some of the parts we sell are eligible for mail-in rebates since we can recycle them. We will display any applicable rebates in your shopping cart. To redeem your rebate, contact Customer Service after you have received your part.