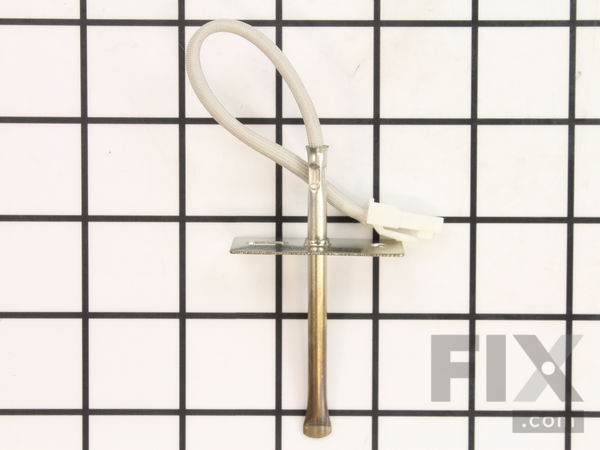
Part Location Diagram of WB21X22134 GE Temperature Sensor
See part 252 in the diagram
Replacing your General Electric Range Temperature Sensor
( Grid squares measure 1x1 inch )

Temperature Sensor

Works With Model JK915BF6BB!

Rated by 10 customers 

?

Really Easy 

15 - 30 mins 

Ratings submitted by customers like you who bought this part.

?
$38.48
In Stock
Fix Number:
FIX10059162
Manufacturer #:
WB21X22134
Manufactured by:
GE
Works With Model JK915BF6BB!

Product Description

If your oven is running hot, not heating evenly, not coming up to temperature, or just not heating up at all, there may be an issue with the temperature sensor. This sensor is usually found in the back of the oven or fitted onto the broil assembly, and is used to measure the temperature inside the cavity of the oven. It then sends that information back to the electronic control, which adjusts the temperature as necessary. If you need a new sensor, this is a genuine OEM replacement part. Before beginning the repair, be sure to disconnect the power supply to your oven, along with the gas if applicable.

Videos For installing this part.

Replacing your Temperature Sensor

Replacing your Temperature Sensor

Questions and Answers

We're sorry, but our Q&A experts are temporarily unavailable.
Please check back later if you still haven't found the answer you need.

Installation Instructions Provided by Fix customers like you.

Average Repair Rating: 4.7 / 5.0, 10 reviews.
  • 1
Sort by:
Sorry, we couldn't find any existing installation instruction that matched.
Customer:
Stuart from Parrish, FL
Parts Used:
WB21X22134
Difficulty Level:
Really Easy
Total Repair Time:
30 - 60 mins
Tools:
Nutdriver, Screw drivers
Oven temperature was erratic and finally would not preheat.
I was lucky to stumble on this website. There seemed to be many with the same problem. I ordered the part and hoped for the best. It arrived and I installed just as others had described. First, I unplugged the range. Removed the back cover (a central panel) with 4 screws. Familiarized myself with the plug-in thermal sensor. Went aro und front and loosened the single set screw for the probe (near the top of oven). Threaded the bad element out and rethreaded the new element from the front. In back, reinstall the plastic plug-in connector. Tightened set screw in the oven, plugged it in and tested. It worked! Put the back on and it was done. It took 31 minutes. Actually took longer to clean behind the stave than the repair. Thanks to all for advice.
3 of 3 people found this instruction helpful.
Was this instruction helpful to you?
Thank you for voting!
Customer:
Rosemary from District heightx, MD
Parts Used:
WB21X22134
Difficulty Level:
Very Easy
Total Repair Time:
Less than 15 mins
Tools:
Socket set
Oven not heating at all
I attempted to replace the temperature sensor but in removing it I noticed both broil and bake elements damaged on the undersides. Replaced all and the stove is working better than new.
1 person found this instruction helpful.
Was this instruction helpful to you?
Thank you for voting!
Customer:
Marty from Stafford, VA
Parts Used:
WB21X22134
Difficulty Level:
Really Easy
Total Repair Time:
Less than 15 mins
Tools:
Pliers, Screw drivers, Socket set
After trying to clean my oven twice , I got on your site and found what the problem may be
This is the second time I used your service , ie washer, timer, this time was my oven.. For 12$ I fix my oven in 15 minutes, I'll never call a service company that charges 75 to 125 per hour, 75 if they just come in your house.. I fixed it in 15 minutes.. I'm sold on your cost and your tech service, I'm no mr fix it but this was so easy three bolts and plug in the new thermostat works like new GE
1 person found this instruction helpful.
Was this instruction helpful to you?
Thank you for voting!
Customer:
johnny from brea, CA
Parts Used:
WB21X22134
Difficulty Level:
Very Easy
Total Repair Time:
15 - 30 mins
Tools:
Nutdriver, Pliers
My oven would not reach the correct temp, it kept turning off before it would get really hot.
The repair was effortless. I just removed the screw with a nut driver, then pulled out the old part with needle nose pliers, unplugged the old part and plugged in the new part. I then put the one screw back in, and the job was done! The whole job took 10 - 15 minutes. Oven is now back in working order. If i had to do the job again it coul d be done in 5 minutes.
1 person found this instruction helpful.
Was this instruction helpful to you?
Thank you for voting!
Customer:
Melodie from Front Royal, VA
Parts Used:
WB21X22134
Difficulty Level:
Very Easy
Total Repair Time:
Less than 15 mins
Tools:
Nutdriver
Stove was not heating to the right temp and was taking too long to preheat.
This repair was very easy. It didn't turn out to be the problem but I thought I would try this route first since it was such a cheap part. In any case, I took the five screws off of the back and unscrewed the screw holding in the old part from the inside of the stove. It was simply an act of un-clipping the old part, pulling it out, and r e-clipping the new one. Then simply screw everything back in place. I didn't take long at all.
1 person found this instruction helpful.
Was this instruction helpful to you?
Thank you for voting!
Customer:
Brian from Gig Harbor, WA
Parts Used:
WB21X22134
Difficulty Level:
Very Easy
Total Repair Time:
Less than 15 mins
Tools:
Nutdriver
Lower oven not heating hot enough
Removed the 6-8 hex head screws holding the back panel of the range on. Located the sensor plug, unplugged the sensor wire that goes through the insulation into the lower oven. Inside the lower oven cavity, removed 2 hex screws holding the sensor unit on. Removed old sensor unit. Did reverse to install the new one. Only slight issue wa s needing to get the plug end through the insulation on the back of the range but really no big deal.
0 of 1 people found this instruction helpful.
Was this instruction helpful to you?
Thank you for voting!
Customer:
Christopher from Williston, VT
Parts Used:
WB21X22134
Difficulty Level:
Easy
Total Repair Time:
15 - 30 mins
Tools:
Socket set
Electric Oven was not heating up on Convection or Convention.
Unplug oven, take off back center plate removing 5-6 hexagon screws with socket set. Disconnect wire of thermostat. Open door of oven look up near upper heating element, one hex screw holding thermostat in place, remove and pull through hole.Install new thermostat, in reverse order of steps.
0 of 1 people found this instruction helpful.
Was this instruction helpful to you?
Thank you for voting!
Customer:
Clifford from Simi Valley, CA
Parts Used:
WB21X22134
Difficulty Level:
Really Easy
Total Repair Time:
15 - 30 mins
Tools:
Nutdriver
HEATING INCONSISTENT
REPLACED THERMOSTAT (SENSOR ASSEMBLY). PULL STOVE AWAY FROM WALL, UNPLUG AC/ TURN OFF GAS SHUTOFF VALVE. IF FURNACE HAS LONG GAS LINE, CAREFULLY PULL FOR WORK SPACE. WITH NUT DRIVER, LOOSEN 1/4 NUT BACK OF STOVE TO REMOVE CENTER COVER, AND LOOSEN 2 , 1/4 NUT SENSOR ASSEMBLY INSIDE TOP RIGHT OVEN. REPLACE AND PLUG BACK COMPONENT.
0 of 1 people found this instruction helpful.
Was this instruction helpful to you?
Thank you for voting!
Customer:
Heidi from Portland, ME
Parts Used:
WB21X22134
Difficulty Level:
Really Easy
Total Repair Time:
Less than 15 mins
Tools:
Socket set
F4 code on oven, issues with thermometer
Simply unplugged oven, unscrewed part from inside, removed backing of oven, unclipped old wire, removed part from oven, pushed new wires through, attached new part, connected wires in back, wahlah!
0 of 1 people found this instruction helpful.
Was this instruction helpful to you?
Thank you for voting!
Customer:
John from Vancouver, WA
Parts Used:
WB21X22134
Difficulty Level:
Really Easy
Total Repair Time:
15 - 30 mins
Tools:
Nutdriver
Range would not pre heat
Removed old sensor screwed in new sensor, plugged sensor in and tested. Works great.
0 of 1 people found this instruction helpful.
Was this instruction helpful to you?
Thank you for voting!
  • 1

Model Compatibility

This part works with the following models:
Fix Number: FIX10059162
Manufacturer Part Number: WB21X22134
Brand
Model Number
Description
General Electric
137480
Range
General Electric
155910
Range
General Electric
15891
Range - Electric Range
General Electric
15891 1
Range
General Electric
158911
Range
Kenmore
91147619200
Range
Kenmore
91147619201
Wall Oven
Kenmore
91147643100
Wall Oven
Kenmore
91147692100
Microwave Oven Combo
Kenmore
91147699100
Microwave - 27" ELECTRIC BUILT-IN OVEN
Kenmore
91147702200
Wall Oven
Kenmore
91147702201
Wall Oven
Kenmore
91147703200
Wall Oven
Kenmore
91147703201
Wall Oven
Kenmore
91147704200
Wall Oven
Kenmore
91147704201
Wall Oven
Kenmore
91147709200
Wall Oven
Kenmore
91147709201
Wall Oven
Kenmore
91147722200
Range
Kenmore
91147722201
Wall Oven
Kenmore
91147722202
Wall Oven
Kenmore
91147724200
Range
Kenmore
91147724201
Wall Oven
Kenmore
91147724202
Wall Oven
Kenmore
91147729200
Range
Kenmore
91147729201
Wall Oven
Kenmore
91147729202
Wall Oven
Kenmore
91147742200
Wall Oven
Kenmore
91147742201
Wall Oven
Kenmore
91147743200
Wall Oven