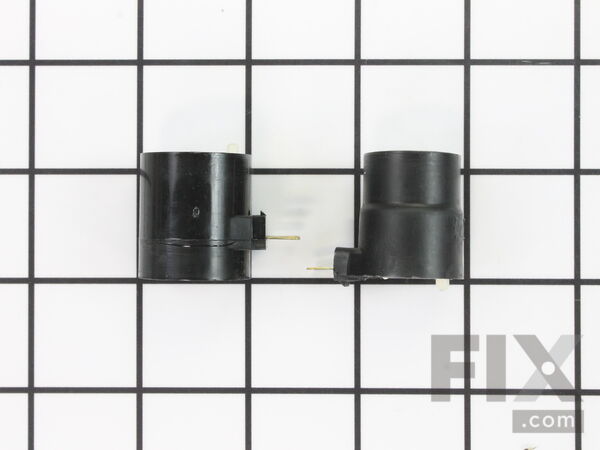
Part Location Diagram of 279834 Whirlpool M Series New Style Coil Kit
See part 14 in the diagram
( Grid squares measure 1x1 inch )

M Series New Style Coil Kit 279834

Works With Model JDG3000W!
★★★★★
★★★★★
1 Review

Rated by 87 customers 

?

Really Easy 

30 - 60 mins 

Ratings submitted by customers like you who bought this part.

?
$30.86
In Stock
Fix Number:
FIX334310
Manufacturer #:
279834
Manufactured by:
Whirlpool
Works With Model JDG3000W!

Product Description

This OEM kit comes with two ignition coils (one three-terminal boost/hold coil, and one two-terminal secondary coil). Usually only one of them burns out, but you should replace them as a set as both have to be operational for the gas valve to open. The primary purpose of the part is to open the gas valve and allow the gas to enter the burner. This is a safety mechanism to make sure that there is never an unsafe buildup of gas inside the appliance. You will find the coils attached to the dryer gas valve. This is not an uncommon repair; it can fail due to normal material fatigue over time. To test your current parts, watch the burner, and if the igniter glows for a while and then shuts off without the gas is igniting, it usually means one of these coils is bad.

Questions and Answers

We're sorry, but our Q&A experts are temporarily unavailable.
Please check back later if you still haven't found the answer you need.

1 question answered by our experts.
  • 1
Sort by:
Sorry, we couldn't find any existing answers that matched.
Try using some different or simpler keywords, or submit your new question by using the "Ask a Question" button above!
Marcelo
March 24, 2022
DRYER COME ON FOR 2 MINUTES AFTER THAT FLAME SHUT OFF THE IGNITER COME FOR FEW SECOND BUT NO FLAME ?
For model number LG8163WM
Fix.com logo
Hello Marcelo, There are a few parts that could make your dryer turn off too soon, and all can be tested with a multimeter. Make sure you cut power to your appliance before doing any repairs or tests. First you should test your cycling thermostat, part number: FIX2053297 with a multimeter. A good thermostat will read 0. If the readout says infinity instead, your thermostat will need to be replaced. Second you should test the High Limit Thermostat, part number: FIX2201082 Place the thermostat on an electric griddle or skillet and set the heat to the temperature matching the high limit designation on your thermostat. Touch one of the probes to the left gold inner terminal and the other probe to the right inner terminal. Monitor the readout. The instrument will show between 1,000 and 1,200 ohms of resistance as it heats. If the thermostat switches off by showing zero ohms of resistance within 5 percent of the designated temperature, the thermostat is working properly; however, if the thermostat does not switch off, or switches off prematurely, the thermostat is faulty and must be replaced. The third thing it could be is the Dryer timer, part number: FIX2045997 Clip or touch one probe to the terminal from which you removed the wire. Touch the other probe to one of the other terminals. You should get a reading of zero. If you get a high reading, then the timer motor is bad and it's time to replace it. These are the most common parts that cause this issue in your appliance. So, it is suggested you check them first. We hope that helps. Good luck with your repair. If you need help placing an order, our customer service is open 7 days a week. Please feel free to give us a call. We look forward to hearing from you!

Was this helpful?
Thank you for voting!
Related Parts:
View More View Less
Dryer Thermal Fuse
$19.61
In Stock
Dryer Radiant Flame Sensor
$47.87
In Stock
Affresh Washing Machine Cleaner - 3 pack
$12.58
In Stock
Produce Preserver Filter
$21.50
In Stock
Affresh Dishwasher Cleaner Tablets - 6
$19.09
In Stock
Cooktop Cleaning Cream
$15.57
In Stock
Cooktop Cleaner
$17.74
In Stock
Affresh Cleaner
$19.09
In Stock

Installation Instructions Provided by Fix customers like you.

Average Repair Rating: 3.7 / 5.0, 87 reviews.
  • 1
  • 2
  • 3
Sort by:
Sorry, we couldn't find any existing installation instruction that matched.
Customer:
Dennis from ALISO VIEJO, CA
Parts Used:
WP306604, 4391996, WP3392519, WP3387134, 279834
Difficulty Level:
Really Easy
Total Repair Time:
1- 2 hours
Tools:
Nutdriver, Screw drivers
Dryer ran but did not dry clothing.
Best site I have ever used for repairs. First a list of what parts were needed was provided right from the start, no guessing. I followed all of the video's provided for installation instructions and and that was it. Very easy to make repairs and almost rebuilt my dated dryer to like new condition. Appliance was in very good physical c ondition just needed new components to bring it back. Highly recommend this site to anyone who can turn a wrench.
41 of 48 people found this instruction helpful.
Was this instruction helpful to you?
Thank you for voting!
Customer:
John from Warrington, PA
Parts Used:
279834
Difficulty Level:
Really Easy
Total Repair Time:
30 - 60 mins
Tools:
Screw drivers, Socket set
Dryer did not stay hot
To avoid the mistake I made, make sure you pop the small, square white plug towards the bottom left on the front of the dryer. This gives you a view into the heater so you can see if the igniter and other components are working. In our case, the heater would ignite and stay on for 5 minutes and then go out. As noted on this site, 50% o f the time it is the gas coils so we tested them and they tested fine cold. However, testing all of the other electrical components and they tested out as well so we purchased the coil kit (again 50%). Following one of the many videos on the site, it was quite simple to get to the coils. Unplug and turn off the gas at the wall. Unscrew the two screws in the lint trap and pop up the lid with small flat screwdriver as there is a catch on each side under the lip in the front. With the top lid up, pull up and out on the front panel, the drum will stay in place but dip as you remove the front panel holding the drum in place. Reach under and to the right to remove the belt around the drum so you can remove the drum. The coils are right in front and are easily removed with a phillips screwdriver to remove the cap holding the coils. The coils are keyed and just slide out and into place. Replace the cap and reverse the steps. However, while you have the dryer apart, it is a good idea to remove all of the extra lint as we also did the same removing the back panel and the lint trap apparatus. We had quite the collection of lint and stuff in the blower that could never be removed without taking this apart so I highly suggest you take a look. It is about 10 phillips screws holding everything in place. With the coils in place, the dryer starts hot and stays hot. Repaired in under an hour and under $25 thanks to this site!
36 of 44 people found this instruction helpful.
Was this instruction helpful to you?
Thank you for voting!
Customer:
Pete from WHITE LAKE, MI
Parts Used:
279834
Difficulty Level:
Very Easy
Total Repair Time:
15 - 30 mins
Tools:
Screw drivers
My dryer would heat up for a few minutes and then quite.
Step 1. Uplugged dryer
Step 2. Removed 4 screws from inside door area.
Step 3. Lifted front panel off lower bracket
Step 4 unplugged wires from coils
Step 5.Removed 2 screws from bracket holding coil valves in place.
Step 6. Installed new coils
Step 7. Replaced holding brackets
Step 8. Plug wires back in to could
Step 9. Tested dryer
All went well and reversed remaining steps to put back together!
6 of 9 people found this instruction helpful.
Was this instruction helpful to you?
Thank you for voting!
Customer:
Benjamin from Sandwich, IL
Parts Used:
WP3392519, WP3387134, 279834
Difficulty Level:
Very Easy
Total Repair Time:
Less than 15 mins
Tools:
Nutdriver, Pliers
Dryer ran, heated got to temp but would not heat again
Took off back panel of dryer and be removed old thermostat and thermal fuse. Replaced with the new one and wired up by transferring one wire at a time. Took apart top and front of dryer to get to coil valve. Replaced with new ones. Repair person would have posted 150 to diagnose and additional 50 per part got all three parts shipped for 50 so did it myself and saved at least 250.
6 of 9 people found this instruction helpful.
Was this instruction helpful to you?
Thank you for voting!
Customer:
doyle from houston, TX
Parts Used:
279834
Difficulty Level:
Really Easy
Total Repair Time:
15 - 30 mins
Tools:
Nutdriver, Screw drivers
no heat
REMOVE LINT FILTER. REMOVE 2 SCREWS ON FILTER HOLDER.REMOVE 2 BOLTS ON TOP OF FRONT AND REMOVE FRONT. REMOVE 2 SCREWS HOLDING COILS IN, AND REPLACE COILS WITH NEW COILS. REVERSE PROJECT. BE SURE YOU REMOVED POWER AND GAS BEFORE STARTING. TURN POWER AND GASON,AND TRY DRYER. PRETTY EASY INSTALLATION. COILS ARE ON LEFT SIDE IN THE FRONT OF MY DRYER, ON GAS VALVE.
5 of 6 people found this instruction helpful.
Was this instruction helpful to you?
Thank you for voting!
Customer:
Patrick from South Bend, IN
Parts Used:
279834
Difficulty Level:
Really Easy
Total Repair Time:
30 - 60 mins
Tools:
Nutdriver
it wouldn't heat up enough to dry clothes
Replaced the coils and the fuse. I also cleaned the vent pipe which had a lot of lint in it. I now wish I had cleaned the vent pipe before I ever ordered parts. I might have been fine by just cleaning the lint out of the vent pipe. Anyway the dryer works fantastic now.
4 of 5 people found this instruction helpful.
Was this instruction helpful to you?
Thank you for voting!
Customer:
Joe from Red Bank, NJ
Parts Used:
279834, 279311
Difficulty Level:
Difficult
Total Repair Time:
More than 2 hours
Tools:
Wrench set
The coil kit was malfunctioning. Difficult to fully diagnosis as the problem.
The coil kit showed the correct numbers and it worked intermittently. However, when replaced everything worked OK. I also replaced the igniter, however, I do not believed it was a problem. However, I left in the new igniter.
4 of 5 people found this instruction helpful.
Was this instruction helpful to you?
Thank you for voting!
Customer:
Bryan from BOULDER CITY, NV
Parts Used:
279834
Difficulty Level:
Really Easy
Total Repair Time:
15 - 30 mins
Tools:
Nutdriver, Screw drivers
No heat, would not sure off
Un plugged electrical cord. Shut gas disconnected gas.
Pulled front off. Stubby cross tip, 2 screws. Bink disconnected coils put new one in.reverse order install.
4 of 6 people found this instruction helpful.
Was this instruction helpful to you?
Thank you for voting!
Customer:
Craig from Rio Rancho, NM
Parts Used:
WP3392519, WP3387134, 279834
Difficulty Level:
Easy
Total Repair Time:
1- 2 hours
Tools:
Nutdriver, Screw drivers, Socket set
Our Whirlpool dryer had stopped beating.
I initially thought to replace the heater element, however the website gave me a list of the possible issues, with the probability ratings conveniently listed next to the part numbers. Not knowing exactly which part was needed I decided to replace all three just to be on the safe side. The parts arrived quickly (about five days) and the i nstallation was easy and straightforward. Total cost for this project was about $50 bucks, which sure beats buying a brand new dryer.
4 of 6 people found this instruction helpful.
Was this instruction helpful to you?
Thank you for voting!
Customer:
Donald from Ottawa, IL
Parts Used:
W11050897, WP338906, WP3387134, 279834
Difficulty Level:
Really Easy
Total Repair Time:
15 - 30 mins
Tools:
Nutdriver, Screw drivers
no heat
Cost was $114.00 to replace all parts , It took longer to take apart & test everything than it did to do the repair ! I tested all parts twice , everything would test fine , I put it all back together and the dryer worked for 5 minutes , did that twice and decided to order all the parts an be done with it . Ordered the parts , that showed up at my door in 2 days !!! Turned OFF gas , took off vent hose , took back off with 8 screws , popped up top in the front , took 2 screws off the top in the back removing the brackets , Inside the front under the top removed 2 screws holding on the front , lifted the front and removed . All parts only have 1 or 2 screws holding them in place , removed 1 part at a time , removing and replacing 1 wire from old part to the new part so I did not mix up the wires , replace the part and go to the next part . It was pretty self explanatory replacing the parts , It took 20 minutes to take apart , replace the parts and put back together so my loving wife could do laundry again. You don't realize what a inconvenience it is to go without a dryer for 3 days when you have had one for 37 yrs ..... THANK YOU , 3 days can seem like forever when someone is not happy , but it was much much better than waiting 7 to 10 days for the wrong parts from somewhere else . You have the BEST parts website that I have EVER used !!! THANK YOU AGAIN , Donald
4 of 8 people found this instruction helpful.
Was this instruction helpful to you?
Thank you for voting!
  • 1
  • 2
  • 3
Customer Reviews
Average Rating: (1 Review)
5.0
★★★★★
★★★★★
Filter By Rating:
  • 5
    1
  • 4
    0
  • 3
    0
  • 2
    0
  • 1
    0
  • 1
Sort by:
Sorry, we couldn't find any existing reviews that matched. Try using some different or simpler keywords.

Model Compatibility

This part works with the following models:
Fix Number: FIX334310
Manufacturer Part Number: 279834
Brand
Model Number
Description
Kenmore
10687884100
Dryer
Kenmore
10687884300
Dryer
Kenmore
10687884600
Dryer
Kenmore
1103387617
Dryer
Kenmore
1103397617
Dryer
Kenmore
1103398423
Dryer
Kenmore
1103401771
Dryer - Kenmore Dryer Model 110.3401771 (1103401771, 110 3401771) Parts
Kenmore
1103401795
Dryer
Kenmore
1103401796
Dryer
Kenmore
1103401797
Dryer
Kenmore
1103401798
Dryer
Kenmore
1103401799
Dryer
Kenmore
1103402243
Dryer
Kenmore
1103402844
Dryer
Kenmore
1103402851
Dryer
Kenmore
1103402855
Dryer
Kenmore
1103402856
Dryer
Kenmore
1104319351
Dryer
Kenmore
1104319410
Dryer
Kenmore
110694670
Dryer
Kenmore
110694671
Dryer
Kenmore
110695502
Dryer
Kenmore
110697436
Dryer
Kenmore
11070012000
Dryer
Kenmore
11070012001
Dryer
Kenmore
11070012002
Dryer
Kenmore
11070022010
Dryer
Kenmore
11070052990
Dryer
Kenmore
11070052991
Dryer
Kenmore
11070056990
Dryer