Ratings submitted by customers like you who bought this part.
?
$47.74
In Stock
Fix Number:
FIX11746740
Manufacturer #:
WP8577274
Manufactured by:
Whirlpool
Product Description
The internal-bias thermostat, also know as a thermistor, is used to prevent the dryer from overheating. It does this by monitoring and controlling the temperature of the inside of the dryer drum. If your dryer is overheating, not drying your clothes properly, or is not providing enough heat, there could be an issue with the thermostat. You can test the part by using a multimeter, which should read 10,000 ohms of resistance at room temperature, give or take a 10 percent fluctuation. If your reading is not in that range, the thermistor will need to be replaced. Replacing this part is a simple repair, but to access it you will need to lift the main top on your dryer, and remove both the front panel and the bulkhead. The part is found next to the thermal fuse, on the blower housing. Be sure to disconnect the power supply to your dryer before beginning this repair. This is a genuine OEM thermistor, made of white plastic and is sold individually.
Works with the following brands:
Whirlpool, Kenmore, Maytag, KitchenAid
Works with the following products
Dryer, Washer Dryer Combo
Fixes the following symptoms
Too hot, Not Heating, Touchpad does not respond, Won’t Start
The internal-bias thermostat, also know as a thermistor, is used to prevent the dryer from overheating. It does this by monitoring and controlling the temperature of the inside of the dryer drum. If your dryer is overheating, not drying your clothes properly, or is not providing enough heat, there could be an issue with the thermostat. You can test the part by using a multimeter, which should read 10,000 ohms of resistance at room temperature, give or take a 10 percent fluctuation. If your reading is not in that range, the thermistor will need to be replaced. Replacing this part is a simple repair, but to access it you will need to lift the main top on your dryer, and remove both the front panel and the bulkhead. The part is found next to the thermal fuse, on the blower housing. Be sure to disconnect the power supply to your dryer before beginning this repair. This is a genuine OEM thermistor, made of white plastic and is sold individually.
Works with the following brands:
Whirlpool, Kenmore, Maytag, KitchenAid
Works with the following products:
Dryer, Washer Dryer Combo
Fixes the following symptoms:
Too hot, Not Heating, Touchpad does not respond, Won’t Start
Part# WP8577274 replaces these:
AP6013514, 3390292, 3406294, 3976615, 772546, 8577274
...
Show more, WP8577274VP Show less
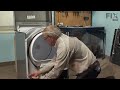
Videos For installing this part.
Replacing your Thermostat, Internal-Bias
Questions and Answers
We're sorry, but our Q&A experts are temporarily unavailable.
Please check back later if you still haven't found the answer you need.
5 questions answered by our experts.
< Prev
1
Next >
Sort by:
Search filter:
Clear Filter
Your search term must have 3 or more characters.
Keep searches simple. Use keywords, e.g. "leaking", "pump", "broken" or "fit".
Sorry, we couldn't find any existing answers that matched. Try using some different or simpler keywords, or submit your new question by using the "Ask a Question" button above!
Barry
February 2, 2023
To replace the Thermostat Internal Bias Switch. Is it located going thru the front of the unit or thru the back?
For model number MED 6000 XW
Hello Barry, Thank you for writing. We suggest watching the How to Video for more details on accessing the part and replacing it. We hope this helps!
Was this helpful?
Thank you for voting!
Barry
February 2, 2023
I need to replace the Thermo Stat on my Maytag Dryer and looking over the internet I saw video for disassembly of the front of the dryer and a different one showing installation on the back of the unit. Can you tell which is the right one?
Thanks
For model number MED6000XE
Hello Barry, thank you for your inquiry. The video for this part we have on site shows to be disassembled from the Top and Front. We hope this information helps!
Was this helpful?
Thank you for voting!
Faith
February 20, 2023
The dryer does not work when set on normal setting. It shuts off before the run time is complete and the clothes are not dry. It does not have this problem when using any other settings. What part do I need to fix this?
For model number Medb835dw3
Hello Faith, thank you for reaching out. According to our research, the issue seems to be with the Moisture Sensor and you may need to replace it, the part number is FIX12348005. It monitors the clothing's moisture level and sends a signal to the control board when the clothes are dry. If that does not help, we would suggest checking the Thermostat, part number FIX11746740. We hope this sorts out your problem!
My dryer would turn on and once I would hit start, it would immediately turn off. Now it won’t turn on at all. I’ve replaced the internal-bias thermostat and it still will not turn on. I’ve also turned of the breaker to make sure that wasn’t off.
For model number WED8500DW4
Hello Ginger, thank you for contacting us. A blown thermal fuse does not allow the dryer to start its operation. Use a multimeter to check if the thermal fuse has continuity. If the thermal fuse, part number FIX11766766, does not have continuity replace it. We hope this helps.
This dryer is all the sudden way over heating the clothes. Very hot too touch and also has all the clothes come out excessively wrinkled. I am replacing the thermostat. Is there any other possible cause?
For model number WED9500TW2
Hi Rich, thank you for the question. Based on the description that you have provided, the issue is with the high-limit thermostat, part number FIX11746386. It shuts off the heating element or burner when the dryer overheats. We would recommend replacing the high-limit thermostat to fix the issue. We hope this helps, good luck with this repair!
The dryer thermal fuse, also sometimes referred to as the thermal cut off or temperature fuse, is a 2 by 1/2-inch, white, plastic safety mechanism that halts the flow of electricity to the motor circuit when a dryer over...
Installation Instructions Provided by Fix customers like you.
Average Repair Rating: 3.3 / 5.0, 22 reviews.
< Prev
1
2
3
Next >
Sort by:
Search filter:
Clear Filter
Your search term must have 3 or more characters.
Keep searches simple. Use keywords, e.g. "leaking", "pump", "broken" or "fit".
Sorry, we couldn't find any existing installation instruction that matched.
Needed it running quick, so no diagnostics. Ordered one of everything that could fix problem (plus a new door catch). Tipped it onto it's back & popped the bottom cover off. Element, thermal cutoff, thermistor, and fuse. were right in front and held by 2 screws each (don't drop them, don't ask). A little bit tight inside, but no big issu
... Read moree. vacuumed the inside, replaced everything (it was the Heating Element, by the way), slapped the cover on, and put it back in its spot. works like it was new. Yes, I unplugged it first. Remember! Safety Third!
no owners manual fount, local service was weeks out & 100.00 to look at it.Pulled dry out,removed back cover & top, found technical repair manual inside ! found & retrieve codes.Looking for parts stumbled onto your great web site, ordered all possible parts you listed. spent 175.00 fixed,re assemble within 1 hr. HAPPY-HAPPY. HAPPY-WIFEY
... Read more-HAPPY-LIFEY !!
dryer got to hot and shut off with an Error message "E1". Found this site after many. Better explanations and half the price for the part verses Sears. I had watched Sears Tech. Tear down the machine before so i had a pretty good idea how to do it. Takes two people, just for that extra hand to hold things. The Electrical connection clips
... Read morewere kind of tricky to undo. So far so good. Good luck.
replaced the above items, dryer worked but did not solve the problem of running hot on all settings, replaced the temp gauge, did not solve the problem. Realized it was probably the electronic control assy. Decided to replace the dryer given this one's age and the ability to get a new one for about $400. Parts sent were correct. I sho
... Read moreuld have checked the continuity of the parts prior to buying the new ones. Probably only needed a fuse.
Unplugged the dryer from the wall outlet. NO NEED to remove the top panel or drum for this! Open the lower front panel of the dryer by holding down the metal clips with a flat screw driver. Clean the path of lint removal system including the lint chamber. Suck out all lint with a vacuum from the internals of the dryer
... Read more and the rear lint outlet. Remove two nuts holding the fan cover. Use a paint brush on the fan blades to remove caked lint and suck out all of the lint with a vacuum. With the lint removed, use a pair of nose pliers to disconnect wiring to the fuse. Remove the old fuse with a nut driver and replace with new one, wiring it back. Do the same with the Thermostat which is located right next to the Thermal fuse in this model. Put back fan cover and lower cabinet cover of the dryer. Plug unit back into the outlet. Run diagnostics. if all parts show working. Do a test run and make sure dryer hits right temperatures in different modes.
As this site recommends the parts that would be needed to fix the problem, it recommends the most likely to the least likely. Of course I bought the least likely and proceeded to buy all parts up the the most likely. All though I only spent about $100.00 total, it was the most likely that fixed the problem. The fixes were fairly easy to
... Read more do and were all made from the front side of the unit. Not much space to work in but made all the fixes with out issues. Unit seems to be running well. Glad I did it myself, would do it again!
Error code E -1, Dryer would stop after 2 minutes.
Unplug. Removed the lower front panel. Locate identical part inside of Dryer. Used correct socket to break free the two screws. Removed the old Thermistor. Removed wires from old part replaced wires. Replace with new Thermistor, install two screws. Re install front panel. Plug in Dryer. Saved several hundred dollars as Dryer works great o
... Read morence again! Thanks, it took me longer to research the cause than to replace the part!
Read less
1 personfound this instruction helpful.
Was this instruction helpful to you?
Thank you for voting!
< Prev
1
2
3
Next >
★
Customer Reviews
Average Rating:
(2 Reviews)
5.0
★★★★★
★★★★★
Filter By Rating:
5★
2
4★
0
3★
0
2★
0
1★
0
< Prev
1
Next >
Sort by:
Search filter:
Clear Filter
Your search term must have 3 or more characters.
Keep searches simple. Use keywords, e.g. "leaking", "pump", "broken" or "fit".
Sorry, we couldn't find any existing reviews that matched. Try using some different or simpler keywords.
★★★★★
★★★★★
Harry J. D - May 28, 2020
Verified Purchase
So far so good
Had a problem with gas dryer not drying and alarming at times. Replaced this item as well as High Limit Thermostat and Thermal Cutoff. Cleaned out some lint where some of items fit in fan area. Shortened exhaust duct some. Again so far so good.
★★★★★
★★★★★
Srinivasan I - November 7, 2019
Verified Purchase
Perfect!
Whirlpool dryer was not heating and clothes were left wet.The dryer internal lint area including the fan had been choked with lint. Cleaning it and the vent did not help. The Thermostat and fuse are in the path of the lint outlet. Suspicion was they had to be replaced, based on probability given by fix.com. Ordered both parts from fix.com. Simple replacement which took about 15 minutes. Parts were perfect fit. Re-ran all diagnostics to make sure everything was working and no other parts were broken. Dryer works perfectly now. Thanks fix.com!
Model Compatibility
This part works with the following models:
Fix Number: FIX11746740
Manufacturer Part Number: WP8577274
Dryer
- Kenmore Dryer Model 110.6095799 (1106095799, 110 6095799) Parts
✖
Mail-In Recycling Rebate
Some of the parts we sell are eligible for mail-in rebates since we can recycle them. We will display any applicable rebates in your shopping cart. To redeem your rebate, contact Customer Service after you have received your part.