AP4242494, 2798, LA-1044, 31001499, 53-0180, 53-0500
...
Show more, 53-0919, 53-0920, 53-1641, H180, K85-950, L85-950, LA-1044, LA-1044VP, LA1044 Show less
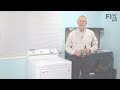
Videos For installing this part.
Replacing your Heating Element Kit - 240V 4750W
Questions and Answers
We're sorry, but our Q&A experts are temporarily unavailable.
Please check back later if you still haven't found the answer you need.
1 question answered by our experts.
< Prev
1
Next >
Sort by:
Search filter:
Clear Filter
Your search term must have 3 or more characters.
Keep searches simple. Use keywords, e.g. "leaking", "pump", "broken" or "fit".
Sorry, we couldn't find any existing answers that matched. Try using some different or simpler keywords, or submit your new question by using the "Ask a Question" button above!
Ron
July 12, 2023
Dryer coil is working at half capacity,IE.,the bottom coil heats up but the top coil is only red at the coil bridges. Continunity has been tested and all is ok.
For model number den202wc
Hi Ron, thank you for contacting us. Based on our understanding of the issue, we would suggest you replace the heating element, part number FIX2162280, as it is most likely faulty. Let us know if you have further questions!
Was this helpful?
Thank you for voting!
Installation Instructions Provided by Fix customers like you.
Average Repair Rating: 4.4 / 5.0, 17 reviews.
< Prev
1
2
Next >
Sort by:
Search filter:
Clear Filter
Your search term must have 3 or more characters.
Keep searches simple. Use keywords, e.g. "leaking", "pump", "broken" or "fit".
Sorry, we couldn't find any existing installation instruction that matched.
checked continuity on the thermal fuse it was bad ordered new fuse and heat element (dryer is over 10 years old time for new element) took out drum and behind it was heat assy, replaced fuse and element put back together and hit start button worked great
I followed the instruction given but the thing you have to make sure of is that the thermostat is put back on the unit just the way it came off because I did not and had to turn it 180 degrees to get heat
Watched video on how to do it. Used putty knife to pop catches on dryer cover. Removed wires, noted which went where. Removed high temp thermostat, removed heater element, put in new heater element, put in new high temp thermostat, reconnected wires, closed lid and started dryer. Worked perfectly. I could have done it in less than 15
... Read more minutes, but took a little longer as my grandbaby was a welcome distraction. Old heater element had broken and old high temperature thermostat basically fell apart in my hands as it was removed. Highly recommend buying both parts and don't discard the high temperature thermostat and two screws as you need them for the new thermostat. You may have to wiggle the heater element to get it to go in to the space as my element did not just drop in, but it went in easily enough.
I poped the top of the dryer with a flat head screwdriver, used the nutdriver to take out the heating element and the thermal fuses. I checked with Ohm meter and found thermal fuse open. Since the dryer was over 5 years old I decided to replace the heating element kit also. The one connector was real tight, so I used a small pen knife to
... Read morelosen the connection, replaced all connectors in order that they were, re-installed fuse and element (had a tough time keeping the fuse in the correct spot until I colud put the element screw back in, had to hold fuse in place with one hand while starting screw with other), got everything back together put top back on and ran dryer for 10 minutes. Works good as new.
My clothes dryer suddenly stopped getting hot. The blower was blowing, but the air was not warm.
After googling what the problem could be, I googled the heating element and this site came up. They even had the video showing how to replace the parts....awesome!! My husband was not so sure I could do it (doubter), but I saved us a load of cash by doing it myself! Thanks to this site!! These aren't really instructions, but this site
... Read more has that covered far better than I could do!! :)
Video was all I needed for this repair. Be sure your nut-driver has a magnetic screw holder, otherwise be very careful as you remove the screws from back of dryer. Hardest part of the job was removing the sticky bubble wrap from the new heating element, lol.
Followed the provided video's instruction. Piece of cake! This is the second repair I've done using this site (first was replacing the motor in a Maytag Washer). Can't recommend this site enough for the part selection and the great video's that make it sooooo easy to repair appliances.9
0 of 1 peoplefound this instruction helpful.
Was this instruction helpful to you?
Thank you for voting!
< Prev
1
2
Next >
★
Customer Reviews
Average Rating:
(1 Review)
5.0
★★★★★
★★★★★
Filter By Rating:
5★
1
4★
0
3★
0
2★
0
1★
0
< Prev
1
Next >
Sort by:
Search filter:
Clear Filter
Your search term must have 3 or more characters.
Keep searches simple. Use keywords, e.g. "leaking", "pump", "broken" or "fit".
Sorry, we couldn't find any existing reviews that matched. Try using some different or simpler keywords.
★★★★★
★★★★★
Robert H - May 12, 2021
Verified Purchase
Quality service
Quick and reliable service plus an excellent video instruction.
Model Compatibility
This part works with the following models:
Fix Number: FIX2162280
Manufacturer Part Number: LA-1044
Dryer
- Norge Dryer Model 7433A REV A (7433AREVA) Parts
✖
Mail-In Recycling Rebate
Some of the parts we sell are eligible for mail-in rebates since we can recycle them. We will display any applicable rebates in your shopping cart. To redeem your rebate, contact Customer Service after you have received your part.