Part Location Diagram of WPY312527 Whirlpool Idler Pulley Shaft Washer
See part 10 in the diagram
Replacing your Maytag Dryer Idler Pulley Shaft Washer
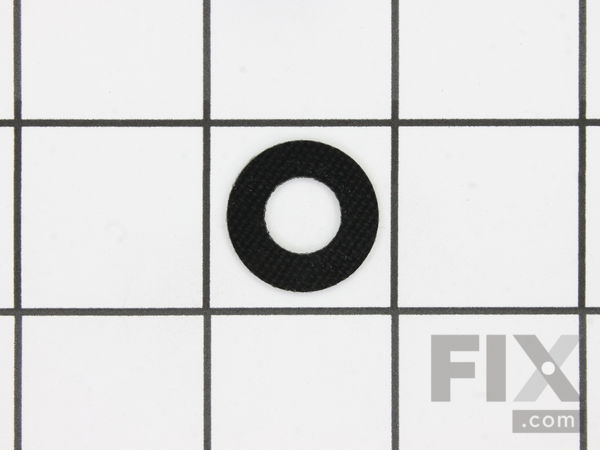
( Grid squares measure 1x1 inch )

Idler Pulley Shaft Washer

★★★★★
★★★★★
1 Review

Rated by 8 customers 

?

Easy 

1- 2 hours 

Ratings submitted by customers like you who bought this part.

?
$13.45
In Stock
Fix Number:
FIX11757538
Manufacturer #:
WPY312527
Manufactured by:
Whirlpool

Product Description

This idler pulley shaft washer is used with many clothes dryers. It is less than an inch long, and it is black in color.

Videos For installing this part.

Replacing your Idler Pulley Shaft Washer

Replacing your Idler Pulley Shaft Washer

Questions and Answers

We're sorry, but our Q&A experts are temporarily unavailable.
Please check back later if you still haven't found the answer you need.

Installation Instructions Provided by Fix customers like you.

Average Repair Rating: 3.1 / 5.0, 8 reviews.
  • 1
Sort by:
Sorry, we couldn't find any existing installation instruction that matched.
Customer:
Brian from Novi, MI
Parts Used:
WP6-3129480, WP6-3037050, WPY312959, WPY312527, 306508, 12001541, WP9703438, WP354987
Difficulty Level:
Easy
Total Repair Time:
30 - 60 mins
Tools:
Nutdriver, Screw drivers, Socket set
Squeaking noises while running dryer
Followed the Video Directions from website. All went as planed. The dryer is running like new now.
13 of 14 people found this instruction helpful.
Was this instruction helpful to you?
Thank you for voting!
Customer:
MATTHEW from TRION, GA
Parts Used:
WPY312959, WPY312527, WP312535, 306436, W10169313
Difficulty Level:
Really Easy
Total Repair Time:
30 - 60 mins
Tools:
Nutdriver, Screw drivers
Loud Squealling While Drying
Take time to examine your machine before ordering parts, I did not need to expensive roller wheel kits , I needed two washers for the roller wheels. I pulled it apart and used the snap ring pliers to pull the roller wheels off,put the washer behind the wheel , I added a dab of hi temp grease to inside of roller and shaft. Put it back to gether. Quite as a new one. . The rest of the parts are straight forward . . Good luck
2 of 2 people found this instruction helpful.
Was this instruction helpful to you?
Thank you for voting!
Customer:
Gregg from Haddonfield, NJ
Parts Used:
WP6-3705180, WP6-3700340, WPY312527, 33002459, WP315772
Difficulty Level:
Really Easy
Total Repair Time:
1- 2 hours
Tools:
Screw drivers, Socket set
When the dryer was running, it would make a loud thumping noise.
Once the dryer was apart, it was fairly easy to see the problem was the idler pulley wheel. The pulley wheel itself is plastic with a metal sleeve that rides on the metal shaft of the idler arm. The metal sleeve of the pulley seized on the metal shaft, and the plastic of the pulley separated and tore itself apart. I actually watched the v ideo instructions on replacing the belt for my specific model to see how the dryer came apart. Once apart I watched the video for replacing the idler pulley. Repair was a breeze after watching the instructions. I ordered everything new that was involved in the idler pulley, and was very glad I did. I didn't realize that the metal sleeve was fused onto the shaft at first, but ordered a new idler arm anyway. I also ordered a new idler spring. Once I received the parts, I realized that the old idler arm would not have worked, and the old spring had no where near the tension the new one had. I made sure to lightly grease the idler arm shaft so the pulley could revolve on it without trouble. I used a flashlight to see the idler arm screw when removing and replacing the idler arm. The dryer was assembled and runs smooth and quiet now. Watch the videos, I don't believe it would have been so easy to disassemble, diagnose, and repair the problem without watching the videos first.
1 of 2 people found this instruction helpful.
Was this instruction helpful to you?
Thank you for voting!
Customer:
Patricia from Toms River, NJ
Parts Used:
WP6-3037050, WPY312959, WPY312527, 12001541
Difficulty Level:
Really Easy
Total Repair Time:
15 - 30 mins
Tools:
Nutdriver, Screw drivers
Loud noise while spinning, metal to metal sounds
Removed dryer from laundry room, removed front cover, removed drum, replaced parts, reassembled, returned dryer to laundry room, no more noise, like new. Very easy even for a woman to do.
0 of 1 people found this instruction helpful.
Was this instruction helpful to you?
Thank you for voting!
Customer:
Michael from Camino, CA
Parts Used:
WP6-3129480, WP6-3037050, WPY312959, WPY312527, Y303836, 12001541, WP9703438
Difficulty Level:
Easy
Total Repair Time:
More than 2 hours
Tools:
Nutdriver, Pliers, Screw drivers, Wrench set
I had a horrendous squealing noise that sounded like bearings that needed oil.
First I watched the video on how to take the front off and gain access. Simple and straight fore ward. Then watched the video on how to remove the drum. Simple. Located the Drum Rollers. I spun the right one---it was grinding and definitely bad. I spun the left one---it was not as bad but still did not spin freely and quietly. Watc hed the video on how to install new Roller Shafts and Drum Wheels. I needed a 1/2" box wrench to remove the hex nut holding the Roller Shaft (not a 5/8" as in the video). A simple job. I then watched the video on how to install a new Blower Wheel. My Blower Wheel wobbled a little. It fit a little loose on the shaft and vibrated when spinning. So I replaced it as long as I had the dryer open anyway. Likewise for the Idler Pulley Wheel. I don't know if it was also making noise but I replaced it anyway. Again a simple job. I took time to clean and vacuum up all the lint and dust from the entire insides as needed. Good for another 10 years now! The videos make this an "easy" repair project. This was my first repair on any Dryer. I spent more time cleaning up the dust etc. inside than I did installing the new parts. It runs great now! Quiet! Since it is over ten years old I would imagine the next thing to fail will be something electrical but now I know I can learn how to repair what ever is needed from the appropriate video and then order the parts.
0 of 1 people found this instruction helpful.
Was this instruction helpful to you?
Thank you for voting!
Customer:
jim from BLANCHESTER, OH
Parts Used:
WP6-3705180, WPY312527
Difficulty Level:
A Bit Difficult
Total Repair Time:
30 - 60 mins
Tools:
Screw drivers, Socket set
The dryer was making a squealing noise and then the dryer quit tumbling.
I took off the dryer door,(2 screws) took off the front panel and the bulkhead and raised the dryer lid. I took out the drum after removing the belt. I then removed white idler wheel and bearing and removed and replaced the idler arm and shaft on the motor. I put on a new white idler wheel and bearing. Also, to make sure that the drum turned correctly, I removed and replace the blue front glides on the bulkhead which was the cause of the white idler wheel and idler arm and shaft going bad. This is the second time I have had to repair this dryer in so few years. The first repair was the heater coil.
0 of 1 people found this instruction helpful.
Was this instruction helpful to you?
Thank you for voting!
Customer:
Richard D Ford from LYONS, OH
Parts Used:
WP6-3700340, WPY312527, WP33002535, WP22002263
Difficulty Level:
Really Easy
Total Repair Time:
1- 2 hours
Tools:
Nutdriver, Screw drivers, Socket set
ldler pulley bearing wore out, making noise. belt came off.
Took front panel off then dryer tub and replaced pulley and belt. Put back together in reverse order.
0 of 1 people found this instruction helpful.
Was this instruction helpful to you?
Thank you for voting!
Customer:
Mary from Harleysville, PA
Parts Used:
WP6-3705180, WP6-3700340, WPY312527, WP33002535
Difficulty Level:
Easy
Total Repair Time:
1- 2 hours
Tools:
Pliers, Screw drivers, Socket set
Dryer not rotating and was squeeking prior to belt failure.
Replaced : Idler Arm and Shaft, Lubricated shaft and arm base with lithium grease. Installed Idler Pulley Wheel and Bearing. Replaced belt. I also vacuumed the bottom of the dryer to remove the lint build-up. Assembly of the dryer was the reverse of taking the unit apart. The repair was straight forward, but took some time.
0 of 1 people found this instruction helpful.
Was this instruction helpful to you?
Thank you for voting!
  • 1
Customer Reviews
Average Rating: (1 Review)
5.0
★★★★★
★★★★★
Filter By Rating:
  • 5
    1
  • 4
    0
  • 3
    0
  • 2
    0
  • 1
    0
  • 1
Sort by:
Sorry, we couldn't find any existing reviews that matched. Try using some different or simpler keywords.

Model Compatibility

This part works with the following models:
Fix Number: FIX11757538
Manufacturer Part Number: WPY312527
Brand
Model Number
Description
Crosley
CDE4205AYJ
Dryer - Residential
Crosley
CDE4205AYW
Dryer - Residential
Crosley
CDE4205AZJ
Dryer - Residential
Crosley
CDE4205AZW
Dryer - Residential
Crosley
CDG4205AWJ
Dryer - Residential
Crosley
CDG4205AWW
Dryer - Residential
Maytag
DE106
Dryer - Electric
Maytag
DE107
Dryer - Electric
Maytag
DE110
Dryer - Electric
Maytag
DE18CA
Dryer - Electric
Maytag
DE18CM
Dryer - Electric
Maytag
DE18CS
Dryer - Electric
Maytag
DE18CT
Dryer - Electric
Maytag
DE19CA
Dryer - Electric
Maytag
DE19CD
Dryer - Electric
Maytag
DE19CS
Dryer - Electric
Maytag
DE19CT
Dryer - Electric
Maytag
DE210
Dryer - Electric
Maytag
DE212
Dryer - Residential
Maytag
DE21CA
Dryer - Electric
Maytag
DE21CM
Dryer - Electric
Maytag
DE21CS
Dryer - Electric
Maytag
DE21CT
Dryer - Electric
Maytag
DE22CA
Dryer - Electric
Maytag
DE22CS
Dryer - Electric
Maytag
DE22CT
Dryer - Electric
Maytag
DE23CD
Dryer - Electric
Maytag
DE24CA
Dryer - Electric
Maytag
DE24CM
Dryer - Electric
Maytag
DE24CS
Dryer - Electric