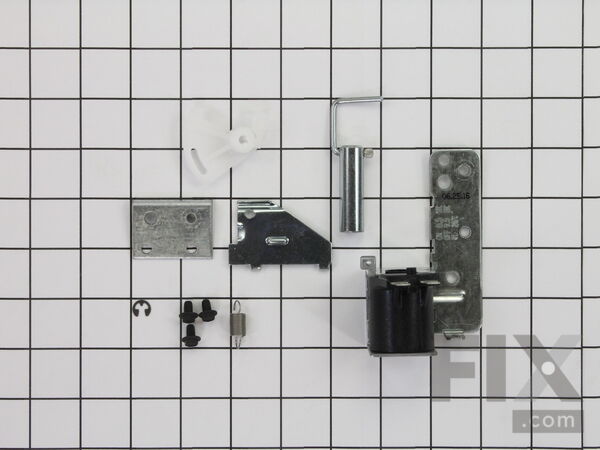
Part Location Diagram of WD21X10060 GE Drain Solenoid Kit
See part 497 in the diagram
Replacing your General Electric Dishwasher Drain Solenoid Kit
( Grid squares measure 1x1 inch )

Drain Solenoid Kit

Rated by 7 customers 

?

Easy 

30 - 60 mins 

Ratings submitted by customers like you who bought this part.

?
$78.79
In Stock
Fix Number:
FIX260117
Manufacturer #:
WD21X10060
Manufactured by:
GE

Product Description

This kit includes the armature and linkage assembly.

Videos For installing this part.

Replacing your Drain Solenoid Kit

Replacing your Drain Solenoid Kit

Questions and Answers

We're sorry, but our Q&A experts are temporarily unavailable.
Please check back later if you still haven't found the answer you need.

Installation Instructions Provided by Fix customers like you.

Average Repair Rating: 3.4 / 5.0, 7 reviews.
  • 1
Sort by:
Sorry, we couldn't find any existing installation instruction that matched.
Customer:
Tarry from GRAND RAPIDS, MN
Parts Used:
WD21X10060
Difficulty Level:
Easy
Total Repair Time:
15 - 30 mins
Tools:
Nutdriver, Pliers, Screw drivers
Dishwasher was not draining. Solonoid had locked up and did not activate.
Removed front panels below door.
Unplugged electrical connection to solenoid.
Disconnected spring.
Remove C clip holding activation cam to pump.
Pulled activation cam off shaft.
Removed 2 screws holding solenoid bracket to pump.
Assembled the replacement solenoid and its bracket.
Slid activation cam onto pump shaft while also positioning solenoid bracket.
Attached solenoid bracket to pump with 2 screws.
Placed C clip to hold activation cam to shaft.
Connected spring.
Plugged electrical connect to solenoid.
Tested dishwasher to make sure it worked. It did.
Replace front panels below door.
Wa la ! Done.
Follow directions provided online by this site. Great video of process.
There is no need to remove dishwasher from it under counter location.
Repair can be done from the front of dishwahser.
2 of 2 people found this instruction helpful.
Was this instruction helpful to you?
Thank you for voting!
Customer:
Mark from Payson, AZ
Parts Used:
WD22X10024, WD21X10060
Difficulty Level:
Easy
Total Repair Time:
15 - 30 mins
Tools:
Nutdriver, Pliers, Screw drivers, Wrench (Adjustable)
Dishwasher wont drain
Shut off water supply, disconnect from supply line, disconnect drain hose, pull electric plug, remove kick plates with nut driver, unscrew dishwasher at under counter top usually two small 1/2 inch screws, fish water line and hoses through opening in the side of cabinet, have some towels ready for a little water over spill not much, place dishwasher on its back, unscrew with nut driver any hose connections, unscrew any screws and use pliers for retaining clip for drain solenoid. bada bing bada boom replace all your done. Afterwards reset all and fish drain hose, water supply hose and electric cord back through make sure everything is secured and tight.
1 of 2 people found this instruction helpful.
Was this instruction helpful to you?
Thank you for voting!
Customer:
James from Van Nuys, CA
Parts Used:
WD21X10060
Difficulty Level:
Really Easy
Total Repair Time:
15 - 30 mins
Tools:
Pliers, Screw drivers
Dishwasher wouldn't drain. It would only circulate in the wash cycle, then...nothing when it was supposed to drain.
Had a repairman come in and he said it was a faulty clock timer and quoted $285 to repair it! That's more than half the cost of a decent dishwasher, new. So I paid his minimum fee and let him go. Before buying a replacement, however, I went on this site and following the trouble shooting instructions and testing the timer, I found out it was working normally! What wasn't working was the solenoid that switches a valve from the wash to the drain cycle. It was so melted inside you couldn't budge the little piston at all. So I ordered a new solenoid here, for about $45. It arrived a few days later. You have to take the kick panel off to get to it, under the machine, but it's only about 10 inches back from the front, so very easily reached. I took a picture of the existing part, as installed, in case I got confused later, putting in the new one. But that wasn't necessary. It was just a matter of taking out two screws, a spring and a little clip that holds one of the parts on a shaft. The replacement part was identical, so all I had to do was put the pieces of it together, matching the old one I had taken out, and reversing the procedure to put in the new one. Very simple. I re-connected the electrical wire to it, plugged the machine back in and BAM. Works like new! This is a great site! Love all the directions you provide!
0 of 1 people found this instruction helpful.
Was this instruction helpful to you?
Thank you for voting!
Customer:
Peter J from Weston, PA
Parts Used:
WD21X10060
Difficulty Level:
Really Easy
Total Repair Time:
15 - 30 mins
Tools:
Nutdriver, Pliers, Screw drivers
Water not draning.
Removed solenoid and installed new one. The C ring was a bit bitchy to put on because of my big fingers, but I got it. Dish washer works fine.
0 of 1 people found this instruction helpful.
Was this instruction helpful to you?
Thank you for voting!
Customer:
Lowel from Sierra Vista, AZ
Parts Used:
WD21X10060
Difficulty Level:
Really Easy
Total Repair Time:
15 - 30 mins
Tools:
Pliers, Screw drivers
Unit not draining
Watch installation video. Unplug unit from main power supply. Remove kickplates. The repair can be done without having to remove unit and turn on backside. Unplug solenoid electrical connector, unhook and remove spring, remove "C" snap ring, remove white plastic lever, remove two screws and remove solenoid assembly. Follow replacement in structions and put it all back together. Done job, works great!
0 of 1 people found this instruction helpful.
Was this instruction helpful to you?
Thank you for voting!
Customer:
Scott from HOLLY SPRINGS, NC
Parts Used:
WR2X7054, WD8X181, WD21X10060
Difficulty Level:
Really Easy
Total Repair Time:
30 - 60 mins
Tools:
Pliers, Screw drivers
Dishwasher Drained Water Immediately (and was leaking)
Bottom Line: Follow the video instructions and it's easy. I'll start by describing how I got to the point of repairing my dishwasher in case someone else has a similar problem. The first indication that I had a problem with my dishwasher was when it didn't clear out all the dishwasher detergent. Upon further inspection, it appeared tha t the water drained from the dishwasher immediately after it filled up. By doing some research - particularly on this site, I came to the conclusion there was something wrong with the solenoid that closed the drain shut-off. Further analysis revealed a lot of water damage to the wood underneath the dishwasher. Apparently the original problem was that there was a leak, but never enough to run out from under the dishwasher - just enough to damage the floor immediately under the dishwasher, so the initial problem went unnoticed for quite a while. Ultimately, what had happened was the Drain Valve Shaft Seal had been failing/leaking for a very long time. It was not only leaking, but the leak caused the Drain Solenoid (which is situated right below the drain valve shaft) to rust and eventually fail. If it wasn't for this website, I don't think I would have figured all of this out and I would have replaced the dishwasher...and according to my wife, the refrigerator and stove too so they would all still match! I followed the repair videos on this site. They were extremely helpful and made the repair go as smoothly as if I had done this repair a number of times. Definitely go with their recommendation to replace the Push On Nut - I had to cut mine off. One thing to add is that I didn't even pull the dishwasher out of it's normal position to fix it even though in the video they showed the repairman working on the dishwasher on it's side. It was a little cramped, but definitely easy to accomplish while still in place. I will absolutely visit this site again if I have a problem with one of my appliances! Thank you very much for the service you all provide!
0 of 1 people found this instruction helpful.
Was this instruction helpful to you?
Thank you for voting!
Customer:
Stephen from Jupiter, FL
Parts Used:
WD21X10060, WD01X10175
Difficulty Level:
Difficult
Total Repair Time:
More than 2 hours
Tools:
Nutdriver, Pliers, Screw drivers, Socket set, Wrench (Adjustable), Wrench set
not draining
Replaced the valve flapper. In this model GSD5310D00AA the flapper is not where the instructions say it is. It is in the out put rubber tube.
0 of 1 people found this instruction helpful.
Was this instruction helpful to you?
Thank you for voting!
  • 1

Model Compatibility

This part works with the following models:
Fix Number: FIX260117
Manufacturer Part Number: WD21X10060
Brand
Model Number
Description
Kenmore
36314031000
Dishwasher
Kenmore
36314031001
Dishwasher
Kenmore
36314032000
Dishwasher
Kenmore
36314032001
Dishwasher
Kenmore
36314038000
Dishwasher
Kenmore
36314038001
Dishwasher
Kenmore
36314039000
Dishwasher
Kenmore
36314039001
Dishwasher
Kenmore
36314071792
Dishwasher
Kenmore
36314071793
Dishwasher
Kenmore
36314071794
Dishwasher
Kenmore
36314072793
Dishwasher
Kenmore
36314072794
Dishwasher
Kenmore
36314072795
Dishwasher
Kenmore
36314074792
Dishwasher
Kenmore
36314074793
Dishwasher
Kenmore
36314074794
Dishwasher
Kenmore
36314075792
Dishwasher
Kenmore
36314075793
Dishwasher
Kenmore
36314075794
Dishwasher
General Electric
36314081991
Dishwasher - DISHWASHER
Kenmore
36314081992
Dishwasher
Kenmore
36314081993
Dishwasher
Kenmore
36314081994
Dishwasher
Kenmore
36314151000
Dishwasher
Kenmore
36314152000
Dishwasher
Kenmore
36314158000
Dishwasher
Kenmore
36314159000
Dishwasher
Kenmore
36314181200
Dishwasher
Kenmore
36314181202
Dishwasher