


Models
>
YWED99HEDC0
YWED99HEDC0 Whirlpool
Jump to:
Find Part by Name
Keep searches simple, eg. "belt" or "pump".
Diagrams for YWED99HEDC0
Viewing 7 of 7


 Diagram and Parts List for Whirlpool")
Keep searches simple, eg. "belt" or "pump".

$22.69
This drum support roller is sold individually. Most dryers require two. The tri-rings are included. This is a drum support roller for a dryer. It is a genuine replacement part. The part includes the d...
In Stock

$53.59
This dryer repair kit consists of five commonly replaced dryer parts: one multi-rib belt (part #661570V and measures 93 1/2 inches long), four drum support rollers, one idler assembly, nine tri-rings,...
In Stock

$21.95
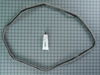
This is a single dryer drum belt that measures 93.5 inches. The belt rotates the dryer drum and is a common wear part that can become brittle over time. It can also stretch and change shape, so keep t...
In Stock

$13.42
This small but mighty OEM piece is called a tri-ring and is used to support the drum roller shaft and the idler pulley shaft in your dryer. It helps to provide a tight seal between components by evenl...
In Stock

$47.74
The internal-bias thermostat, also know as a thermistor, is used to prevent the dryer from overheating. It does this by monitoring and controlling the temperature of the inside of the dryer drum. If ...
In Stock

$11.40
It is important for your dryer to be properly leveled, as an unleveled one can cause excessive vibration and noise when operating, may not drain properly, and can cause excessive wear on various parts...
In Stock

$26.79
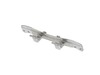
If your dryer is not tumbling, will not start, or is excessively noisy while operating, there may be an issue with your idler pulley. The idler pulley works by maintaining a constant tension on the dr...
In Stock

$10.72
This is an authentic OEM replacement moisture sensor for your dryer. The sensor detects the moisture levels in your clothing while the appliance is operating, and once the appropriate level has been r...
In Stock

This heating element connection wire kit is a genuine OEM replacement for your electric dryer. The kit is used to connect the thermostat to the heater element. The kit comes with a yellow wire nut and...
In Stock

$5.42
This is a multi-use screw and can be used on a variety of appliances. The measurements of the screw are: 8/18 x 3/8. *Please note: the screw is sold individually. Refer to the manual provided by the m...
In Stock

This part seals the drum to prevents air from escaping. This includes silicone rubber adhesive.
In Stock

$8.00
This 18 ml bottle of white appliance touch-up paint is used to cover scratches or marks on your appliance. The white touch-up paint can be used on refrigerators, microwaves, ranges, clothes dryers, an...
In Stock
Questions and Answers
We're sorry, but our Q&A experts are temporarily unavailable.
Please check back later if you still haven't found the answer you need.
Common Problems and Symptoms for YWED99HEDC0
Viewing 10 of 10Noisy
Fixed by these parts


How to fix it
Door won’t close
Fixed by these parts


How to fix it
Too hot
Fixed by these parts


How to fix it
Marks left on clothes
Fixed by these parts
How to fix it
Lid or door won’t close
Fixed by these parts
How to fix it
Drum Not Spinning
Fixed by these parts

How to fix it
Not Heating
Fixed by these parts

How to fix it
Leaking
Fixed by these parts


How to fix it
Won’t Start
Fixed by these parts
How to fix it
Touchpad does not respond
Fixed by these parts
How to fix it


Keep searches simple. Use keywords, e.g. "leaking", "pump", "broken" or "fit".
- Customer:
- jason from HOLDEN, MA
- Parts Used:
- 4392067
- Difficulty Level:
- Really Easy
- Total Repair Time:
- 30 - 60 mins
- Tools:
- Socket set
very loud squeeling sound
The issue was the idler pulley. First I began opening up the front panel based on a youtube video but soon realized the model was slightly different and required a lot more items to remove. I saw the pulley in the back with nothing in the way so I put the front panel crap back on and removed the rear panel. There it was, very simple to re
... Read more
move and replace. I'm not looking forward to drum rollers though. Hopefully they're aren't as difficult as they appear.
Read less
Was this instruction helpful to you?
Thank you for voting!
- Customer:
- Jerry from Everett, WA
- Parts Used:
- 280114
- Difficulty Level:
- Easy
- Total Repair Time:
- 30 - 60 mins
- Tools:
- Screw drivers, Socket set
Rear tub seal failure
I removed the top cover and then the back cover, released the belt tensioner and removed the drive belt. Then slid the tub out of the unit and onto the back dack. Sanded the remnents of the old seal off. Wiped the tub lip with laquer thinner and applied the "fast" drying glue supplied with the kit. Installed the seal and re-assembled the
... Read more
unit...works fine
Read less
Was this instruction helpful to you?
Thank you for voting!
- Customer:
- Eddie from PELZER, SC
- Parts Used:
- 4392067
- Difficulty Level:
- A Bit Difficult
- Total Repair Time:
- More than 2 hours
- Tools:
- Nutdriver, Screw drivers
Squeaky Dryer Noise
I purchased the dryer repair kit with the drum belt, wheels and idler pulley. I watched the instructional videos online and it seemed fairly straight forward. Breaking down the dryer and replacing the pulleys was easy enough. My problem began when I tried to feed the drum belt around the idler pulley. After finishing the job, the dryer wo
... Read more
uld not turn and the sensor light stayed on. I thought something else was broken with the dryer and spent hours trouble shooting other problems that I was having. Finally I figured out that the drum belt was not installed correctly around the idler pulley. However, I could not get it properly installed from the front of the machine so I tried from the rear still with no avail. I finally had to fish the old belt out of the garbage can that I had thrown away earlier. I lined up the old belt with the new one in the kit and discovered that the new belt was much smaller, so I put the old one back on the drum. Here's the lesson I learned...make sure the belts are the same size before attempting to install. The old idler was responsible for the squeaking and that stopped but I am still using the same old drum belt. Hope it lasts.
Read less
Was this instruction helpful to you?
Thank you for voting!