


Models
>
CEW30IF6ISA
CEW30IF6ISA Electrolux Range
Jump to:
Find Part by Name
Keep searches simple, eg. "belt" or "pump".
Diagrams for CEW30IF6ISA
Viewing 6 of 6


Manuals & Guides for CEW30IF6ISA
Click to downloadInstall
Installation Instructions
(0.72MB)
Install
Installation Instructions
(2.27MB)
Manual
Owner's Manuals
(4.35MB)
Manual
Owner's Manuals
(7.48MB)
Specs
Product Specifications Sheet
(0.59MB)
Wiring
Wiring Diagram
(0.78MB)
Keep searches simple, eg. "belt" or "pump".

$47.25
If your oven has little to no heat, is not heating evenly, or is reaching too high a temperature, there may be a problem with your oven probe. This probe, also known as an oven temperature sensor or a...
In Stock
Order within the next 12 hrs and your part ships today!

$121.67
This is a replacement rack for your oven. The oven rack fits into grooves on the side of the oven wall, and acts as a shelf that you can place food items on when you want to cook them in the oven. Thi...
In Stock
Order within the next 12 hrs and your part ships today!

$9.37
Terminal blocks (also called terminal boards or strips) provide a convenient means of connecting individual electrical wires.
In Stock
Order within the next 12 hrs and your part ships today!

$53.04
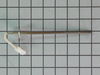
This temperature sensor detects the temperature within the oven cavity.
In Stock
Order within the next 12 hrs and your part ships today!

$11.25
This is an anti-tip kit for your range. The kit comes with two installation screws, one metal bracket, and instructions. The kit stops your freestanding range from tipping over due to extra weight on ...
In Stock
Order within the next 12 hrs and your part ships today!

$7.70
Sold Individually. These legs should be adjusted to make your appliance level on uneven flooring.
In Stock
Order within the next 12 hrs and your part ships today!

In Stock
Order within the next 12 hrs and your part ships today!

$11.77
This is a screw for your range or microwave. This part is sold individually. It has a pan head, a pointed tip for use with sheet metal, and an x-shaped drive. This screw is a #8, has 18 threads to the...
In Stock
Order within the next 12 hrs and your part ships today!

In Stock
Order within the next 12 hrs and your part ships today!

In Stock
Order within the next 12 hrs and your part ships today!

In Stock
Order within the next 12 hrs and your part ships today!

In Stock
Order within the next 12 hrs and your part ships today!
Questions and Answers
We're sorry, but our Q&A experts are temporarily unavailable.
Please check back later if you still haven't found the answer you need.
Common Problems and Symptoms for CEW30IF6ISA
Viewing 9 of 9Little to no heat when baking
Fixed by these parts


How to fix it
Oven is too hot
Fixed by these parts
How to fix it
Oven not heating evenly
Fixed by these parts
How to fix it
Will Not Start
Fixed by these parts
How to fix it
Element will not heat
Fixed by these parts
How to fix it
Little to no heat when broiling
Fixed by these parts
How to fix it
Door won’t open after self cleaning cycle
Fixed by these parts

How to fix it
Gas igniter glows, but will not light
Fixed by these parts
How to fix it
Door won’t close
Fixed by these parts

How to fix it


Keep searches simple. Use keywords, e.g. "leaking", "pump", "broken" or "fit".
- Customer:
- Russell from Lake Havasu, AZ
- Parts Used:
- 316490001
- Difficulty Level:
- Easy
- Total Repair Time:
- 30 - 60 mins
- Tools:
- Nutdriver
Above 400 beeper went off & code numbers came up on read out
Cut off power at fuse panel. pulled stove out from wall went behind stove removed back panels in area of sensor that I could see from the front side, inside oven. Located sensor from rear & unpluged senser from wiring bundle reached inside oven & removed screws from sensor. Pulled sensor out & threaded wire through hole. Took old & new
... Read more
sensors to bench in shop. Plug on new not the same as old. Had to change plug Cut and stripped wires. Wire is very small, need to use a good stripper. Twisted wire together & soldered connection, used shrink wrap to insulate wire. Took part inside and reinstalled in reverse order. Used 1/4 inch nutdriver on total job start to finish.
Read less
Was this instruction helpful to you?
Thank you for voting!
- Customer:
- Timothy from Spring Valley, AL
- Parts Used:
- 5304409888
- Difficulty Level:
- Really Easy
- Total Repair Time:
- 15 - 30 mins
- Tools:
- Screw drivers, Socket set
Cord was not tightened enough by delivery crew.
PF alarm appeared on display. Noticed clicking when cord was moved. Had arced for some time and melted original block. New part slightly different. Only has 3 lugs, old one had six. Stack using washers provided. Take note of colors before disassembly. Use caution while working through access opening. The edges are sharp. Only tools neede
... Read more
d are phillips screwdriver, deep socket for lug nuts. Nut driver optional. Hope this is helpful.
Read less
Was this instruction helpful to you?
Thank you for voting!
- Customer:
- Richard from Centennial, CO
- Parts Used:
- 5304528973
- Difficulty Level:
- Really Easy
- Total Repair Time:
- Less than 15 mins
- Tools:
- Nutdriver
Oven wouldn't operated. Error code F9
I called a repair place. They charged $54 to diagnose, (said it needed a new latch motor) then wanted $220 to complete the repair. I checked online prices and did it myself for about 15 minutes work and the latch motor itself ($44?).
Was necessary to uplug the range, pull it away from the wall and remove the back panel sheet m ... Read more etal, then 3 screws that mount the motor. Replace motor, reattach sheet metal. Plug in. Done. Ready to bake cookies.
Was necessary to uplug the range, pull it away from the wall and remove the back panel sheet m ... Read more etal, then 3 screws that mount the motor. Replace motor, reattach sheet metal. Plug in. Done. Ready to bake cookies.
Read less
Was this instruction helpful to you?
Thank you for voting!