


Models
>
RT18HDXHN00
RT18HDXHN00 Roper Refrigerator
Jump to:
Find Part by Name
Keep searches simple, eg. "belt" or "pump".
Diagrams for RT18HDXHN00
Viewing 6 of 6


Keep searches simple, eg. "belt" or "pump".

$116.17
Replacing a broken crisper drawer in your refrigerator is a simple repair that does not require any tools. Simply remove any items from the damaged drawer, and remove the drawer from the fridge. The w...
In Stock

$34.61
The defrost timer works on a predetermined schedule, to alternate between the cooling cycle and the defrost heater in your freezer. When the heating circuit is activated, it melts any ice that has for...
In Stock

$79.16
The capacitor, also known as a run capacitor, is a component in your fridge that allows the compressor to cycle on and off to maintain a constant temperature. If your fridge and freezer are too warm i...
In Stock

In Stock

$42.49
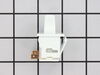
This clip-on thermostat will sense the temperature increase in the evaporator during the defrost cycle and will cycle the defrost heater off after the ice or frost is melted.
In Stock

This genuine OEM part is an end cap for the door shelf retainer bar in your refrigerator. The end cap is used to secure the retainer bar and attach it to the fridge or freezer door. It is made of whit...
In Stock

In Stock

In Stock

$8.00
This 18 ml bottle of white appliance touch-up paint is used to cover scratches or marks on your appliance. The white touch-up paint can be used on refrigerators, microwaves, ranges, clothes dryers, an...
In Stock

In Stock

In Stock

In Stock
Questions and Answers
We're sorry, but our Q&A experts are temporarily unavailable.
Please check back later if you still haven't found the answer you need.
Common Problems and Symptoms for RT18HDXHN00
Viewing 18 of 18Light not working
Fixed by these parts

How to fix it
Fridge too warm
Fixed by these parts


How to fix it
Will Not Start
Fixed by these parts

How to fix it
Freezer section too warm
Fixed by these parts
How to fix it
Freezer not defrosting
Fixed by these parts

How to fix it
Leaking
Fixed by these parts
How to fix it
Fridge and Freezer are too warm
Fixed by these parts
How to fix it
Door won’t open or close
Fixed by these parts


How to fix it
Noisy
Fixed by these parts


How to fix it
Too warm
Fixed by these parts
How to fix it
Fridge runs too long
Fixed by these parts
How to fix it
Clicking sound
Fixed by these parts
How to fix it
Frost buildup
Fixed by these parts
How to fix it
Fridge too cold
Fixed by these parts
How to fix it
Freezer too cold
Fixed by these parts
How to fix it
Door Sweating
Fixed by these parts

How to fix it
Won’t start
Fixed by these parts
How to fix it
Ice maker not making ice
Fixed by these parts

How to fix it


Keep searches simple. Use keywords, e.g. "leaking", "pump", "broken" or "fit".
The frost free feature of the freezer was freezing over with ice and cooling coils were being insulated with thickening frost which caused the cooling air to rise in temperature from -5 degrees to 20 degrees.
I troubleshot the problem by reading the electrical schematic and concluding the heating elements (defrost cables) were either defective or the bi-metal temp sensor was open. When closed the temp sensor completes the circuit for the current to flow through the heaters to defrost the cooling coils every 8 hours and then when the bimetal o
... Read more
pens at 55 degrees the circuit is open and the coils are cooled because the refridgeration motor is in run mode. A timer between the motor and heater elements also was defective. The timer controls the cooling period and the defrost period. I ohmed out each part according to the spec sheet of normal resistance of parts and thus the bimetal and timer were defective. I gather a surge of some duration and amplitude affected these parts because a storm 24 hours prior to refridgerator problem had passsed through the area and the AC electrical power had oscillated several times during that event. I used hand tools to do the repair. If you are not mechanically inclined a step by step proceedure would be moot. It is a matter of disassembly and assembly paying close attention to fragile parts.
Read less
Was this instruction helpful to you?
Thank you for voting!
- Customer:
- garth from forest lake, MN
- Parts Used:
- WPW10662129
- Difficulty Level:
- Really Easy
- Total Repair Time:
- 15 - 30 mins
- Tools:
- Nutdriver, Screw drivers
My refrigerator stopped cooling and the freezer section stopped freezing
I knew the chances of all the freon leaking out was unlikely so I looked at the wiring to the compressor and there was a capacitor and a starter/overload so i figured I would start there. I went on line and found the parts at this site and they were less than the minimum service call charge for a service tech so I figured what the heck le
... Read more
t's give her a shot so I did give it a shot. I ordered the parts and they were there in less time than a service tech could come out and i installed the parts and guess what for 90.00 in parts and 15 minutes in time I repaired my refrigerator. Thanks guys, It took less time to order the parts than it did to make the repair so thanks, your website rocks and is very well designed so my hat is off to you guys!
Read less
Was this instruction helpful to you?
Thank you for voting!
- Customer:
- Aaron from Houston, TX
- Parts Used:
- WP2204605
- Difficulty Level:
- Easy
- Total Repair Time:
- Less than 15 mins
- Tools:
- Screw drivers, Socket set
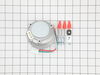
Faulty thermostat
My refrigerator is approximately seven years old (date of manufacture: 2001). I had come home twice in the last month to find that it had not been running for several hours (ice melted, milk spoiled, etc.) but it would start running again if I twisted the thermostat knob. So, I ordered a new thermostat. First I removed the 1/4" hex scr
... Read more
ew that held the plastic thermostat housing in place (it screws up into the top of the refrigerator compartment). Then I removed the plastic thermostat knob and slid the old thermostat out of the housing. I then disconnected the wires one-by-one from the old thermostat and connected them to the new one so I could be certain they were all connected correctly. Finally, I pulled the plastic sheathing off the old sensor wire, slid it onto the new one and popped the wire back into place. Slide the thermostat back into the housing, screw the housing back into the top of the refrigerator compartment, replace the plastic thermostat knob, and the job is done.
Read less
Was this instruction helpful to you?
Thank you for voting!