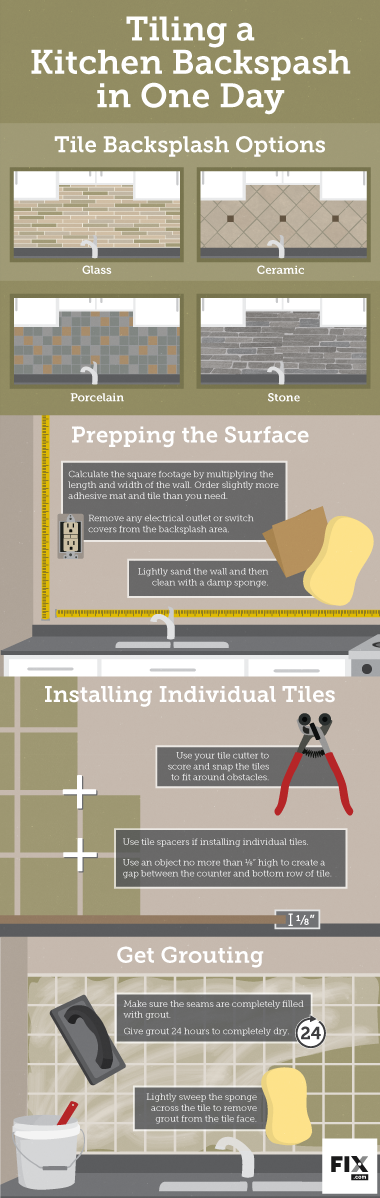
Make a Splash!
Tiling a Kitchen Backsplash in One Day
Everyone loves instant gratification. One problem with kitchen remodeling, though, is that gratification is often achieved slowly and laboriously.
So, for the sake of your sanity, you sometimes need to dip your hand into projects that can be finished quickly and offer eye-popping results. Backsplashes are just that kind of project: fast, beautiful, practical, and yes, instantly gratifying.
Why Backsplashes Stand Out
Spend a weekend painting a ceiling, and people never notice. Replace your windows to the tune of several thousand dollars, and guests politely say, “Hmm, nice.”
But backsplashes attract immediate attention. More importantly, you will feel like you have made major inroads toward creating a brand-new kitchen – for little more than you would spend on a weekend trip.
The reasons are because kitchen backsplashes are:
Close to Eye Level:This means that the backsplash is the first thing you see when entering the kitchen.
Densely Decorative:Just one square foot of glass mosaic tile or travertine stone is like a work of art. You would not use these materials to tile a floor or an entire wall because the visual density would be too chaotic.
But within the limited space of a backsplash, this compact visual appeal – glass mosaic’s sparkling color, natural stone’s rich veining – always stands out.
Traditional Method of Tiling Backsplashes
When tiling a backsplash, you have three simple materials: tile, wall, and the adhesive used to join tile to wall.
If you are using a wet adhesive, your project will take several days to complete because the adhesive needs to dry to properly set.http://www.custombuildingproducts.com/TDS/TDS-119.pdf
What if you could remove water from the equation? Would that speed up the process?
Yes. An innovative material called adhesive tile mat does just that.
Your Ticket to Instant Grouting
Generally available in widths of nine inches and lengths ranging from 18 to 40 feet, adhesive tile mats are thick, double-sided, gummy rolls that perform the same function as thinset with none of the mess or curing time.
Using tile mat is nearly as simple as applying contact paper to a shelf.
Instead of troweling on thinset and hurrying to lay tile before the thinset dries, you cut the mat to size and unroll it on the wall at your leisure.
When you are ready to lay tile, peel the protective plastic from the installed mat and press the tile into the mat.http://thesimplemat.com/settingTile.html
After the tile is in place, you can immediately begin pressing grout between the tiles with a rubber float. Your backsplash goes up as fast as you can lay tile – no curing time necessary.
Tools and Materials
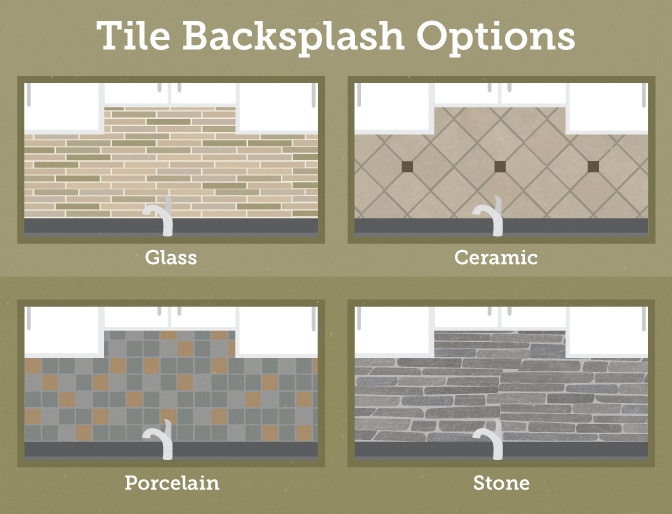
- Tile: You may use ceramic, porcelain, glass, or stone. Tile without mesh backing tends to stick best. If you prefer to make fewer cuts, purchase one-inch square mosaic tile.
Smaller tiles stand a better chance of staying within your layout area with less cutting. Though tile mat will hold natural stone, which tends to be heavy, be advised that the mat’s holding power does max out at seven pounds per square foot.
- Adhesive Tile Mat: SimpleMat, Bondera, and MusselBound are the three most prominent brands on the market.
- Grout: Consult tile mat instructions for the correct type of grout.
- Grout Float
- Tape Measure
- Utility Knife or Scissors
- Non-Stick Cooking Spray
- Sandpaper
- Plastic Tile Spacers: Inexpensive spacers are helpful when installing individual tiles. They are not needed if you are installing sheets of mesh-backed mosaic tiles.
- Grout Sponge: This is a large, dense sponge available at home improvement stores. Do not use a household sponge.
- Tool to Cut Tile: A wet tile saw is an electrical circular table saw that has water continually running to wash away debris and keep the work piece and blade cool. Low-end saws cost about $100. A rail tile cutter works much like a glass cutter.
It is a manual device that runs a metal wheel along the tile face to score it and then snap it in half. These run about $30 to $40. If you are installing mosaic tiles, you should purchase a manual mosaic tile cutter. These cost about $20.http://www.mosaicartsupply.com/mosaic-glass-cutter.aspx
How to Build a Backsplash
1. Estimate Square Footage and Amount of Materials Needed
Run your tape measure along the length of the wall and note the measurement. Next, run it vertically from the counter to the bottom of the cabinets (the usual vertical stopping point), and note that measurement.
Multiply the length by the width to determine the square footage. So, a 14-foot-long wall that is two feet high is 28 square feet.http://buybondera.com/how-to
Use this number to purchase tile mat and tiles, adding five percent to 10 percent for wastage. In this example, you would purchase about 30 square feet of mat and tile.
2. Plan Your Layout
Dry-fit a few of your tiles on the wall prior to laying out the tile mat, particularly with an eye toward establishing the vertical layout. If you’re using individual tiles, be sure to put spacers between the tiles to allow for seams.
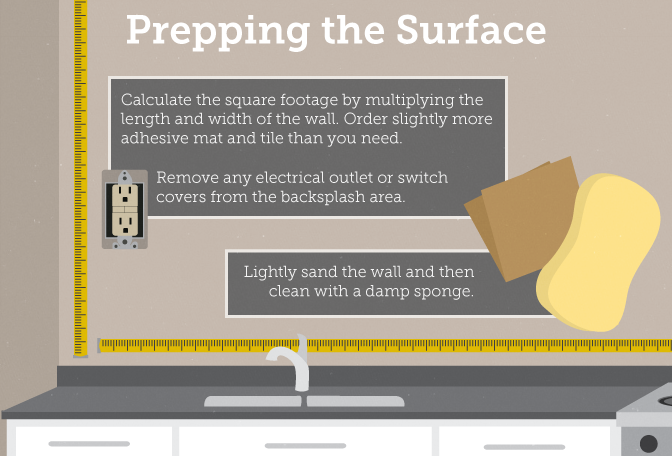
3. Clean and Prep Surface
Turn off the power to all electric outlets and switches located in the tiling area. Remove outlet and switch covers.
Scuff the surface lightly with sandpaper. Clean with a damp sponge and let dry.
4. Cut and Install Tile Mat
Transfer the layout area measurements to the tile mat. It is generally better to install the mat vertically, like you would do with wallpaper. Leave the protective liner on the mat until you are ready to install tile.
Cut the mat to size with a utility knife or scissors. If using scissors, it is helpful to coat the blades with cooking spray so they do not stick to the mat.
Once the mat is in place on the wall, carefully peel off the protective liner, beginning at a corner.
5. Install Tile
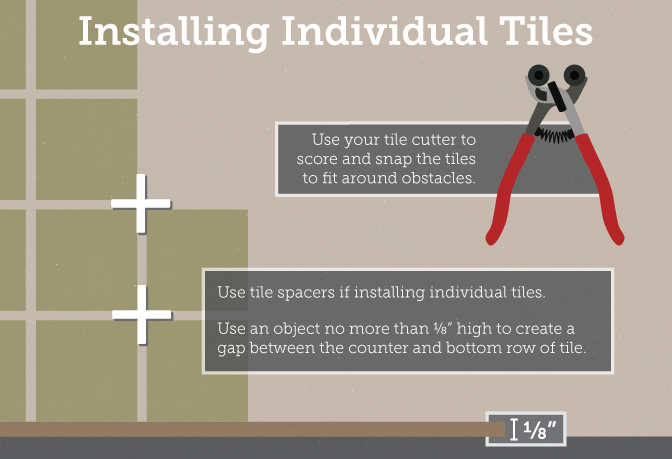
Establish a gap between the bottom of the lowest row of tile and the counter by laying down a header on top of the counter. This can be as simple as putting down a yardstick (flat side down) or anything that is long and no more than 1/8” high.
Besides creating a needed gap, this header helps to support the weight of the lower row of tiles.
Lightly press the tile onto the tile mat. Start with the bottom row and move upward. If you’re installing individual tiles, use spacers to set the width of the tile seams.
If the tiles do not fit into the layout or around outlets and switches, you will need to cut the tiles.
This is where one-inch mosaic tile shows its true value because you can easily snap the tiles with the hand-held cutter rather than running them through a wet tile saw or rail cutter.
Tile mat allows for repositioning of tiles. When you are satisfied with the layout, press the tiles firmly into place with a dry tile float.
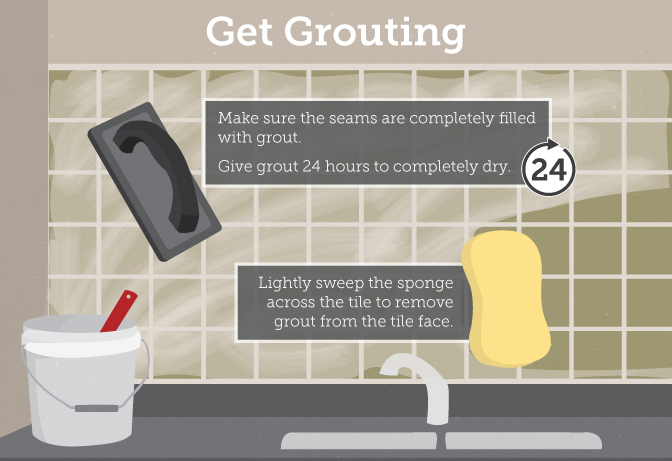
6. Grout Tile
Apply a golf ball-sized amount of grout to your float. Spread the grout across the face of the tile by holding the float at a 45-degree angle and sweeping firmly across the face of the tile.
Make sure that all the seams are completely filled with grout. With your float held at the same angle, lightly pull it across the tile to scrape off excess grout. Return the excess to the container.
Moisten your grout sponge. Squeeze out as much water as possible. Very lightly, sweep the sponge across the tile to remove grout from the tile face. Make sure that you do not scrape out grout from the tile seams.http://musselbound.com/Grout.asp
Let the grout dry for 24 hours. You are now ready to enjoy your new kitchen backsplash!
Get Splashing!
With minimal labor and material cost, backsplash tiling quickly beautifies your kitchen. While even the conventional method of using thinset mortar is fast, adhesive tile mat is far faster, reducing the installation time from several days to just one day.
Embed the article on your site