9 Steps to Harden Off Seedlings
Whether you’ve got seedlings you’ve nurtured yourself, or ones that you’ve bought
from the local nursery, those plants need a helping hand in order to grow well
outdoors. Here’s how to harden off your vulnerable vegetables, fruits, and flowers.
If you’re new to starting your own seeds or have just-purchased sprouts in your
store cart, you may think that since the tiny plants have grown a few inches and
sprouted a few leaves, you can simply move them from their sheltered spot indoors
to outside in your garden. I’ve been there. Anxious to kick my gardening into high
gear, I’ll throw caution to the wind and dig a hole in ground that’s still warming up
after a cold winter.
But don’t jump too quickly from planting container to garden shovel. Those
too-early plants I’ve rushed into the ground can be likened to a toddler just learning
to walk. They haven’t learned all the ins and outs of that delicate dance from hand-holding to full steam ahead.
Seedlings are tender and have been sheltered their whole young lives. Like a toddler, those newborn plants need an extra step in their growing cycle. In order to transition successfully from inside to outside,
they need a bit of loving care, also called hardening off.
Hardening off describes slowly exposing newly grown vegetables, fruits, and flowers to the elements—changing temperatures,
varying levels of sunlight, wind—to enable healthy growth. While hardening off doesn’t take a lot of time, it does involve some vigilance.
Here’s what to do:
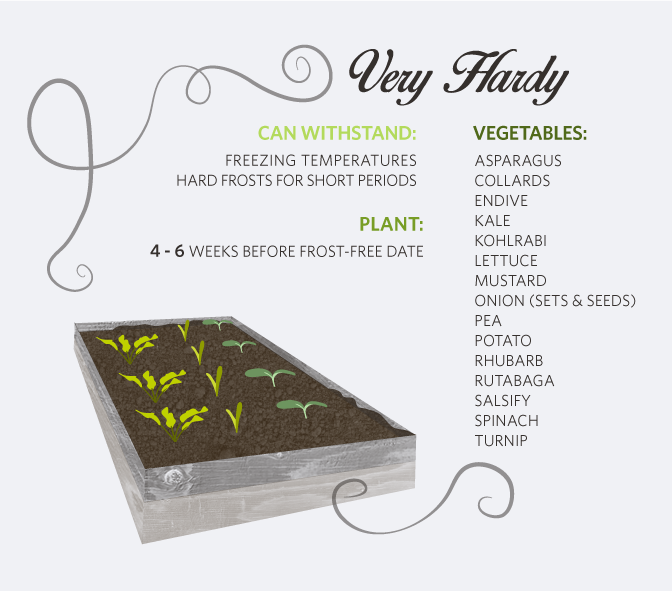
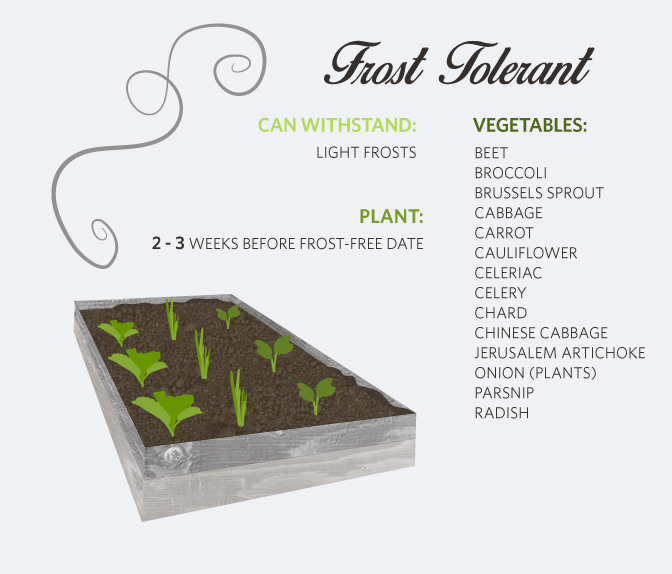
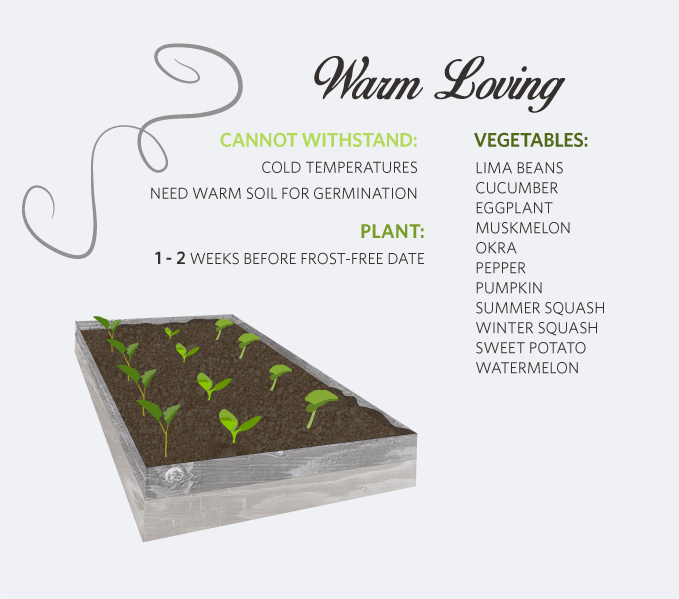
1. Check your seedlings’ frost dates. Some plants—onions, for example—may be OK to harden off while there’s still a risk of frost. Others, such as tomatoes,
are typically unable to endure those cold extremes. Wait until the advised date before beginning to harden off.
Below is a chart of commonly planted vegetables and their classification of frost tolerance https://www.extension.purdue.edu/extmedia/ho/ho-203.html.

2. Stop indoor watering or fertilizing. About a week before your seedlings will go outside, suspend any supplemental watering or plant food.
3. Choose your first hardening off spot. Your seedlings need some protection from wind and sun during their first hours outside.
You have a couple of options including a shady spot against your home, a table under a tree, or inside a cold frame.
4. Place your seedlings outside for an hour. Mid to late afternoon, move your seedlings to your hardening off spot, just for an hour or two.
Make sure that the plants aren’t getting bashed around by the wind, and are protected from any pests or animals.
5. Move your plants back indoors. At the end of the first day’s hardening off time, put your seedlings back inside. If they’re in a cold frame, close and secure the opening.
6. Lengthen the hardening off time. Each day, leave your seedlings outside for an hour more than the previous day, gradually giving them more and more direct sunlight time.
At the same time, you can move seedlings to a less sheltered location—further from the house, out from under a tree, or outside the cold frame, for example.
7. Protect your seedlings as needed. If temperatures dip during the hardening off time, you may need to bring seedlings inside or close the cover of the cold frame.
You can also use row covers to offer extra security and warmth if there’s a hard rain or cold-weather day.
Not sure how to construct a row cover? There are many different row cover materials and styles.
We have featured two below, hooped and floating, along with two of the most popular materials to use, plastic and spunbound.
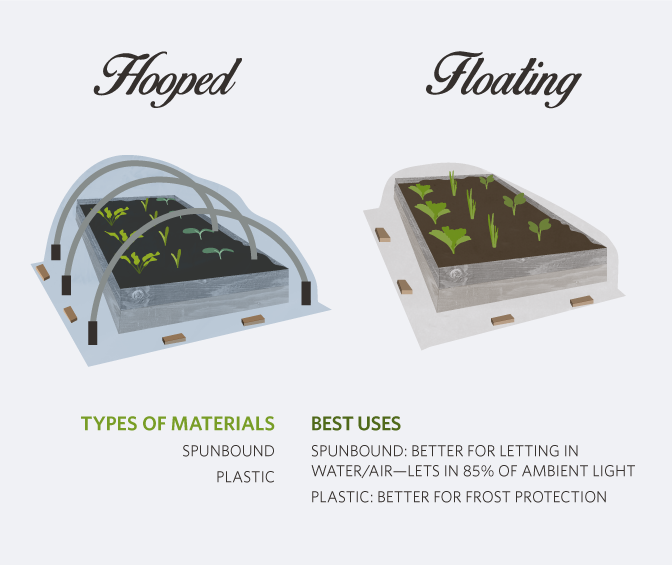
Steps To Creating A Hooped Row Cover:
- Materials – ¾” PVC piping, ½” rebar, ¾” clamps & plastic or spunbound material.
- PVC Piping should be the same length as your bed.
- There will be one ‘hoop’ for every 5’.
- The material needs to be 8’ longer then the bed.
- Put a rebar on each side of the bed.
- Connect with the PVC piping to create a ‘hoop’
- Repeat every 5’ to the end of the bed.
- Once all ‘hoops’ are created, drape the material over the hoops.
- Secure the material with the clamps on each side of the hoop.
- Gather the cover at the center of each end of the tunnel and secure it with a sandbag or rock.
- Walk the perimeter to make sure material is secured
Steps To Creating A Floating Row Cover:
- Materials – plastic or spunbound material that is 1-2’ larger then the bed and
ground stakes that will be placed around the bed to secure the cover.
- Alternatively, you can use bricks or rocks to hold down the cover.
- Loosely cover the bed with the material.
- Be careful to not pull the material tightly over the bed.
- Place the stakes, or heavy objects around the perimeter of the bed.
- Walk the perimeter to make sure material is secured.
8. Extend nighttime hardening off hours. After several days of getting acclimated to daytime conditions, your seedlings will be ready to adapt to nighttime hours, too.
Leave them outside longer and longer—always watching temperatures—until they’ve begun to spend the whole night outside.
9. Water as needed. If your seedlings show signs of wilting, give them a light sprinkle of water.
The entire process of hardening off will probably take about a week, depending on temperatures and conditions in your area.
During this time, your plants are getting thicker and sturdier, better able to adapt to summertime extremes.
Planting in the Garden
The true joy of starting your own seeds comes when you can finally transplant those flowers, vegetables, and plants into the garden. In general when transplanting:
- Pick a cloudy day. Plants already endure a big shock when they go from pot to ground. Too much sun can stress them even more.
- Dig a hole that’s a little bigger than the root ball. Typically a hand shovel works.
- Fill the hole to the plant’s root line. Tamp down firmly with your hands.
- Water new garden transplants thoroughly.
In the first few days after planting in the garden, check on your plants regularly. A little wilting in the first day is normal, but plants should quickly perk up.
And while some may adjust just fine and not need any special care, others may need supplemental watering.
Also monitor temperatures carefully; unexpected temperature dips are rare but do happen, and you may need to cover some plants to protect them.
You may only ever start one flower or vegetable from seeds, or you may decide growing your own plants is worth the time and house space.
And once you’ve successfully transplanted those seedlings, you’ll feel a little glow on your green thumb.
Embed the article on your site