Exposing Landscape Photography
Get Perfectly Lit Outdoor Photos Every Time
Anyone who has spent any time outdoors in the wilderness with a digital single-lens reflex (DSLR) camera knows that the magnificence of nature often seems to have been distilled by the time it’s downloaded after the trip.
Some might put it down to the difference between being there and remembering it. But it doesn’t have to be like that.
Whether you’re on safari in the Serengheti or hiking the Pacific Northwest, there are some basic steps you can take to make sure you’ll come away with a realistic and evocative reminder of the experience.
Don’t Point and Shoot
When you plan to do some significant hiking you need to prepare for photo stops. Most of the places we might wander have been trailed before – the images people upload to Google Earth will give you not only an idea of the terrain,
but also the most popular spots to capture. Schedule these stops to occur at natural rest stops where you might break anyway for water or snacks, otherwise you might find yourself shooting from the hip as you move.
That’s a guaranteed way to come away with a full memory card of average and poorly-shot pictures.
Shooting a landscape photo isn’t a snap, and although you don’t have to spend a day scouting the location for one frame, you should take time to set up the shot, and importantly, add this time to your total expedition time.
You don’t want to be walking when it gets dark unless you’re prepped for camping.
Exposure
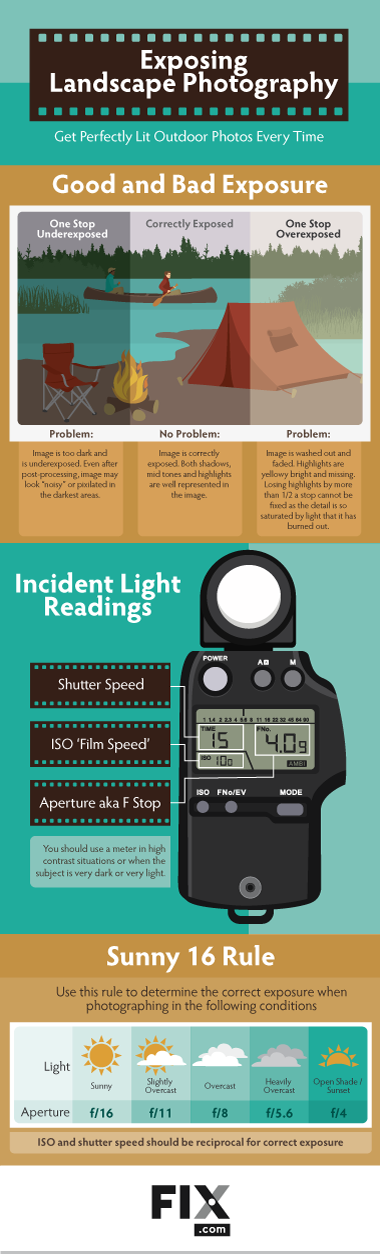
Exposing outside in good weather shouldn’t be a problem if you use manual exposure. You know that little landscape setting on your camera dial? Ignore it.
That’s going to prioritize your aperture and set it at a small aperture of f16 or f11, but it won’t help you with your exposure. Your camera’s meter is going to be right about 65 percent of the time.
But if you move the camera a tiny bit, it can be thrown off and spoil a photo.
Bracketing Exposures
You can take steps to bracket your exposures. That means you’ll come home with a couple of different exposures of the same scene and you can pick the best one (or combine them to make an HDR image).
Again, set your controls to manual. Whatever exposure the camera recommends, set your camera to make an exposure on either side of that recommended exposure.
Then set another exposure one stop (or a fraction thereof) under the recommended exposure and one more over the camera-chosen exposure. If you look in your camera’s manual, there’s probably a way of doing this automatically.

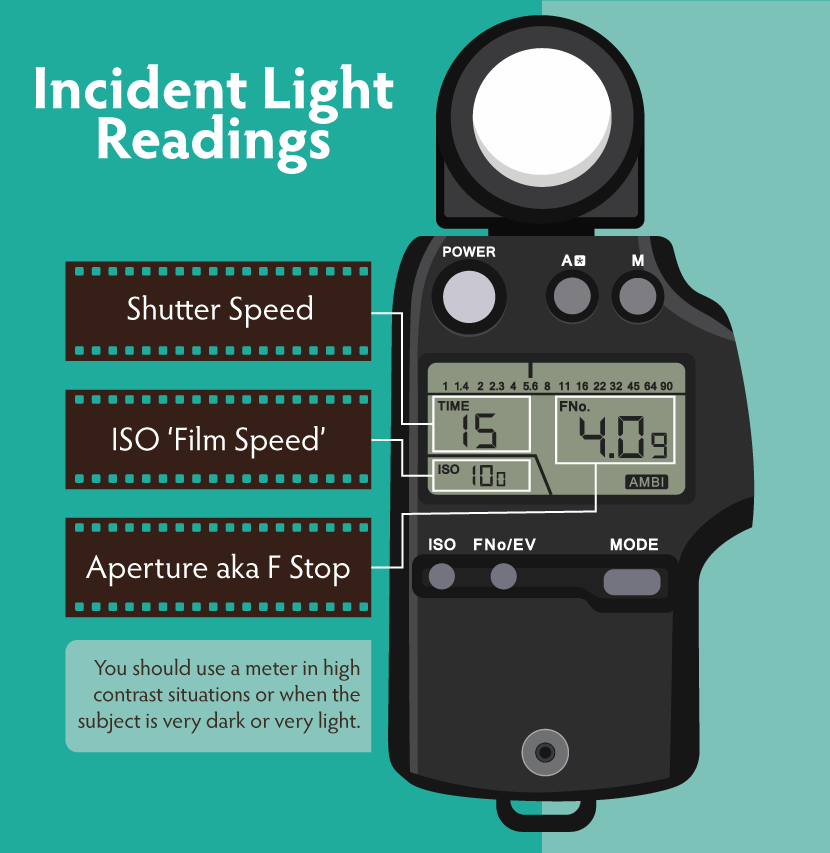
Use an Incident Light Meter
Your camera’s light meter measures the light reflected off a subject. That exposure is affected by the color of the subject.
A dark subject will absorb light and the camera won’t receive enough light bouncing into the lens: it will think it needs to compensate, resulting in overexposure.
A bright subject will do the opposite and underexpose. Modern cameras do a pretty good job of measuring different areas of the frame but when you’re out in the mountains squinting at a three-inch screen, do you think you can tell how good your exposure is?
You need to measure the light before it hits your subject. This is called an incident light reading.
Sunny 16
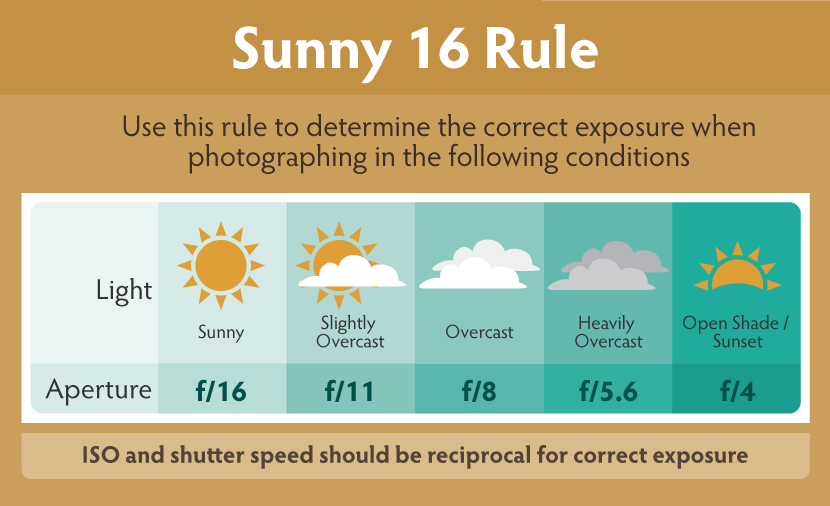
Another way to do it is to use the “Sunny 16” rule. This rule, which is as old as photography itself, states that in bright sunshine when your ISO is the same as your shutter speed, your aperture must be f16 to make the exposure.
Accordingly, at 1/200 with your ISO at 200, your aperture will be f16. With a shutter speed of 1/100, and a 100 ISO, the same f16 exposure will result in proper exposure.
If it sounds tricky, don’t worry. It’s a lot less complicated when you have your camera in your hands!
The Long Lens is Your Friend
The wide-angle lens is the one we tend to reach for in a landscape setting because we want to get everything in.
The super-wide zoom 17mm-35mm is an excellent choice to replace fixed focal length, prime lenses and cut down on weight, but there’s another oft-neglected option to consider: the long lens landscape picture.
The 300mm lens has always been a favorite of mine for making a photo that, although doesn’t have the sweep of the super-wide, has a concentrated grandeur.
A telephoto long lens will make a subject appear larger than it is in real life, and it foreshortens or compresses the depth of a scene.
When selecting this lens you’ll be able to pick out and isolate a certain characteristic of a landscape: a mountain peak or a valley stream in the distance.
Magic Hour
Finally, and most importantly, your photos are going to look most magnificent if you shoot in the morning after sunrise and in the hours before sunset.
“Magic Hour” is when the sun is near the horizon and more illumination is coming from indirect light reflected off cloud cover and the atmosphere itself.
There’s less blue light, hence the golden color. In more northern climes that golden light lasts much longer.
The light at this time of day is coming from much lower in the sky, and is therefore more even.
Highlights and shadows are further away from each other in tone during the middle of the day, and as advanced as the DSLR’s digital sensor is, it can’t record as wide a dynamic range as the human eye, or 35mm film for that matter.
This makes deciding on an exposure even more difficult in the middle of the day, because you can’t capture all the detail in the highlights and the shadows.
Utilize the techniques above and your landscapes will achieve a more consistent level of exposure, wherever in the great outdoors you choose to roam, and whatever time of day that perfect photographic moment arrives.
Embed the article on your site