Make the Best Beef Jerky at Home
It’s smoky. Savory. Salty. Sometimes a little sweet. It has been a favorite snack of travelers and nomads for thousands of years. I’m speaking, of course, of jerky.
Today, jerky is a big business. The Washington Post recently reported that it’s a $1.5 billion industry in the United States. Sales are up 46 percent since 2009. This high-protein, low-fat, low-carb, gluten-free snack has never been more popular.
It’s likely that our cave-dwelling ancestors had a “light bulb” moment when smoke from their fires not only repelled insects and scavengers but also gave their hard-won food flavor and portability.
This allowed them to cache proteins for future hunting expeditions.
Later, in Neolithic times, people discovered that salting meat and fish before drying them extended their shelf lives even more.
Etymologists believe the word “jerky” comes from South America, specifically from ch’arki, the Quechan term for dried meat. Spanish conquistadors reported that dried strips of llama were served to itinerants at way stations along primitive Incan roadways.
(Selling jerky in gas stations has a historical precedent!)
But if you love jerky, you don’t have to buy it. You can easily make jerky at home (and you get to control the quality from start to finish). Here’s how.
Select the Meat and Slice it into Strips
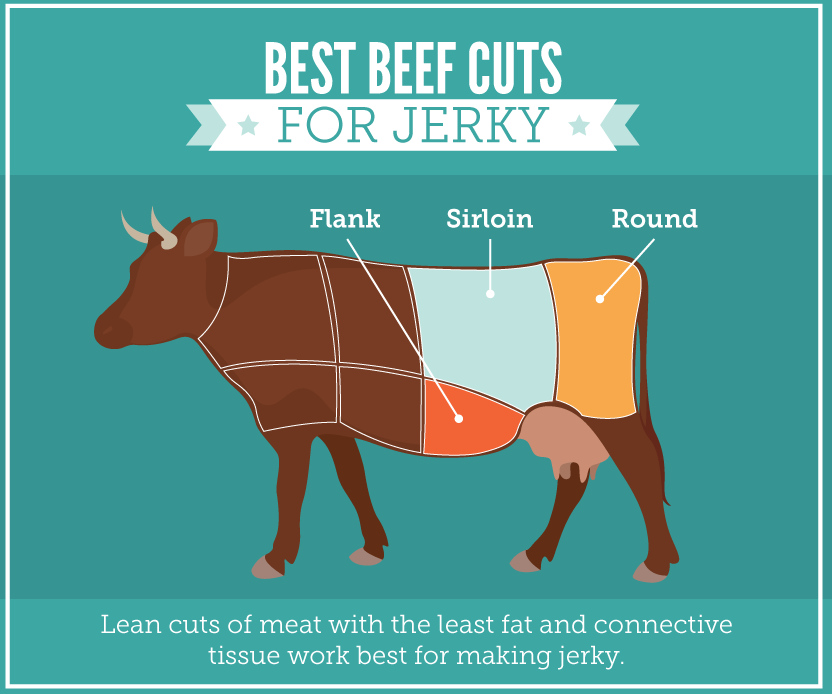
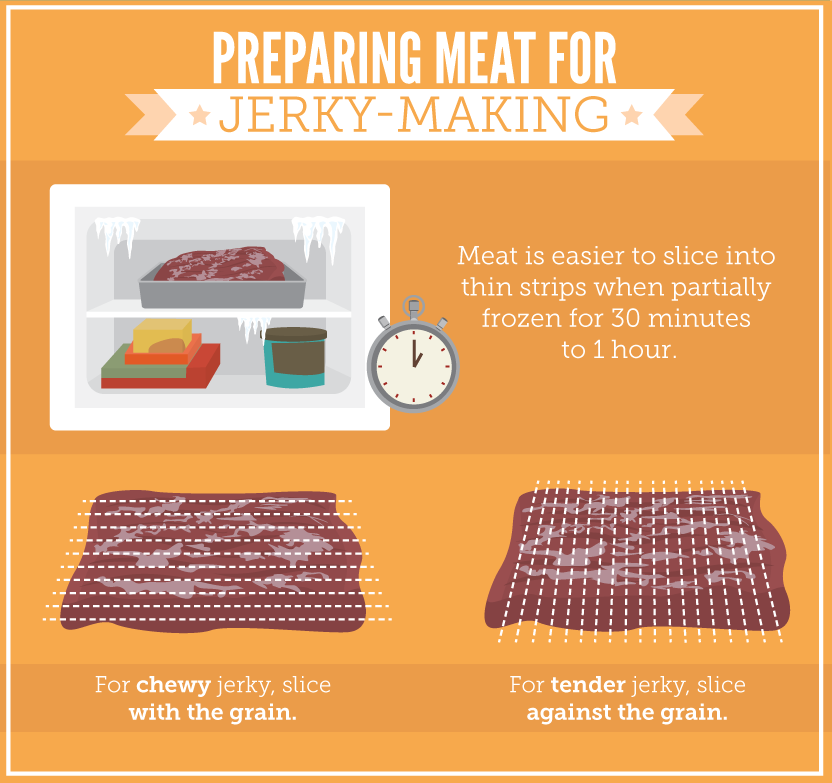
Beef is the most popular meat for jerky. Look for lean cuts (fat spoils) with little connective tissue. Consider the top or bottom round, eye of round, flank steak, or sirloin steak. For easier slicing, partially freeze the meat.
Slice the meat into 1/8- to 1/4-inch strips with a sharp chef’s knife or a meat slicer.
For chewier jerky, slice with the grain. For more tender jerky, slice against the grain.
Make the Marinade
Use the simple recipe below as a starting point. Note: The meat will lose about 50 percent of its weight when dried.
Take the Cure
Curing salt, also called pink salt, is a specialty salt used by butchers and commercial meat processors to give meats such as ham and pastrami their rosy color. When used in small amounts (1 level teaspoon for 5 pounds of meat),
it not only slows spoilage but also gives jerky its characteristic texture and translucency.
Make sure you measure the salt accurately.
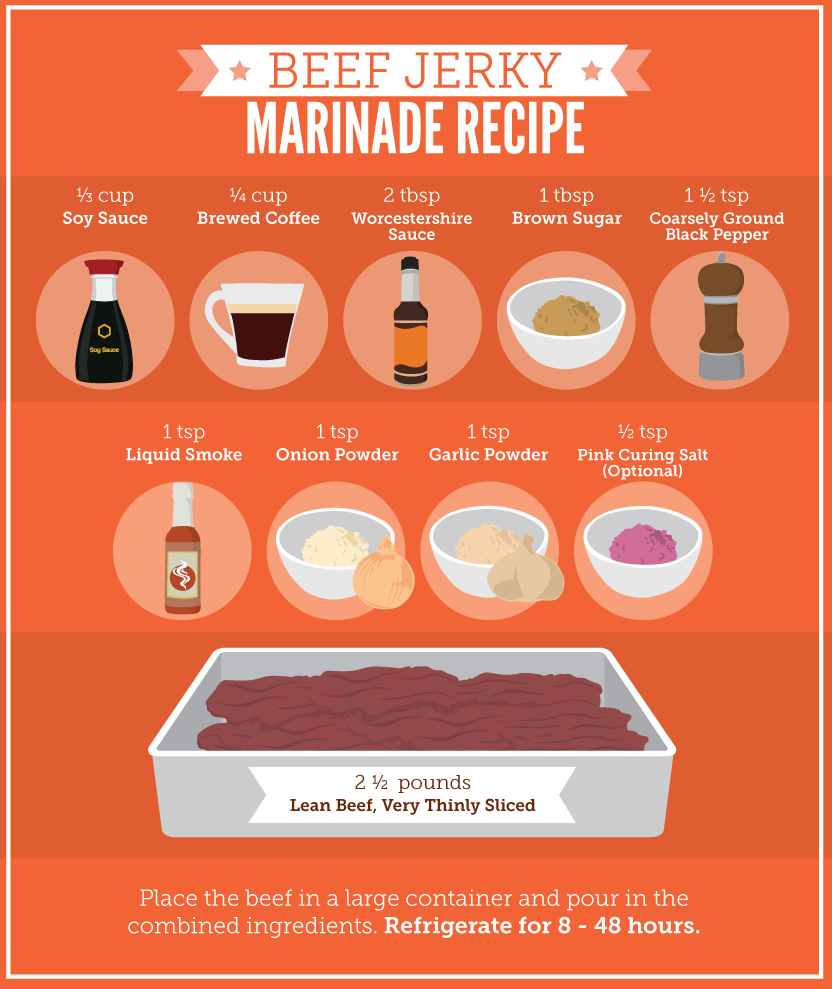
Place the beef in a large re-sealable plastic bag. In a mixing bowl, combine the marinade ingredients. Pour the marinade over the beef. Massage the bag to distribute the marinade. Refrigerate the bag for 8 to 48 hours.
Drain the marinade from the bag before smoking or drying and discard the marinade. This yields about 1.25 pounds of finished jerky.
Make it Your Own
You can customize your flavors. Once you’ve mastered the basic method, use a jerk chicken marinade for “jerk jerky.” You can also deconstruct a Bloody Mary by marinating the meat in tomato juice, lemon or lime juice, horseradish, vodka, and celery salt.
You can also use your favorite ethnic cuisine as a starting point.
Remember, you can add ingredients to the marinade or sprinkle them on the meat before smoking or drying.
Smoking or Drying
Jerky was traditionally dried three ways: over a low but smoky fire; in the sun; or freeze-dried in colder climates. The latter two are neither safe nor practical today. However, you have other options.
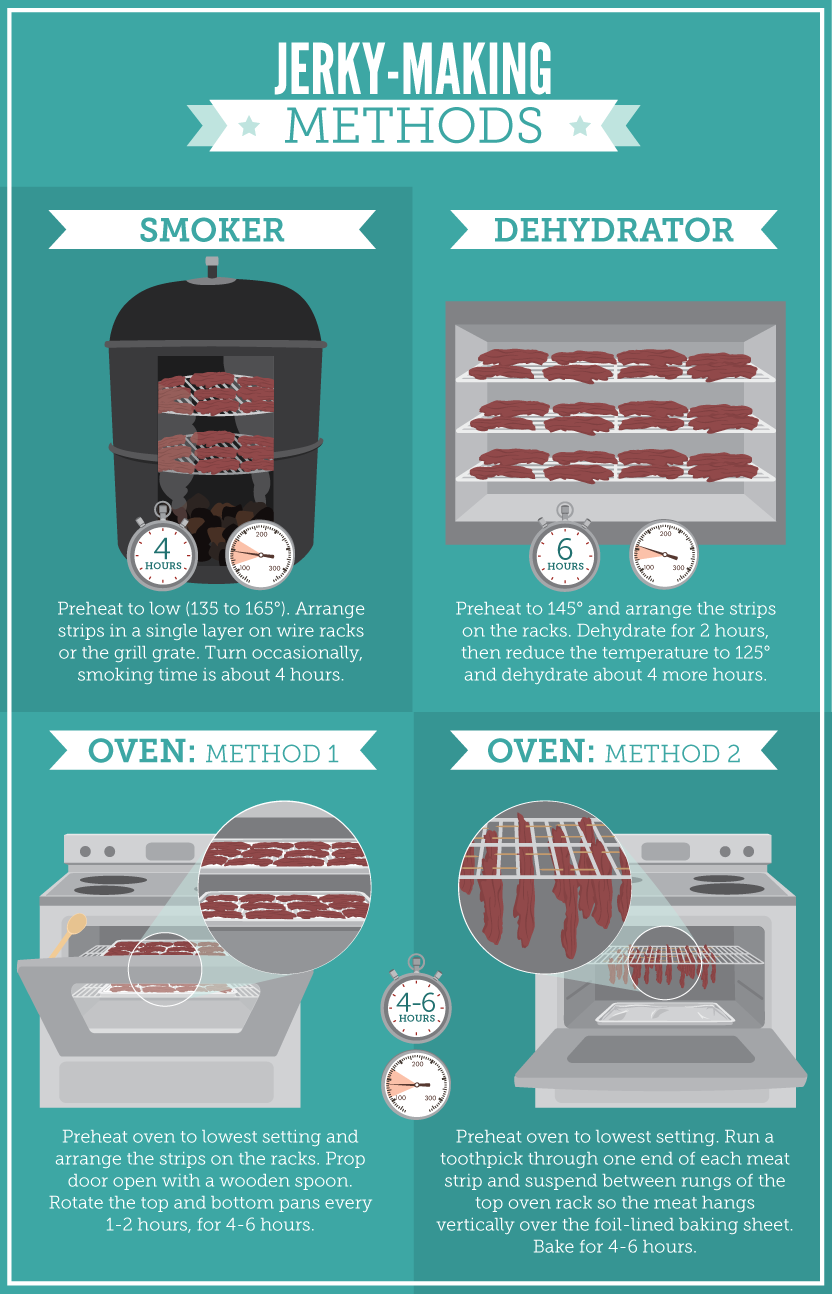
Smoke drying: If using a smoker (electric or wood-burning), set it up according to the manufacturer’s instructions. Preheat it to low (135–165°F).
Lay the strips of meat in a single layer on wire racks or the grill grate, turning them occasionally until the meat is dry but still pliant. This usually takes about four hours. Taste test the meat at intervals.
You can also set up a charcoal grill for indirect grilling and preheat it to low (keep the vents partially closed to maintain low temperatures). Arrange the meat on the grill grate away from direct heat.
Throw a handful of water-soaked wood chips on the coals and replace the lid. Turn the meat occasionally, replenishing the coals and wood chips as needed.
Oven drying: Preheat your oven to its lowest setting. Line a baking sheet with foil and place a wire rack on top (you will likely need to use more than one baking sheet, or you can work in batches).
Arrange the meat in a single layer on the wire rack(s) and place them in the oven. Prop the door of the oven open with a wooden spoon so moisture can escape. Rotate the pans from top to bottom every two hours.
Alternatively, lay a foil-lined sheet pan on the bottom rack of your oven. Run a toothpick through one end of each meat strip (the toothpick should be perpendicular to the meat).
Suspend each strip of meat between the rungs of the top oven rack so the meat hangs vertically over the foil-lined baking sheet. Dry the meat as described above.
Dehydrating: If you own a dehydrator, set it up according to the manufacturer’s instructions and preheat it to 145°F (if the temperature setting on your dehydrator is not calibrated by degrees, don’t worry).
Arrange the drained meat on the racks. Dehydrate it for two hours, then reduce the temperature, if possible, to 125°F.
Continue to dehydrate the meat until it is dry but still pliant, which takes about four hours.
Combining these methods: You can make jerky by combining smoking with one of the indoor drying methods; this option works well if you don’t have time to tend a smoker or grill for several hours.
Smoke the jerky for one to two hours to develop the natural flavor, and then finish drying it in an oven or dehydrator as described above.
Final Thoughts
Transfer the still-warm jerky to a resealable plastic bag. The residual heat generates a little steam, which relaxes the meat and gives it better texture. You can store the bag in the refrigerator for up to three weeks or in the freezer for up to three months.
Try not to eat it the first day if you can. Believe me, it won’t last long.
Embed the article on your site