X-Bench Marks The Spot
Simple DIY Plans for the Perfect Stool
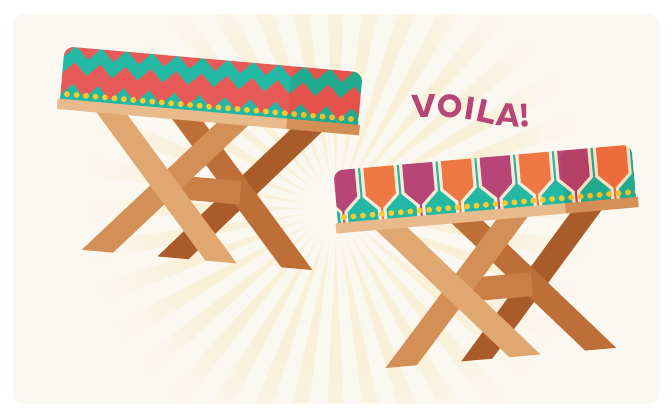
Some call it an X-bench, cross stool, curule, Savonarola, or Faldistorium. Whatever name you give it, this easily crafted yet cleverly designed chair has one real function: giving you time off your feet.
For the mighty armies of the ancient Romans, Egyptians, and Greeks, this classic furniture piece ranged in grandeur from opulent solid gold thrones to simple leather folding lawn chairs. The stylish yet practical design of the X-bench inspired furniture builders to create their own unique versions.
Today, the X-bench can be found everywhere from haughty castles to cramped efficiency apartments. Thanks to the nearly endless ways of designing this elegant easy-to-build chair, it’s become a furniture fundamental around the globe.
While my X-bench design has more of a classic feel with clean crisp lines, solid dark oak legs, and a plush leather seat, you can create your own X-bench design using the basic outline from the following plans. Just keep in mind: No matter how extravagant or simple you make your X-bench, there’s always going to be a power struggle to usurp you from your new throne.
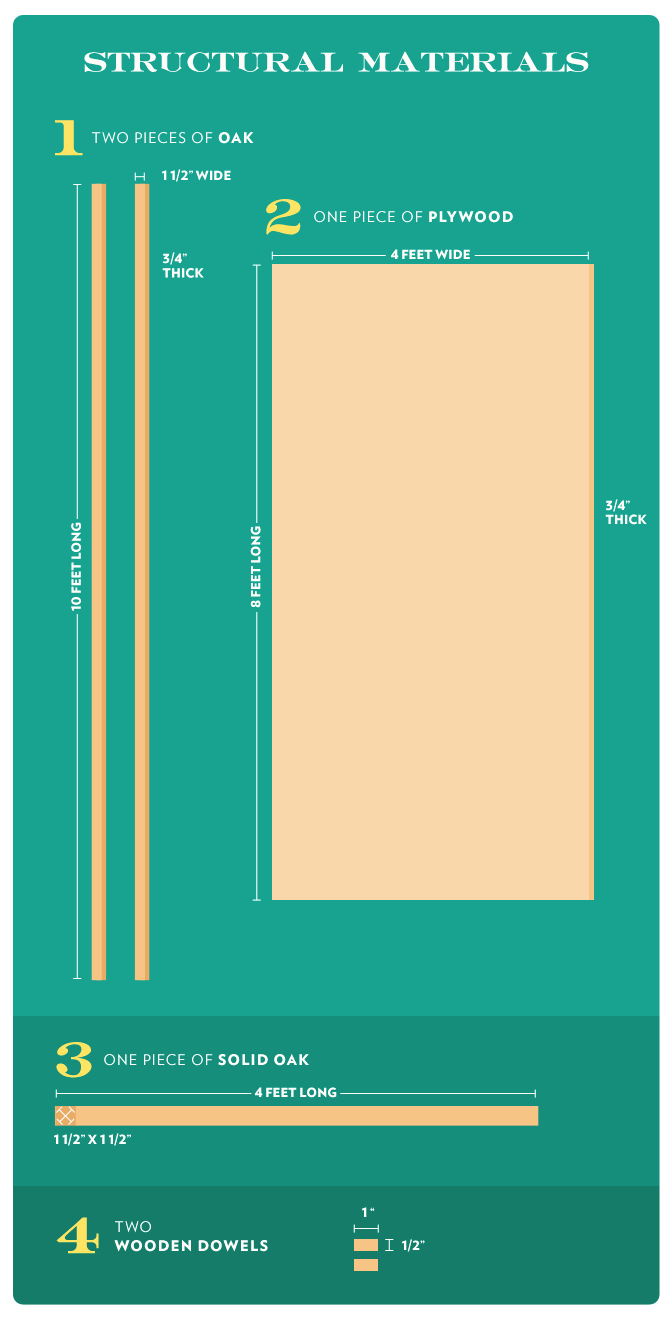
Structural Materials
For the structure of the X-bench, I used solid 1½ x ¾-inch oak boards.
While you don’t have to use oak, do use a solid material that is free from finger joints or engineered products that can split, crack, or break apart under pressure. You’ll need at least 18 feet of material; two 10-foot-long pieces of 1½ x ¾-inch stock will work just fine.
You’ll also need a piece of ¾-inch-wide plywood for the seat top. The center strut is made from a piece of solid oak 1½ x 1½ inches in diameter and should be made from solid material as well. Finally, two one-inch long, ½-inch diameter wooden dowels are needed for the center strut fasteners.
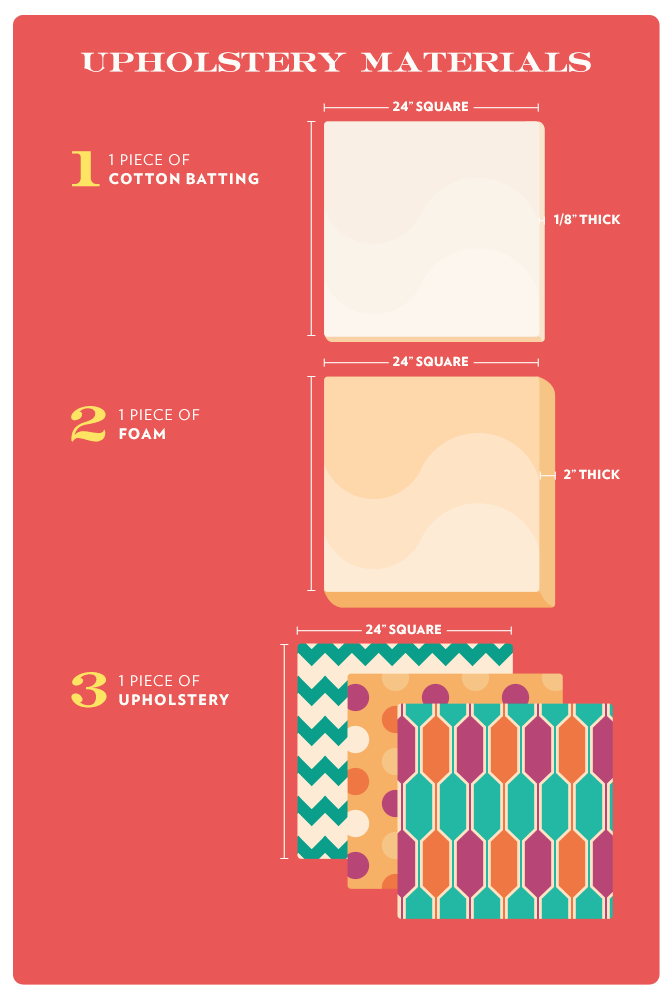
Upholstery Materials
To upholster your X-bench, you’ll need three pieces of material: the batting, the foam, and the upholstery, each piece measuring a minimum of 24 x 24 inches. The batting is typical cotton batting ⅛-inch thick, while the foam upholstery cushion should be at most two inches thick. The finished layer of upholstery leather or other similar upholstery-grade substitute is all that you need to put the finishing touches on your X-bench.
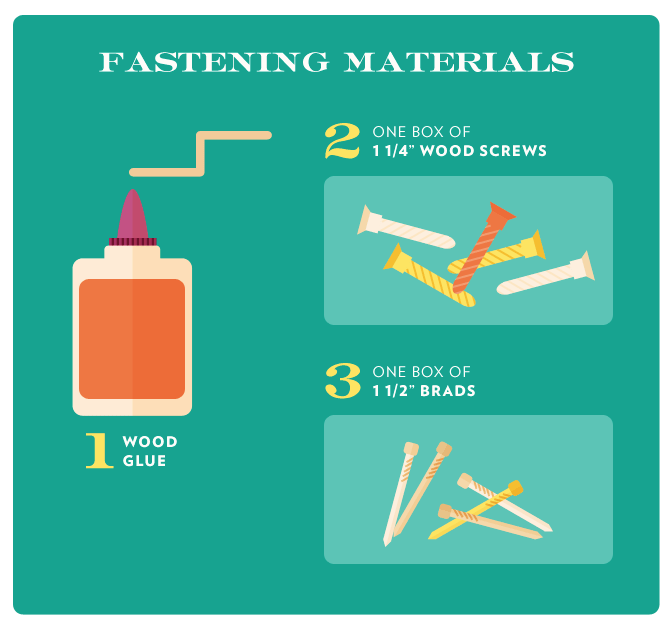
Fastening Materials
Fastening the materials together requires wood glue as well as a small box of 1¼-inch wood screws. A small box of 1½-inch brads are also needed to help join the legs of the X-bench together permanently.
One package of ½-inch 22-gauge upholstery staples is needed to fasten the upholstery. While you can use a hand-powered stapler and staples, it’s easier to use a pneumatic stapler and staples.
Tools
You’ll need a circular saw, miter saw, framing square, tape measure, pencil, scissors, and a chalk box. A compressor, air hose, pneumatic brad nailer, and upholstery nailer are recommended, or you can fasten everything the old-fashioned way with a hammer, nail punch, and hand-powered staple gun. You’ll also need a 1 ⁄ 16-inch drill bit and drill to make a few predrilled holes for the screws.
Additional Materials
You can paint, stain, or clear-finish your X-bench. Whatever you choose, you’ll need sandpaper, a small two-inch chisel tip china bristle brush, and a drop cloth.
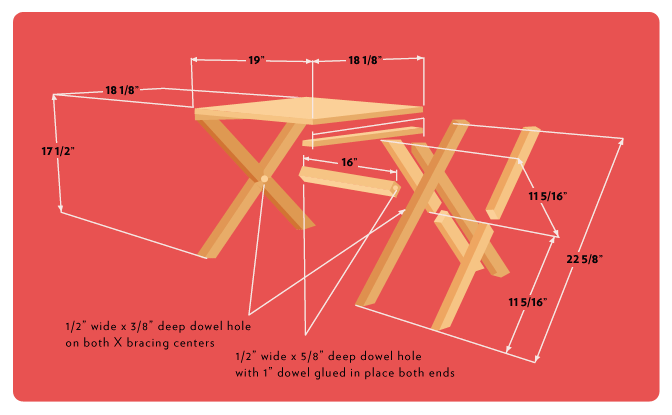
Measurements and Cuts
Begin by assembling the X-bracing, aka the legs.
You’ll need 12 pieces cut from the 1½ x ¾-inch oak stock; cut the four long leg pieces first.
Set your miter saw to a 45-degree angle and place one inch of the end of a 1½ x ¾-inch stock under the saw blade so the widest side of the board is face down against the table; make the 45-degree cut.
Measure 22⅝ inches from the long point of the 45-degree angle down the length of the board and make a mark.
Now, make another parallel 45-degree angle cut so that the short point of the 45-degree angle is pointing away from your mark.
Repeat this step until you have four identical long leg pieces.
Next, cut the eight short leg pieces from the same 1½ x ¾-inch oak stock, starting with a 45-degree angle on the first end, just like the last cut.
Measure down the length of the board from the long point as you did in the previous step and make a mark at the 11-15/16-inch mark.
This time, instead of creating another 45-degree angle, make a simple 90-degree square cut.
Repeat this step until you have eight identical short leg pieces.
Cut the two seat struts from the remaining stock to a length of 18⅛ inches, both with square 90-degree cuts on each end.
Now cut the center strut from the 1½ x 1½-inch stock at 16 inches in length with square 90-degree cuts on each end. Finish up on the miter saw by cutting the ½-inch dowel into two one-inch-long pieces.
Finally, cut the plywood into an 18⅛ x 19-inch rectangle using a circular saw. Be sure to double-check your angles with a framing square before making the final cut.
Sand, finish, and paint all wood pieces as desired and set them on a dust-free workbench to dry.
Frame Assembly
After a minimum of four hours of drying time, place the first long leg piece wide side down on a workbench and coat the top with wood glue.
Next, attach a short leg piece to each side of the long leg piece and align the 45-degree angle so they are flush. Fasten a few brads up the length of the short leg pieces to hold it all together.
Measure down each side of the next long leg piece, 115 ⁄ 16 inches, to help align the X.
Sandwich the final long leg piece between the two short pieces and fasten with brads. You may need to gently tap it in the wedge with a rubber mallet.
Wipe away any excess glue with a damp sponge and repeat the entire frame assembly process for the other X-brace section.
Find the center on the ends of the center strut board by connecting the four corners with a pencil line to make an X.
Drill a ½-inch hole to a depth of ⅝-inch deep.
Place a piece of tape ⅝-inch up the end of the bit to gauge the depth of the hole accordingly.
Find the center on the inside of the X-bracing by connecting a line from inside corner to inside corner.
Drill a ½-inch hole ⅜-inch deep, once again using tape to gauge the depth of the hole.
Glue each hole and attach the center strut to the two X-braces by placing it on its side. Be sure that everything’s properly aligned with a framing square as the glue dries.
Attaching the two top seat struts will align each end so that they are square. Predrill to a depth of one inch. Then use two wood screws to square the chair up on each of the four corners.
Upholstery
Upholstering begins first with cotton batting followed by a two-inch foam panel cut into an 18⅛ x 19-inch rectangle.
Top it off with the plywood and pull the batting up tightly around the plywood edge, stapling with the pneumatic upholstery nailer as you work your way around the edge of the plywood.
Fold the corners neatly (like a Christmas present) and trim any excess materials away.
Place the upholstery face down on a mar-free surface and then place the batting/foam/plywood package on top with the plywood facing up.
Pull up one side of the upholstery and staple it in place to the plywood.
Repeat the process on the opposite side, stretching the material tightly as you work.
Tuck each corner in neatly and staple the two folds in place.
Fold the remaining two sides of upholstery over the plywood, pull tightly, and staple into place.
Align the plywood onto the seat so it rests squarely on each of the two seat struts.
Again, predrill with the ⅛-inch drill bit to a depth of one inch and install three wood screws for each side of the strut.
Let everything dry for 24 hours before use. Then enjoy your new X-bench – you’ve earned your throne!
Embed the article on your site