The Pizza Connection
Turning Your Home Charcoal Grill Into an Authentic Pizza Oven
Grilling a pizza can make for a great social barbecue occasion. It allows your guests to creatively dress their own pizza, and also gives them something to talk about and participate in. Most importantly, you look like a professional grill master who can make delicious authentic pizzas that taste like they’ve come right out of a real wood-burning oven.
Think about it. A real pizza oven uses wood-burning fire to heat the stone walls and hearth. These ovens can cost thousands of dollars, which might impair your desire to make authentic pizza. However, by following the methods in this article you can recreate a wood-burning pizza oven and artisanal pizza flavor right on your own charcoal grill. Best of all, it’s really easy to do once you have a good understanding of how to position charcoal in the proper arrangements.
Rolling in the Dough
One key to a good pizza is an artisan pizza dough recipe. There are endless recipes floating around online, but the best is this overnight-rise New York Style Pizza Dough. This works out perfectly for a pizza cook-out, because you can make all of the dough balls the night before and let them rise in the refrigerator overnight. Slowing down the yeast a bit with a cold overnight rise provides a magic punch to the recipe, as the yeast can accumulate more of their tasty metabolic by-products, which result in that rich dough flavor.
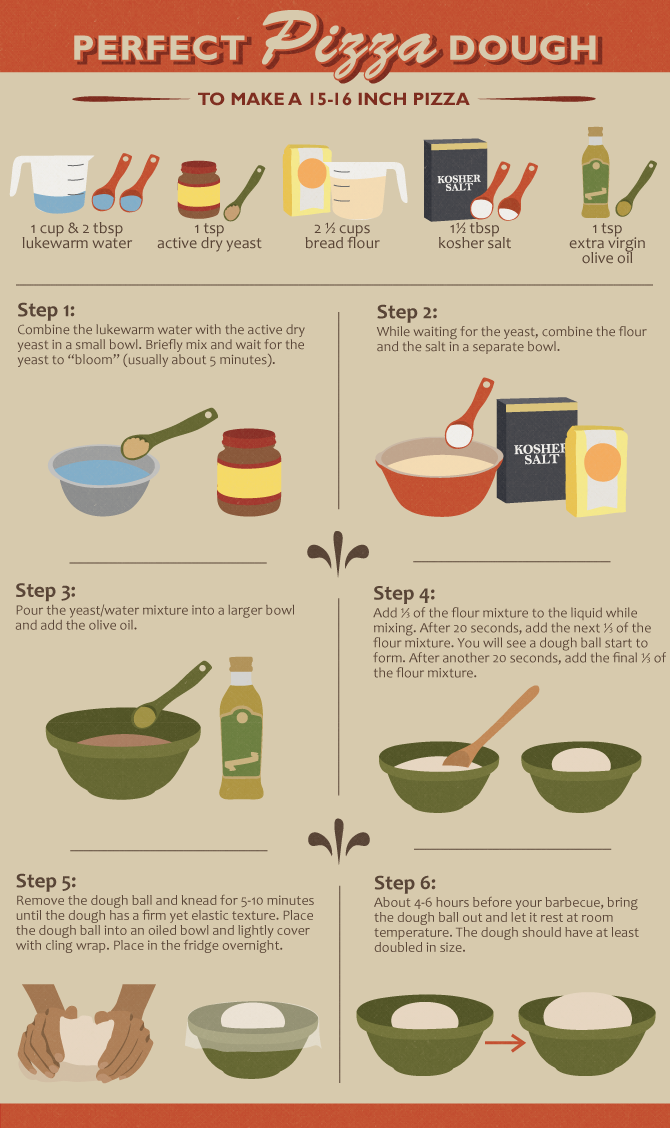
To make one 15-16-inch pizza dough ball, measure one cup and two tablespoons of lukewarm water and add one teaspoon of active dry yeast into the water. Briefly mix and wait for the yeast to “bloom”. Once you see a bubbly bloom rise up from the center, you can proceed with the next step. The bloom will usually take about five minutes.
While you are waiting, mix two-and-a-half cups of bread flour with one-and-a-half tablespoons of kosher salt. Pour the yeast/water mixture into another bowl and add one teaspoon of extra virgin olive oil. Add one-third of the flour mixture into the bowl while slowly mixing with a large wooden spoon. After about 20 seconds of mixing, add the next third of the flour mixture. You will see the dough ball starting to form. After another 20 seconds of mixing, add the final third of the flour mixture. Remove the dough ball and knead for five to 10 minutes on a sturdy clean surface until the dough has a firm yet elastic texture. Place the finished dough ball into an oiled bowl or container and lightly cover with cling wrap. Place in the refrigerator overnight (as many as two or three days is fine as well). About four to six hours before you barbecue, bring the dough ball out and let it rest at room temperature. The dough should have at least doubled in size.
Shaping the Dough
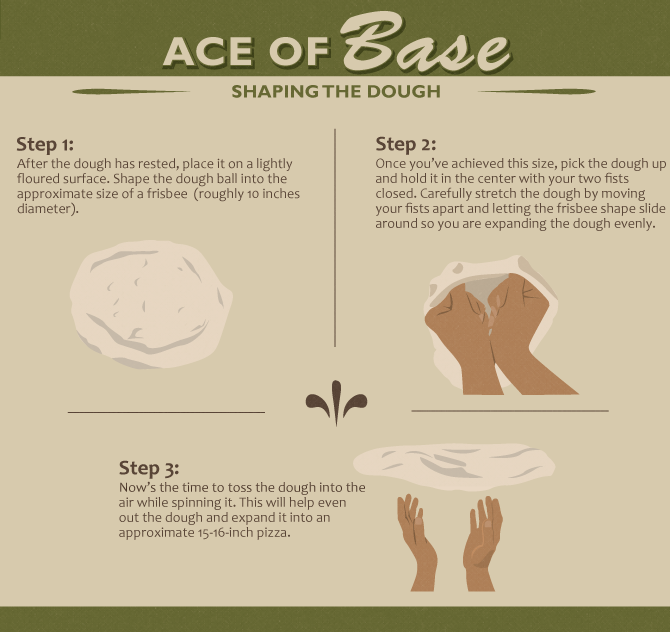
After the dough has rested, which will make it much easier to work with, place it on a lightly floured surface. While being extremely careful to not degas the “rim”, shape the dough ball into the approximate size of a frisbee. Once you achieve this size, pick the dough up and hold it in the center with your two closed fists. Carefully stretch the dough by moving your fists apart and letting the frisbee shape slide around so you are expanding the dough evenly around the circumference, while rotating. If you are feeling brave, now is the time to toss the dough up into the air while spinning it. This will help even out the dough and expand it into an approximate 15-16-inch pizza.
Once the dough is shaped into the appropriate size, with a defined rim and smooth flat center, place it on a lightly floured pizza peel and prepare the grill for one of the following three methods. When using the indirect heat method below, you will want to stretch the pizza dough into an oval shape. This will help keep the pizza on the indirect side of the grill, without coming too close to the charcoal.
Indirect Pizza
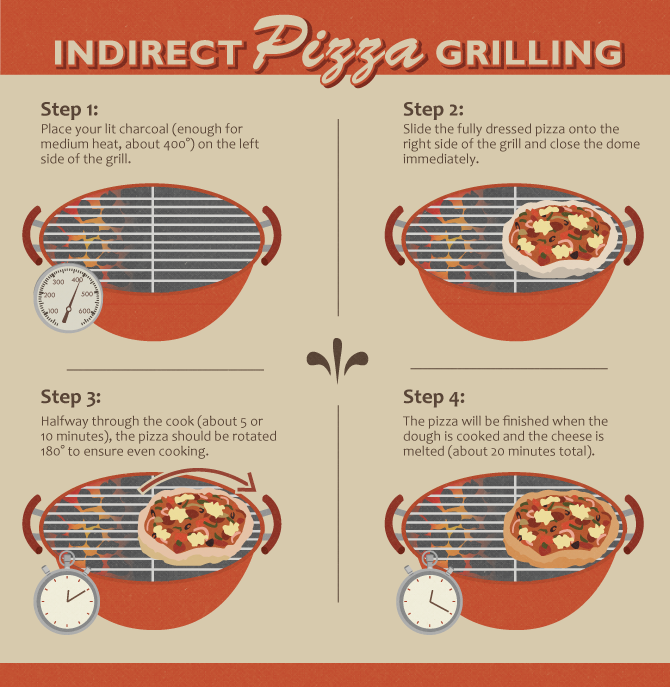
To cook pizza using the indirect method, place your lit charcoal – enough for a medium-heat grill at about 400 degrees – on the left side of the grill. Using a lightly floured pizza peel, slide the fully dressed pizza onto the right side of the grill and close the dome immediately. Halfway through the cook (about five or 10 minutes, depending on your heat) the pizza dough should be rotated 180 degrees to ensure even cooking. The pizza will be finished when the dough is cooked and the cheese is melted. This should take about 20 minutes.
Direct Pizza
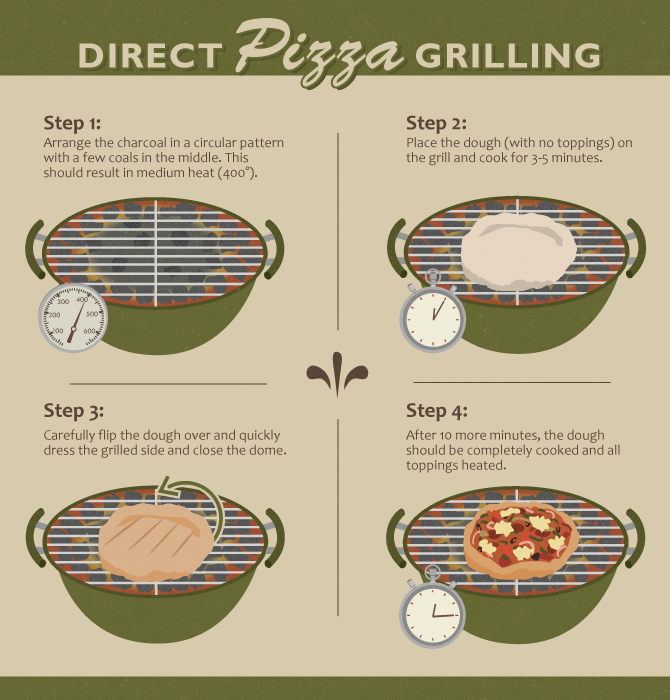
For this method, arrange the charcoal in a circular pattern within the entire grill, so more coals are positioned towards the circumference of the grill with just five or 10 coals scattered throughout the middle, under where the center of the dough will be placed. The amount of coal used should result in a medium heat of about 400 degrees. This method is different from the indirect method above, in that the dough with no toppings is placed directly on the grill grate until the bottom is cooked. Grill the dough for about three to five minutes and carefully flip the dough over using tongs or a pizza peel. Once the dough is flipped over, quickly dress the grilled side of the dough with sauce, cheese, and toppings, and close the dome. By the time the uncooked side of the dough is finished, the cheese will be perfectly melted and the toppings will be heated (about 10 minutes). This results in a crispy, slightly charred dough, because of the direct heat cooking method.
Using a Stone
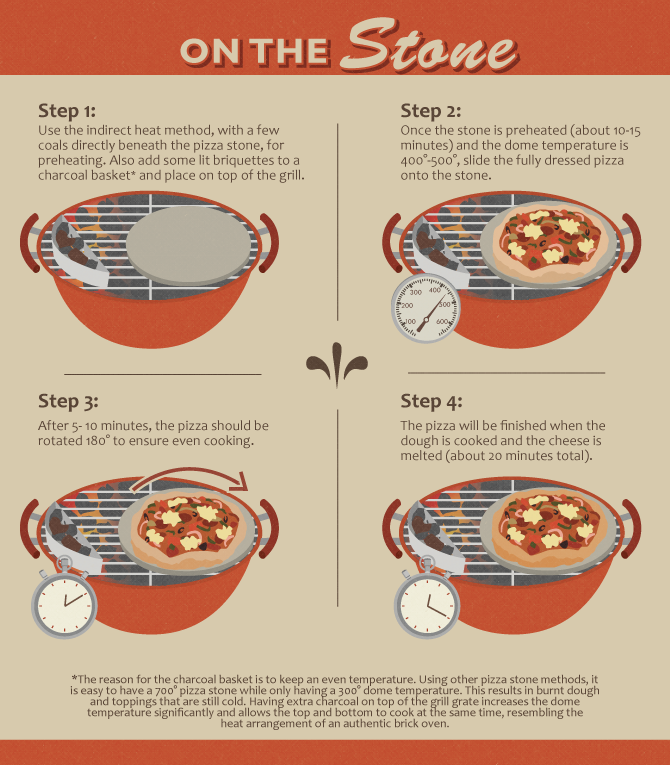
For this method, the best set-up is to have the pizza stone positioned on the right side of the grill. Your lit charcoal will be on the left side of the grill, with five to 10 scattered coals directly underneath where the pizza stone will reside. Additional coals will be placed above the grill grate on the left side. After the coals are arranged, reassemble the grill grate and place the pizza stone on top. Add a few of the extra lit charcoal briquettes to an indirect-heat charcoal basket and sit the basket directly on top of the grill grate, on the left side of the grill. Add about five to 10 unlit briquettes to this basket on top of the lit coals to allow the heat to continue for multiple pizzas.
The reason for this arrangement is that it overcomes a big problem that can arise when using a pizza stone placed in the center of a typical charcoal kettle. Using other pizza stone methods, it is easy to have a 600- or 700-degree pizza stone while only having a 200-300-degree kettle dome temperature. This results in burnt dough with cheese that isn’t melted and toppings that are still cold. Having extra charcoal on top of the grill grate increases the dome temperature significantly and allows the top and bottom to cook at the same time, resembling the heat arrangement of an authentic brick oven. Once the stone is preheated for about 10-15 minutes and the dome temperature is about 400-500 degrees, slide the fully dressed pizza onto the pizza stone by using a pizza peel. After about five or 10 minutes (depending on heat), rotate the pizza 180 degrees and quickly close the dome for another five or 10 minutes to finish cooking (10-20 minutes total).
Using the pizza grilling methods and charcoal arrangements described here will provide you with a lot of options for your grilled pizza cook-out. Each method has its own benefits. The indirect heat method is simple to set up and results in softer pizza dough with a mild charred flavor. The direct heat method relies on closer contact of the pizza dough with the charcoal fire, which results in a pizza dough that has a unique crunch and crispy charred flavor. The pizza stone method is the most authentic way to make a brick oven New York Style pizza on a charcoal grill. The pizza stone gives you the classic “floppy” New York pizza dough, with a bubbly charred rim and special grilled flavor.
Regardless of the method you choose, you can now skip the hot dogs and hamburgers at your next cookout and fire up some authentic grilled pizzas instead!
Embed the article on your site