The Real Rub on Ribs
There are few things more amazing than a juicy, perfectly cooked rack of ribs. They’re not the tidiest of foods to eat, but millions of Americans get their faces and hands covered in sticky glaze in the name of delicious barbecue flavors each year.
They’re easy to prepare and absolutely succulent.
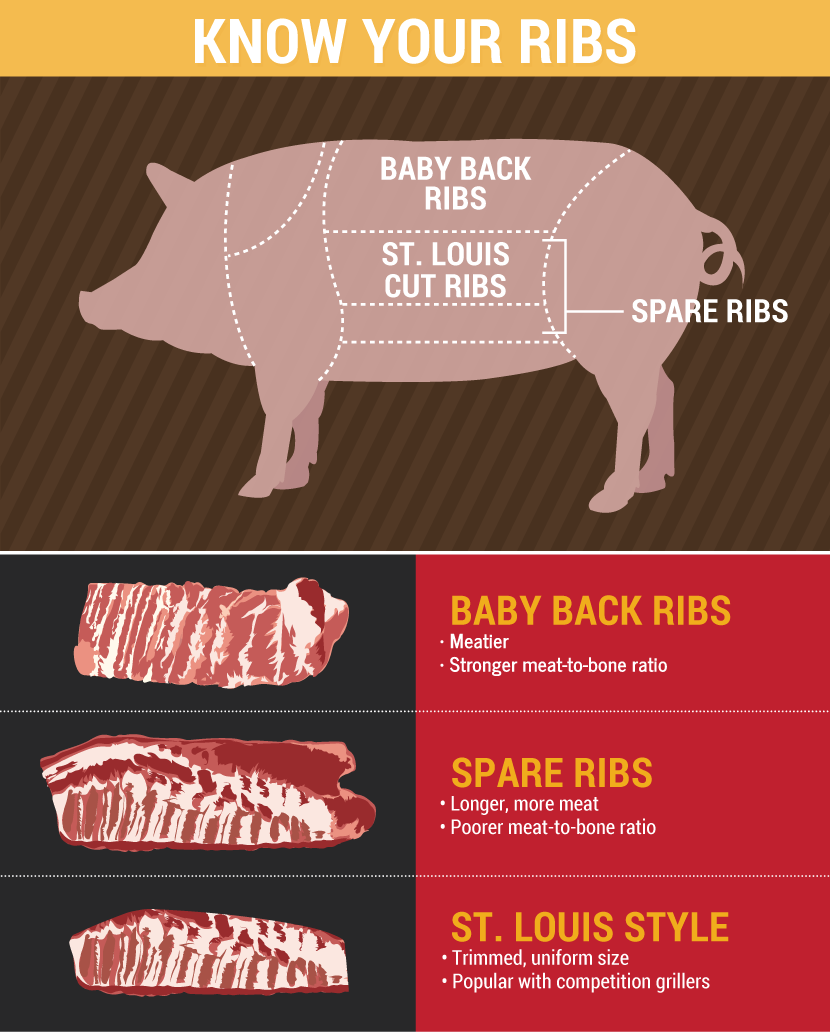
Before grilling ribs, you have to choose the type of rib you want to grill. There are essentially three kinds, although two are very similar. The first are baby back ribs or loin ribs.
They come from farther up the pig, high on the back. They are meatier than their spare rib cousins, with a stronger meat-to-bone ratio.
The spare ribs are from farther down the pig, on the sides, and are much longer than baby back ribs.
While they’ll equal more meat, that’s generally a by-product of the cut being altogether bigger, which means the bones are also bigger and thus the meat-to-bone ratio is worse. And finally, there are St. Louis-Style ribs.
These are really just trimmed spare ribs. Basically, the flap at the end of the slab is removed, along with the sternum and the meat connected to it, to make the slab uniform from one end to the other.
The uniformity makes this cut popular with competition grillers, as the ribs cook more evenly and look better in the turn-in box than traditional spares or the more curved baby back ribs.
By no means should you discard what is trimmed. These are called rib tips and are delicious.
Whichever rib you choose is up to you. Baby backs cost more but can be tenderer, while spares tend to add up to more meat, but also more bone.
No matter what ribs you choose, you must remove the membrane from the bone side of the rib before you think about any cooking. The membrane is chewy and will ruin a slab of ribs if left in place.
This is usually the hardest part of the process, but with a little practice it can be accomplished in a few seconds. First, you must get a good grip on the membrane.
Some use the tine of a fork, a chopstick, or even the blade of a butter knife to get under the membrane and get a grip. But the real trick is paper towels.
With paper towels in hand, grab the corner of the membrane near the bone, grip it, and rip it.
Literally just pull the whole thing back. It should come off in one piece, but if it doesn’t, grab the strip that remained with the paper towels and pull that section off as well.
On rare occasions the membrane just won’t come off. This happens, usually, with older hogs. Simply score the bejesus out of the membrane with a sharp knife. It’s not ideal, but it will reduce the chewiness a lot.

Time to season and grill. First, always season the ribs on the bone side first. Why? If the meat side is seasoned first,
then when the ribs are flipped over to season the bone side, the seasoning will stick to the cutting board and leave a naked stripe of unseasoned meat down the middle of the slab.
If you coat the bone side first, then when the slab is flipped over, the natural concave of the bones will keep the meat elevated off the cutting board and there will be no need to re-season the ribs.
To season, simply coat with a nice layer of coarse salt and your favorite rub on the bone side, then flip the ribs over and repeat on the meat side.
I prefer to leave the ribs on the cutting board for 10-15 minutes to allow the liquid in the meat to soak into the rub.
If the ribs go on the grill when the rub is still dry on the outside, the rub won’t really meld with the meat. Instead, it will be more like a bitter outer layer.
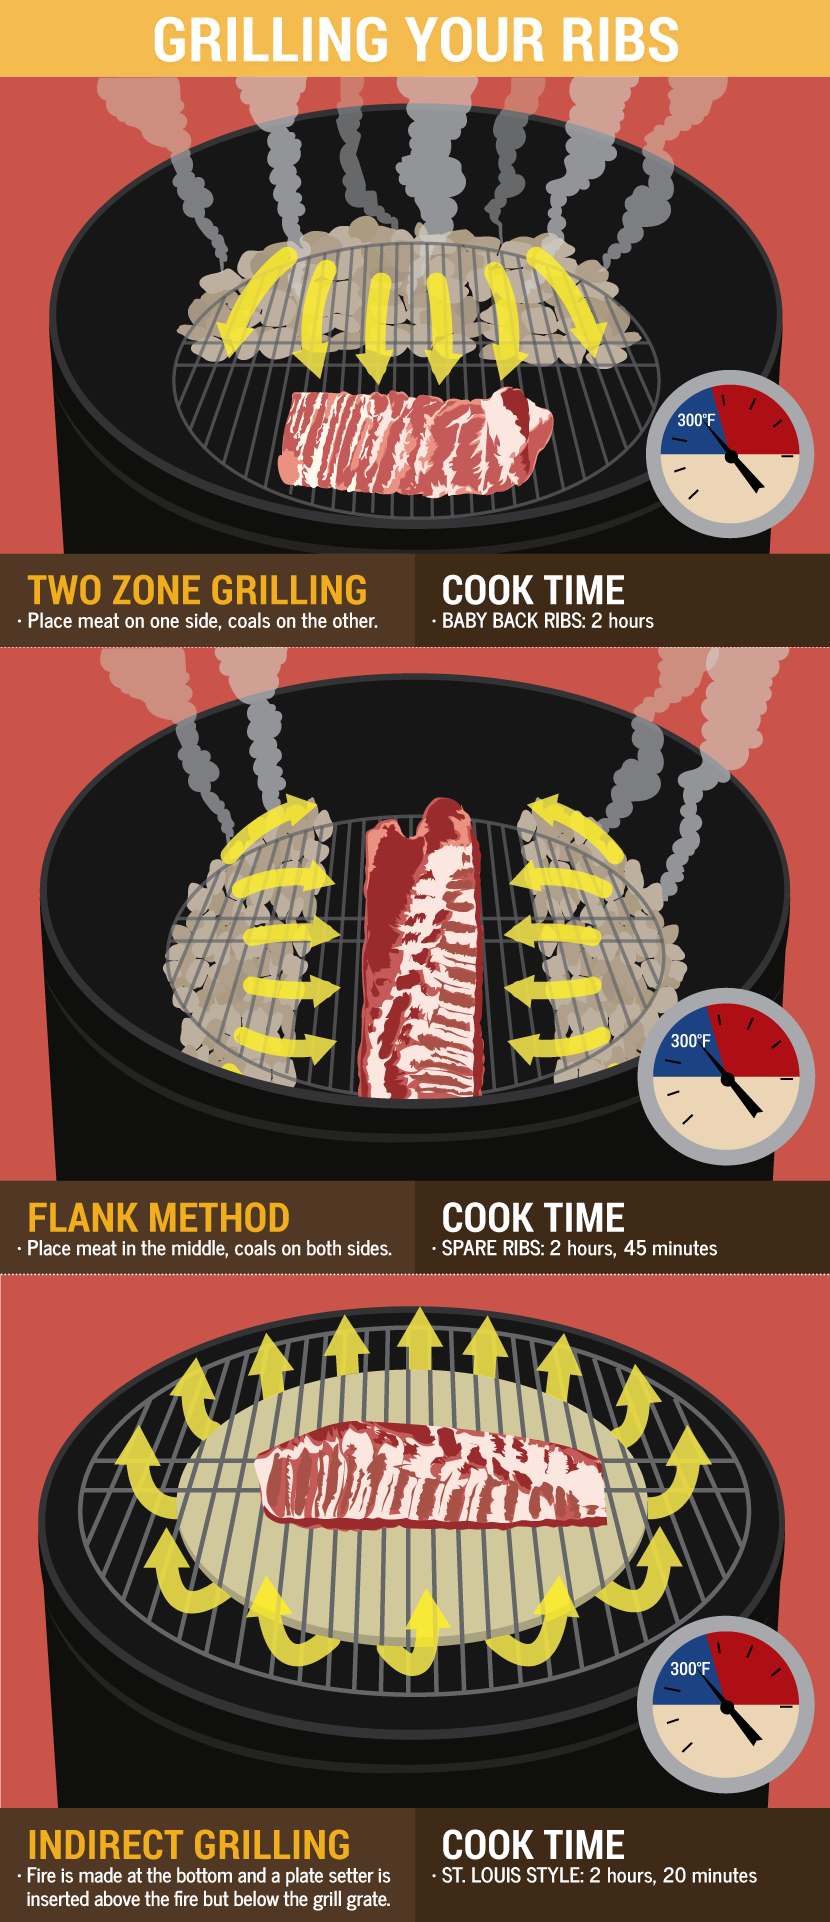
Ribs need to be prepared using the two-zone (or indirect) grilling method. What this generally means is charcoal and smoke wood one side and the meat, in this case ribs, on the other.
The meat cooks slow enough to break down all the connective tissue, but doesn’t burn. Another version of two-zone grilling on a charcoal grill is the flank method, as my father calls it.
With this method you place coals on either side of the grill and the meat in the middle. On the very popular kamado-style grills, the fire is made in the bowl at the bottom and a plate setter is inserted above the fire but below the grill grate.
The ribs are placed on the grill grate and the plate setter deflects the heat away from the meat, producing the same desired indirect effect: the ribs cook for a long time, but don’t burn.
On a gas grill, light the burners on one side and place the ribs on the other with the lid closed to achieve perfect indirect cooking.
The target temperature of the inside of the grill is 300 degrees F across all indirect rib-cooking methods. That sounds high to some people – most people go with 200-225 degrees F for longer periods – but try my hotter recommendation.
I have been grilling ribs at 300 degrees F for close to a decade now and I thoroughly recommend it.
When grilling ribs, there is a simple truth as to how to determine when they are done. When the meat pulls back from the end of the bone one-third to half an inch, the ribs are done.
Now, these are not fall-off-the-bone ribs. The bite is clean, but the bone doesn’t come out with a simple tug. For baby back ribs, it takes about two hours, but remember to watch the meat and not the clock.
Two hours is just a guide to know when to be checking for that “pull back.” For full spares it’s 2.5 to 2.75 hours or so. For St. Louis-style, it’s somewhere in between.
This all depends on the heat of the grill, weight of the ribs, weather conditions, and various other factors. So always watch the bones and not the clock. The clock is more of a guide than a rule.
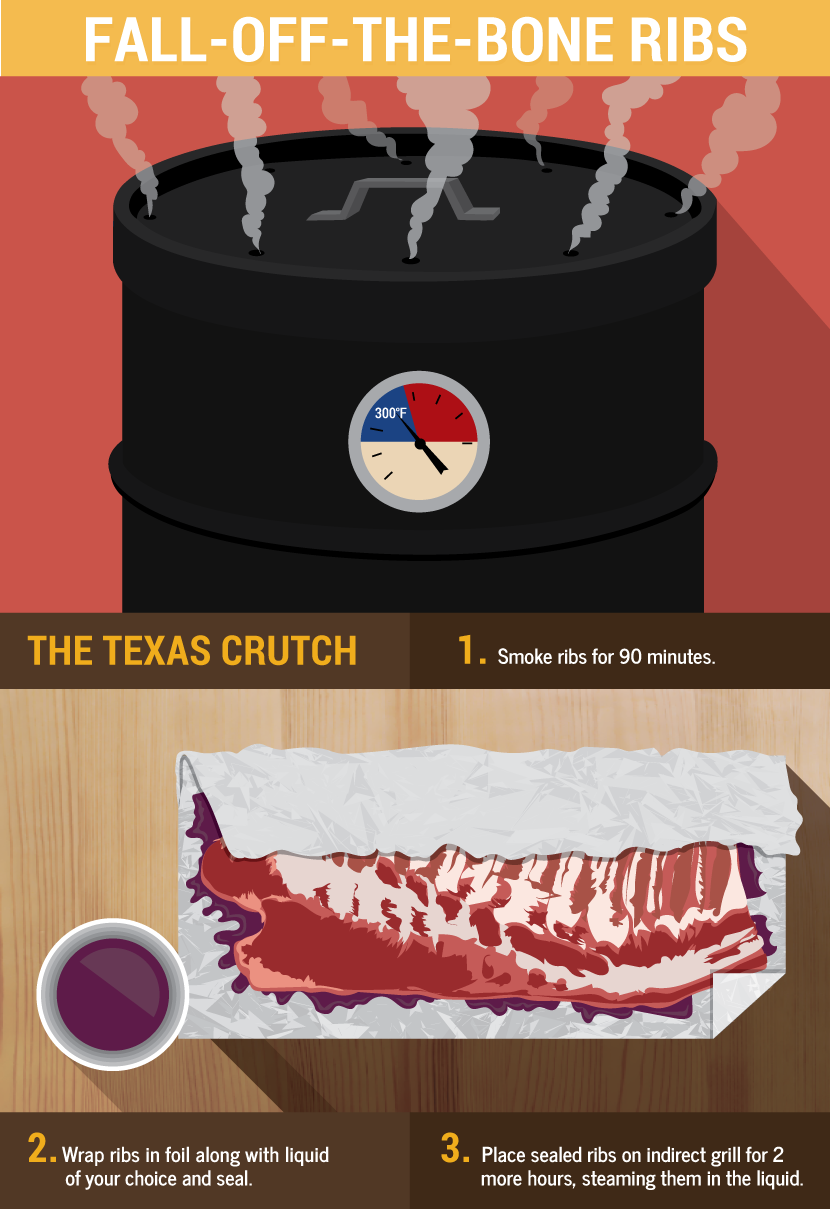
Now for you fall-off-the-bone lovers, try the Texas Crutch method.
Smoke the ribs for 90 minutes (the timing doesn’t really change whether they are spares, baby backs, or St. Louis-style) and then place the ribs on a big sheet of foil and add some liquid before sealing them in the foil.
The liquid could be honey, syrup, barbecue sauce, beer, wine, or even butter or margarine. Place the foiled ribs on the grill for an hour.
Inside that foil, the ribs are going to steam in the liquid and their own juices, hyper-accelerating the breakdown of connective tissues.
When the hour is up, there will be significant meat pull-back and the rib bones should pull out with just a little tug.
Now is the time to take the ribs to the next level and bust out the blowtorch.
This will take your cookout guests from saying, “I had some pretty good ribs this weekend,” to “You’re not going to believe the ribs I had this weekend. One word: blowtorch.”
There may not be a better conversation-starter in the world than a blowtorch.
You could sneak out to the grill full of ribs just about ready to eat, not say a word to anyone, crank up that concentrated flame and everyone within audio or visual range will be standing right next to you asking, “What’s up with the blow torch?”
To which you will reply, “Just some tip I picked up online. Watch and learn.”
Remove the ribs from the grill before torching them, and be careful handling that tool.
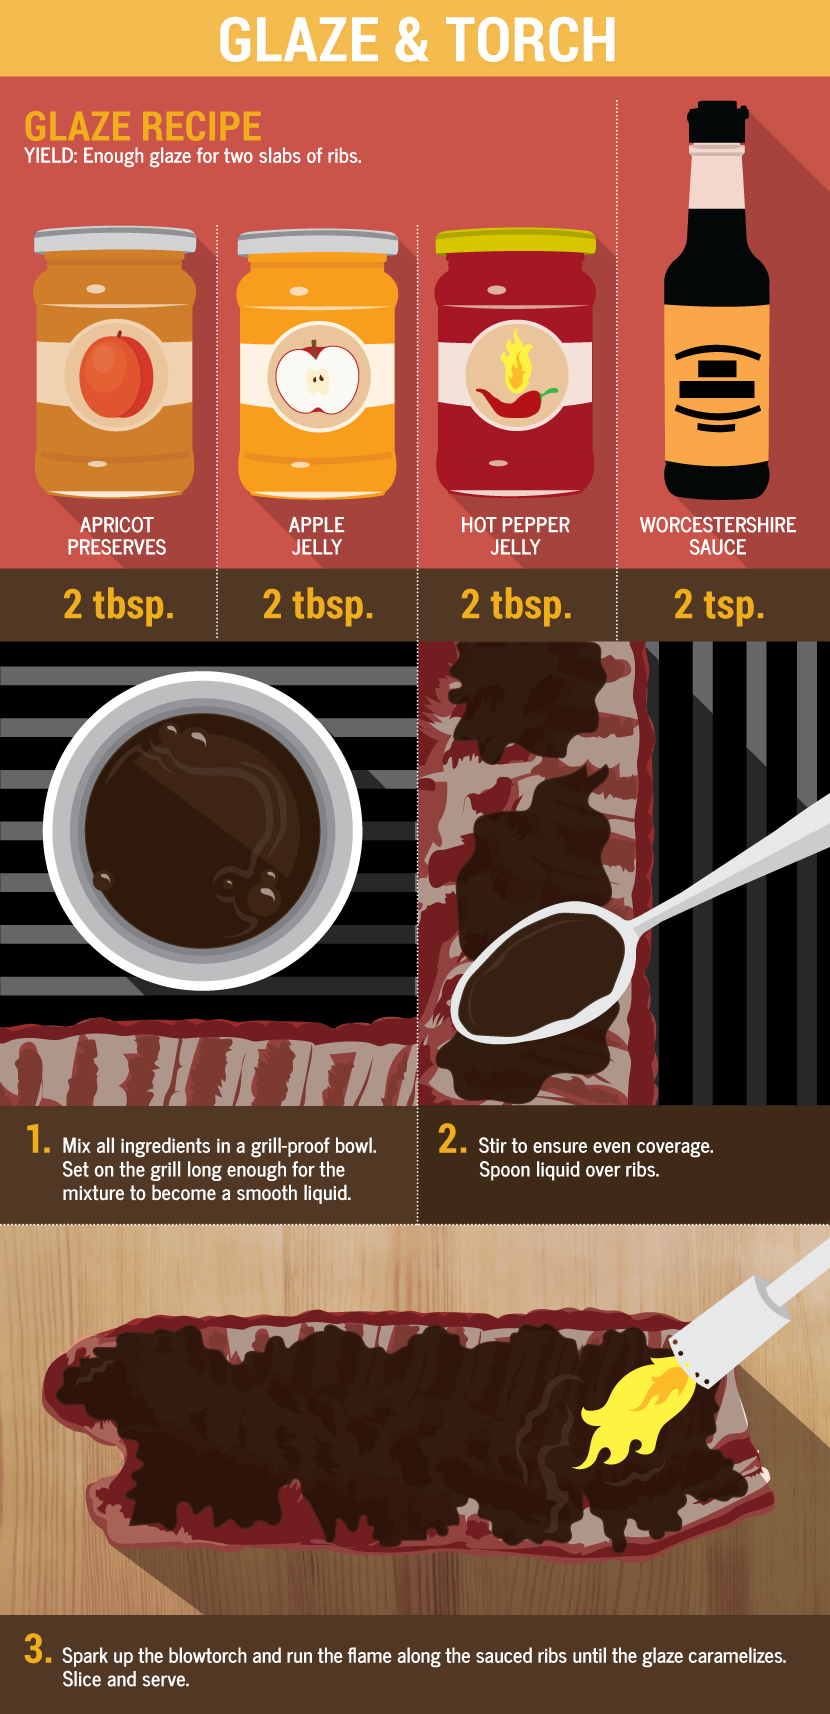
Once you’ve blasted your ribs into a state of pure perfection, you’re ready to slice and serve. Now’s the time to sit back and bask in the glory of the praise handed down by your guests. Try to be humble.
Embed the article on your site