Hot Hints for Growing Chili Peppers at Home
Chilies make a beautiful and satisfying crop. The colors are stunning: reds, purples, yellows and oranges, and there is a chili to suit every taste, from the delicate and fruity to the heart-stoppingly fiery. You can grow them all yourself as long as you can find a sunny corner for them. They are great plants for growing in pots on a warm patio, and will be even happier in a conservatory or cool greenhouse.
Hot History
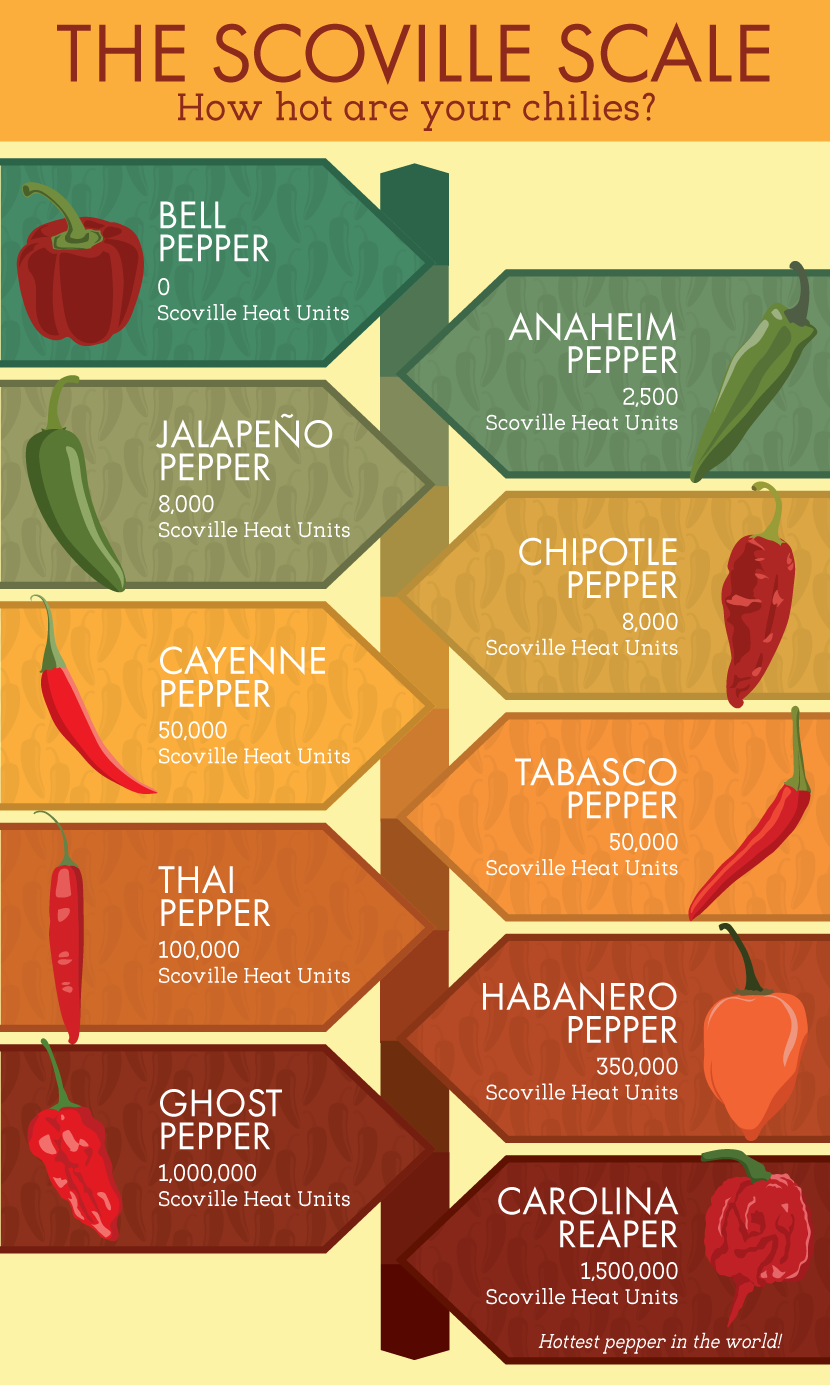
Chili peppers, or "chilli peppers" in the UK, originated in South and Central America, traveling to warm parts of Europe and Asia from around the 16th century onwards. They have become a huge part of many Asian cuisines and varieties have developed independently wherever they are grown. Chilies contain natural chemicals called capsaicinoids, which when eaten, cause a burning sensation. Increased heart rate, perspiration, and a rush of endorphins follows. The heat of a chili pepper is measured on the Scoville Scale, a method of measurement created by American pharmacist Wilbur Scoville in 1912. The test is not entirely accurate, depending as it does on whether the heat in dilutions of the particular chili can be detected by a panel of tasters (the higher the figure, the higher the dilution at which it was sensed), but it gives a rough idea of the pepper’s relative fieriness.
Growing Chilies
Chilies are not the easiest plants to grow, but if you can master their cultivation you will have grown a crop that is packed full of flavor and that will improve a wide array of meals. The problem for many growers is that chilies originate from such warm places, where the season is long and hot and the plants have more time to grow, flower, fruit, and ripen.
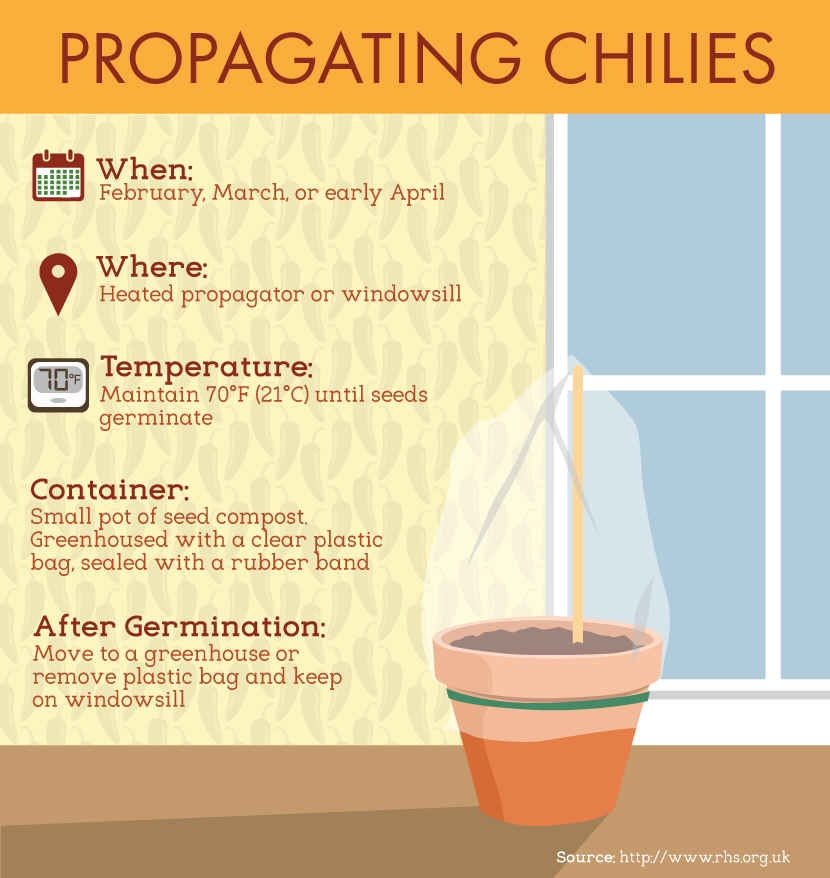
Those of us who can’t expect these kinds of conditions have to use a few tricks to fool them into flourishing. These tricks are designed to lengthen the season, even where the season is naturally short and cool. Start sowing early in the year. It feels like an odd time to be sowing the seed of such heat lovers, but they really do need to be sown in February or March if you hope to see many fruits. The need for heat starts early; your seeds will struggle to germinate if they are in a cool or temperature-fluctuating environment. A heated propagator creates the perfect environment. These small closed cases are cheap to buy and to run. They are plugged into an electrical outlet and emit a gentle but constant heat that seeds find irresistible. If you don’t have a heated propagator, then a sunny windowsill may be your next best bet, though the fluctuation between night and day temperatures is not ideal, particularly on cold nights. You may get better results if you move your pots of seeds to a warmer spot at night.
Once you have germinated seedlings, pot them up into individual pots and keep them somewhere warm and sunny. A greenhouse or a conservatory is ideal but if you have neither of these, then a sunny windowsill will do until the weather warms. It is important to pot your chilies into larger pots regularly: other plants such as tomatoes and cucumbers make it obvious when they need to be potted on, growing leggy and over-balancing their little pots, but chilies do the opposite – they sit and wait for a bigger pot before they grow. So keep on potting on and prompt them into growth. Their final pot should be generous. You can also plant them directly into the ground in polytunnels and greenhouses.
When all chance of frost has passed and the weather is reliably warm, you can plant the chilies out in the open ground. Ideally they should be protected from cold nights by a glass cloche. All plants that have been started indoors will need a period of hardening off to slowly get them used to being outdoors. Start with a few hours outdoors during the day for a few days, then leave them out a full day, followed by a day and night as long as they are well protected. Chilies should not be outdoors unprotected at night until June, and even then, they will be happier with night-time protection.
The Five Chili Species
Domestic chilies are cultivars originating from 5 species
1. Capsicum annuum (e.g. Jalapeno, Chipotle, Cayenne)
2. Capsicum frutescens (e.g. Tabasco, Thai)
3. Capsicum chinense (e.g. Habanero, Ghost Peppers, Carolina Reaper)
4. Capsicum pubescens (e.g. Rocoto)
5. Capsicum baccatum (e.g. Aji)
With luck and a sunny summer your plants will grow happily. Don’t be tempted to prune them – some gardeners nip out the first shoots to encourage their chilies to bush out. There is really no need and you will just delay the development of the first fruit. They have a naturally bushy habit, so let them develop it. However, they may not prove to be entirely self-supporting as they grow, and can benefit from having a stout cane pushed into the ground near the base. Tie the main stem to the cane to prevent toppling.

Keep plants reasonably well watered over the summer (but not waterlogged) and start feeding with a high-potash fertilizer once the flowers appear. A high-potash fertilizer is one that encourages flower and fruit production. Tomato fertilizers are good examples and will work perfectly for chilies. It is worth feeding your plants with them regularly, at least once every week.
Once the fruits start to ripen up, you have the choice of whether to leave them on the plant to grow to their full sweetness or remove them and encourage more fruits. Those removed will carry on ripening, but they do it best on the plant. You have a race to ripen: just as seedlings need protecting at the beginning of the season, so will plants be affected by the colder weather towards the end. In a greenhouse or conservatory, plants will go on into autumn but outdoors they will start to suffer. Any fruits that are hit by frost will turn to mush. Protect outdoor-grown plants with horticultural fleece or cloches, and carry pot-grown plants indoors to a sunny room.
Drying Chilies
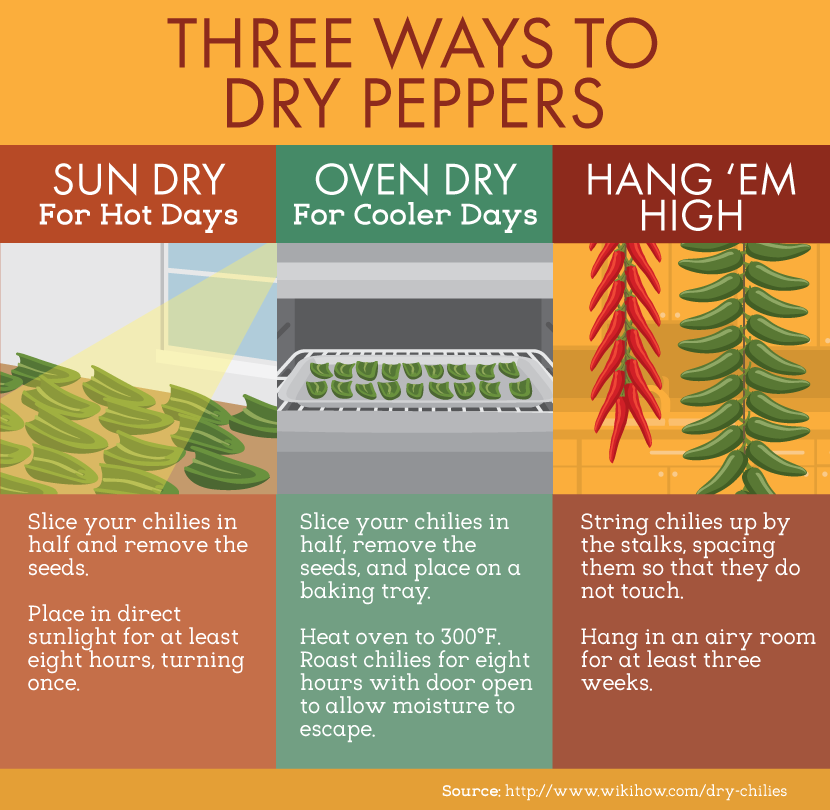
One great way to preserve chili peppers is to dry them out. Drying works best with waxier peppers, and they will stay for years. You can also pickle your peppers, make jellies, and more! Below, we cover three awesome ways to dry your chilies.
Once the fruits start to ripen, the real fun begins: you will have chili con carne and curries to your (slightly faster-beating) heart’s content, and the knowledge that you grew the most important ingredient yourself.
Embed the article on your site