Conducting Your Own Easy Electrical Repairs
There Are Ample Reasons Not to Immediately Call the Electrician
Homeowners who are comfortable with the hardest of home fixes often freeze in fear at the prospect of working on their electrical systems. Hammers and reciprocating saws, clouds of sawdust, and falling timbers – these come nowhere close to the terror caused by thoughts of arcing electrical sparks and electrocution.
Yet basic electrical problems are easily and safely fixable by most homeowners. Here is why.
Why DIY?
You would hire a repair shop to take on the difficult task of fixing your car’s tie rod ends or overhauling the engine. You could also ask the shop to change the oil and filter.
Purely for the sake of convenience, you might pay for this service. But both are owner-friendly fixes that you can accomplish in your driveway with simple tools.
Basic electrical repairs are the same way. You can hire an electrician for the sake of convenience, but if you wish to save money and time, you might consider doing these tasks by yourself with low-cost tools.
Here are four reasons why:
- Electricians are not cost-effective for small jobs: To replace an electrical outlet, an electrician will charge as much as $149 for two hours of service. Electrical outlets cost anywhere from $5 to $14 per unit. This means that, on the high end, the electrician is charging more than 10 times as much for labor as he is for the materials.
While it may be cost-effective to hire an electrician for large jobs, such as running new wires or installing a service panel, it is simply not worth it for small jobs. http://www.homewyse.com/services/cost_to_replace_electrical_outlet.html
- It is safe: As long as the circuit breaker to the outlet or light is flipped off – and you have double-checked this with a voltage tester – you can work on those items in complete safety.
- It is logical: Electrical work follows established procedures. As long as you follow directions, your work will turn out perfectly fine.
- It saves time: Any of the fixes shown below may be completed in less than half an hour – about the time it takes to search for capable local electricians and set up an appointment.
Safety Procedure
For all fixes described below, follow these safety procedures:
- Turn off the circuit breaker: Locate the service panel and flip off the circuit breaker related to the circuit you will be working on. Handwritten notes are often found on the inside of the panel door. These can be helpful, but you should not entirely rely on them, as circuits may have been changed without the notes being updated.
- Test the tester: At a known live outlet, turn on the voltage tester and slide the flat end into any of the outlet slots. The tester should beep or flash, indicating that the outlet is live.
- Check outlet or light switch with tester: Go to the outlet you intend to work on. Turn on the voltage tester and slide the flat end of the tester into the outlet slots. The tester should not beep or flash. For switches, you will need to first remove the switch and then touch the tester to the sides of all wires to ensure that none are live.

Troubleshoot a Faulty Electrical Outlet
You have plugged your tablet into an outlet, yet two hours later, the tablet still has not taken on a charge. What gives?
Assuming that the device works properly, the outlet is the problem. Follow these steps to figure out why:http://www.familyhandyman.com/electrical/wiring-outlets/troubleshooting-dead-outlets/view-all
- Check to see whether the outlet is switch-controlled and that the switch is on. Some outlets turn on or off via wall light switches. Do not assume that “up” means on. In some cases, the direction may be reversed.
- Is this a ground fault circuit interrupter (GFCI) outlet? Usually located in bathrooms and kitchens, GFCIs are easily identified by the small switch located on the outlet. Press the switch to see whether this restores power.
- If other outlets along the wall are dead, the entire circuit may be dead. A circuit is a single line of wire starting at the service panel and running through the house to serve multiple outlets. If all outlets are dead, go to the service panel, locate the corresponding circuit breaker, and flip it back and forth once.
- A little-known troubleshoot is to look for conventional outlets that are controlled “upstream” by a GFCI. Along a single circuit, a GFCI outlet may be the first (i.e., closest to the service panel) in a series of conventional outlets. That lone GFCI will trip off the entire circuit, shutting down all outlets “downstream.” Locate the GFCI that may be the first in this circuit and press the on/off button to reactivate it.
- If all else fails, wires that attach to the outlet are loose or the outlet itself has failed. Conventional outlets rarely fail. However, GFCIs, being more delicate, are prone to failure and sometimes need to be replaced.
Replace an Electrical Outlet
Replacing an electrical outlet is intuitive because you will be switching out wires on a one-for-one basis. Wherever a wire is attached on the old outlet, it will be attached in the same location on the new outlet.http://homerepair.about.com/video/How-to-Replace-a-Wall-Outlet.htm
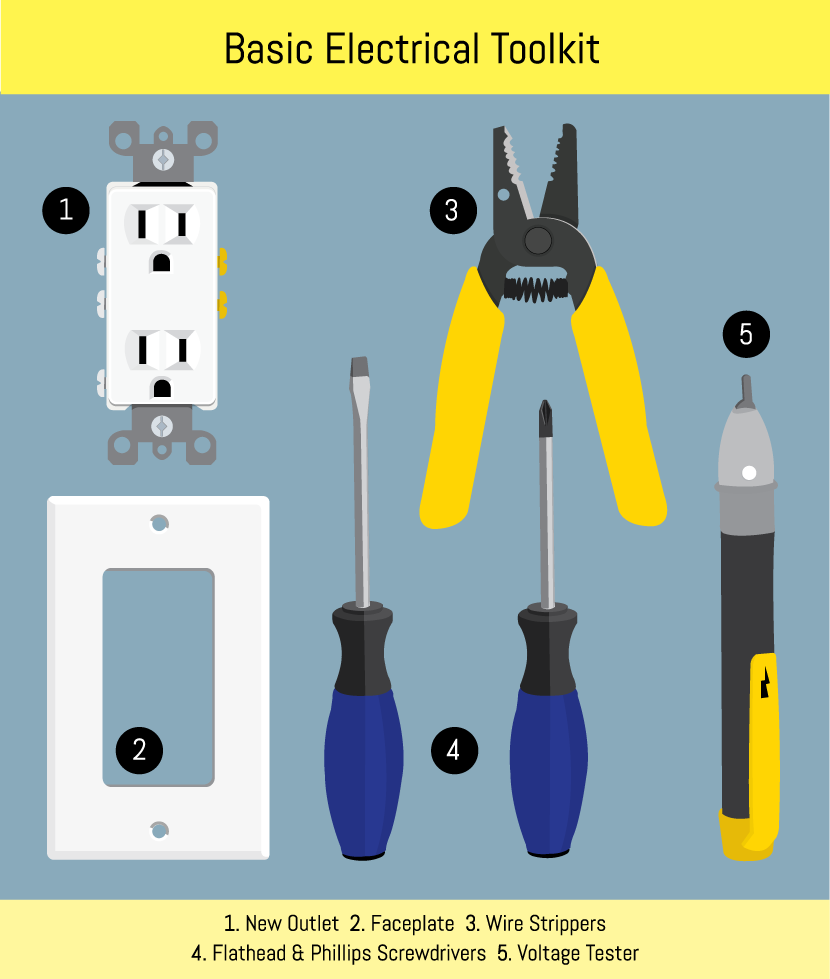
Tools and Materials Needed
- New outlet
- Outlet faceplate (often comes with the outlet, but you can also buy them separately)
- Flathead and Phillips screwdrivers
- Wire stripper
- Voltage tester
Procedure
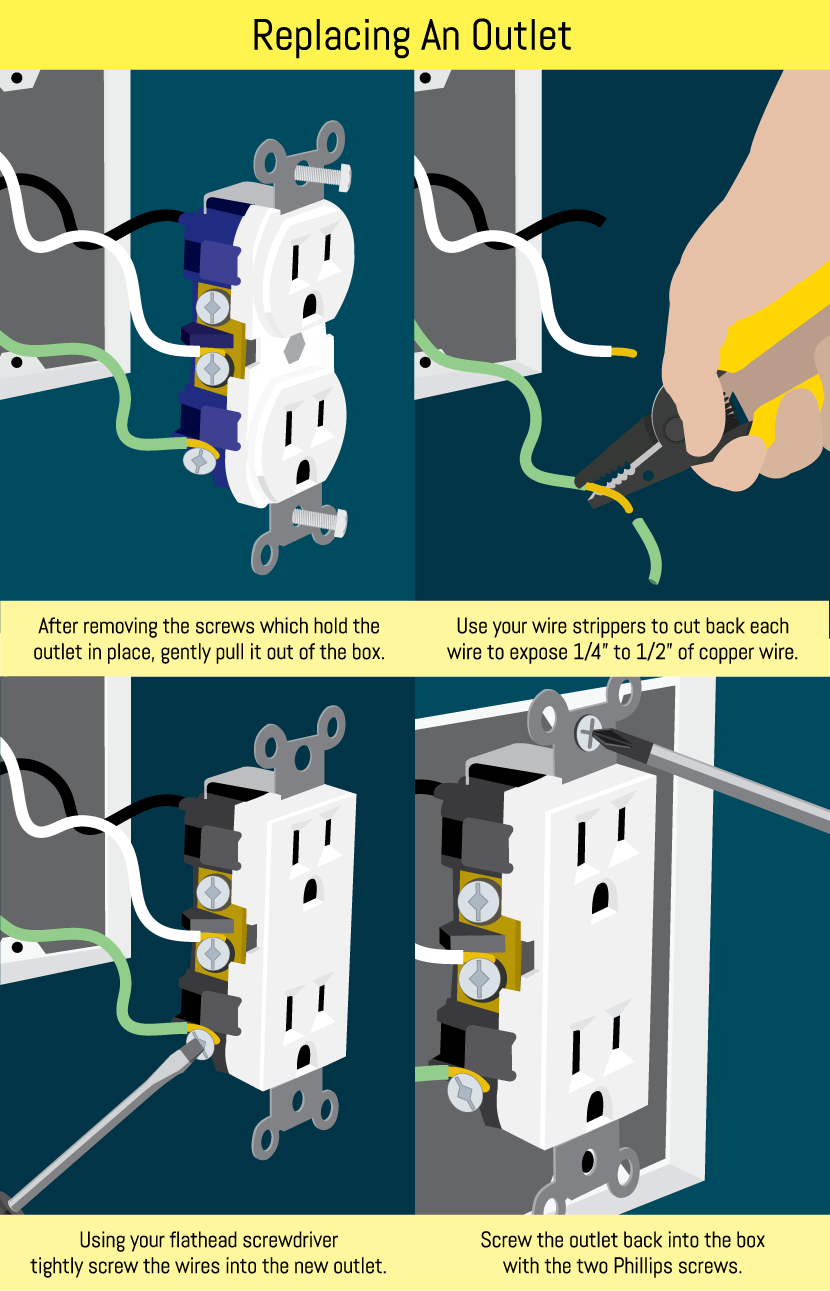
- Follow the Safety Procedure detailed earlier.
- Use the flathead screwdriver to remove the single screw holding the faceplate in place.
- Use the Phillips screwdriver to remove the two screws holding the outlet in the box. This may be difficult because outlet wires may be crammed into the box. Gently pull the outlet straight out.
- Take note of where each wire is attached. Removing all wires at once may prove confusing when you want to reattach them to the new outlet. The solution is to remove one wire, attach it to the new outlet, and then move onto the next wire. Take this opportunity to cut back the ends of the wires down to the plastic casing and re-strip them, exposing about 1/4” to 1/2” of copper wire.
- Tightly screw the wires into the new outlet. You may either insert wires into the little holes in back of the outlet (a process called back-wiring) or loop them around the screws on the sides of the outlet (a process called side-wiring). Either method yields the same results.
- Screw the outlet back into the box with the two Phillips screws. Finish off by screwing the faceplate into place. Be careful not to over-tighten the faceplate screw, as these tend to break easily.
Troubleshoot a Faulty Wall Switch
Overhead lights, wall outlets, garbage disposers, and exterior lights are commonly controlled by wall switches. What if you flip the switch and nothing happens?
We will assume that you have tried the most obvious fix: changing the light bulb. Next, make sure that the light or device is not controlled by two switches.
If the device is a garbage disposer, look under the sink and check the side of the unit for a fuse button that may pop out if the device overloads. Press the fuse button in and try the wall switch again.
After that, your problem is usually with the switch. Traditional knife-style switches rarely go bad. But with the advent of rocker and internally lighted switches, this device has become more complicated and thus more prone to failure.http://homeguides.sfgate.com/troubleshoot-faulty-wall-switch-29112.html
Replace a Light Switch
Like outlet replacement, light switch replacement involves connecting wires on a “like-for-like” basis.
Either change out wires one at a time between the two switches or record the positions of the wires by tabbing them with masking tape and noting their positions.http://www.dummies.com/how-to/content/how-to-replace-a-light-switch.html
- New switch
- New switch faceplate
- Flathead and Phillips screwdrivers
- Wire stripper
- Voltage tester
Procedure
- Follow the Safety Procedure listed earlier.
- Use the flathead screwdriver to remove the two screws holding the faceplate in place.
- Use the Phillips screwdriver to remove the two screws holding the light switch in the box. Remove the switch by pulling straight outward.
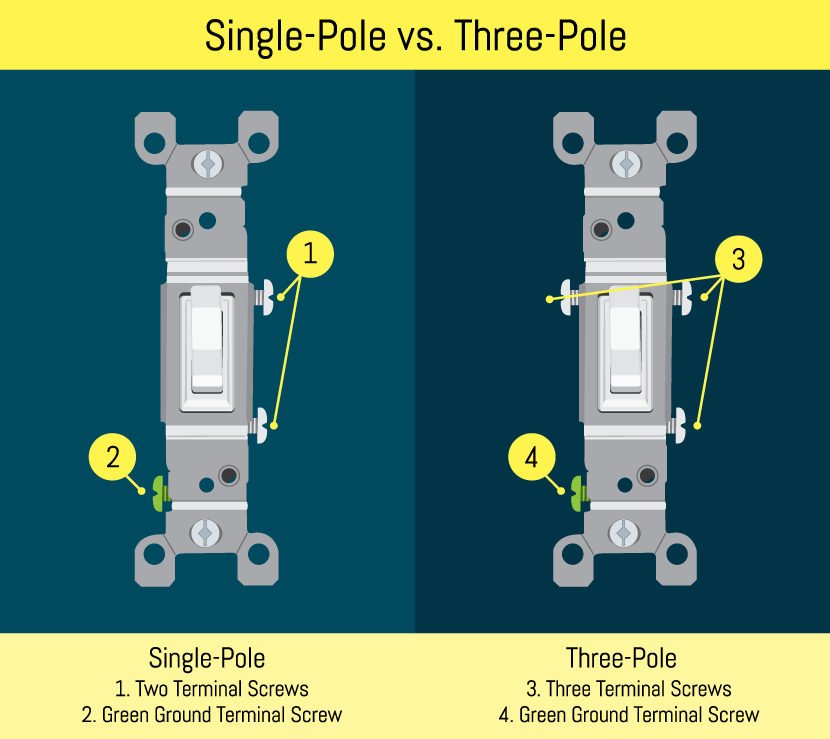
- Make sure that gold and silver screws on the old and new switches correspond. It is easy to accidentally buy the wrong type of switch. A single-pole switch is the most common type, and it alone controls one device. Along with the green ground terminal screw that is common to any switch type, the single-pole switch has two terminal screws.
In contrast, a three-way switch controls one device from either of two switches. A common set-up is for two switches at opposite ends of a room to control one overhead light. Three-way switches have three terminals in addition to the green ground terminal.http://homerepair.about.com/od/electricalrepair/ss/switch_types_1.htm
- Take note of where each wire is attached. It is critical that wires connect in the same fashion because you may accidentally wire a switch backwards (so that down turns the light on and up turns the light off).
- Cut back exposed ends of the wires down to the plastic casing. Re-strip them, exposing about 1/4” to 1/2” of copper wire.
- Tightly screw the wires into the new switch.
- Screw the switch back into the box with the two Phillips screws.
- Screw the faceplate into place, taking care not to over-tighten the screws.
Basic electrical problems such as faulty outlets and wall switches can easily be fixed by the homeowner without the aid of an electrician.
Homeowners who call in electricians for these fixes are only doing themselves a disservice because of the high labor costs associated with licensed tradesmen.
Embed the article on your site