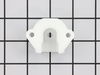
This ball-and-socket style bearing kit is used in your dryer to support the rear of the drum as it tumbles through the dry cycle. The bearing attaches on the inside of the rear panel of the dryer cabi...
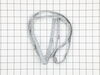
The drum belt, also known as a drive belt, is a rubber piece that wraps around the dryer drum, idler pulley, and motor pulley and is used to make the drum rotate. If you can hear the motor running, bu...
The drum support bearing is an authentic OEM replacement part for your dryer. The bearing is used to support the drum and allow it to rotate smoothly and quietly. If your dryer is excessively noisy wh...
If your dryer has little to no heat, there may be an issue with your heating element assembly. The heater element is a genuine OEM part that is found at the back of the dryer. The heating element come...
This thermal fuse limiter is used in dryers to monitor the temperature and make sure it does not overheat. The thermal fuse has a limit of 220 degrees Fahrenheit before the heating element and power a...
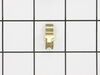
This door catch is an authentic OEM replacement part for your dryer. This part holds the door strike and ensures that the door stays closed while your dryer is running. This prevents hot air or laundr...
This high limit thermostat has a limit of 260 degrees Fahrenheit. Meaning that it will cut out when the internal dryer temperature reaches 260. This thermostat cuts back in when the temperature drops ...
Ask our experts a question about this part and we'll get back to you as soon as possible!
2 questions answered by our experts.
< Prev
1
Next >
Sort by:
Search filter:
Clear Filter
Your search term must have 3 or more characters.
Keep searches simple. Use keywords, e.g. "leaking", "pump", "broken" or "fit".
Sorry, we couldn't find any existing answers that matched. Try using some different or simpler keywords, or submit your new question by using the "Ask a Question" button above!
Dennis
August 29, 2022
The dryer runs for a short time then stops. I got error code r08. I was going to order a circuit board, but would like to make shur that is what it will take.Thank you
For model number AEQ6000ES2
Hey Dennis, thank you for your inquiry. We have researched your model and found that if you are getting error code r08, then this might be caused by a faulty control board. We recommend you change the control board, part number FIX12728777. If you require assistance to place an order, please contact customer service. We hope that helps!
Drying stops prematurely. The display shows two dots on opposite sides of each other running along the out edge of the display in a clock-wise pattern and then it stops.
If the dryer is started back up right after this occurs, it shuts down within 5 seconds. If you wait about 20 minutes to start it back up, the dryer will run for about 10 minutes before it stops prematurely once more.
For model number AEQ6000ES2
Hi Nate, thank you for reaching out. Based on the description, the issue is with the control board, part number FIX12728777. It manages the functions of the dryer such as drying time and temperature. We would recommend replacing the control board to fix the issue. We hope this solves your problem!
1. Unplug dryer from outlet 2. Using Lg. flat screwdriver, pry under the front edge of the top and release two spring tabs 3. Lift up top and tilt back out of your way 4. Unscrew two phillips scews on inside of front panel 5. Lift up and out the front panel. Two spring clips at bottom. 6. Rlease tension on drum be
... Read morelt at the motor. Access panel at rear of dryer. 7.Unscrew 3 screws from inside, center rear of drum. 8. Remove drum through the front of the dryer. You may have to spread the sides apart a little bit for it to fit 9. Lift up on the rear drum bearing to remove it from the bearing retainer. ( U shaped plastic socket) 10. unsrew 2 screws and remove the bearing retainer, ground ball. Ball retainer is on outside of dryer. 11. Vacuum everything--duct, blower, lint trap, ect. 12. Intall new bearing retainer and grounding ball, an assistant is helpful at this time, one to hold ball retainer on rear of dryer, one to screw it in from the inside 13. reassemble remainder of parts in reverse order.
Unplugged Dryer. Opened top of Dryer, over the drum. Removed Thermal Limiter. Tested the Thermal Limiter - found it was open. Checked all vents and exhaust tube for lint build-up. Replaced Thermal Limiter. Closed top of dryer. Plugged Dryer back. Tested Dryer - it works.