The thrust spacer is a genuine OEM part that is more commonly known as a retainer ring. The spacer is made of white plastic and measures approximately 2.5 inches in diameter. This part is found in bet...
In Stock
Order within the next 9 hrs and your part ships today!
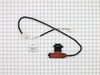
The lid latch is a safety feature found in your washer. Its purpose is to stop the machine from spinning when the lid is opened. You may need to replace the lid latch assembly if your washer will not ...
In Stock
Order within the next 9 hrs and your part ships today!
This agitator repair kit comes with a long cam, a thrust spacer and four dogs ears (agitator cogs). This repair kit is used to move the upper agitator and it connects the base of the agitator with th...
In Stock
Order within the next 9 hrs and your part ships today!
The suspension rods help to keep the tub in your washing machine stable and secure while cycling through your laundry. If your washer is excessively vibrating, moving around, or very loud when operati...
In Stock
Order within the next 9 hrs and your part ships today!
If your washing machine is shaking, noisy, or moves while operating, you may need to replace the suspension rod supports. These supports are used to secure the suspension rods, which help ensure that ...
In Stock
Order within the next 9 hrs and your part ships today!
This part is the replacement lid latch or latch assembly for your top-load washer. The lid latch holds your washer door closed, and allows the washer to run its cycle. If the lid latch is damaged, you...
In Stock
Order within the next 9 hrs and your part ships today!
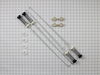
The drain hose carries used water from the washer to your house drain.
In Stock
Order within the next 9 hrs and your part ships today!
Questions and Answers
Ask our experts a question about this part and we'll get back to you as soon as possible!
1 question answered by our experts.
< Prev
1
Next >
Sort by:
Search filter:
Clear Filter
Your search term must have 3 or more characters.
Keep searches simple. Use keywords, e.g. "leaking", "pump", "broken" or "fit".
Sorry, we couldn't find any existing answers that matched. Try using some different or simpler keywords, or submit your new question by using the "Ask a Question" button above!
Laurie
April 13, 2023
How do you tighten the drum and how much movement does the drum have?
For model number 11020022013
Hello Laurie, thank you for your query. A drum should have some movement inside a washing machine. In a top load washer, the drum should be able to be pushed from side to side easily. We have found some relevant instructions for tightening the tub. They may not be of the exact same model, but they will help you with the process. You may follow the following steps:
1. Open the lid and remove the dispenser and agitator's cover from the upper agitator.
2. Unscrew the upper agitator's bolt and then remove the retainer and spring and the cam and cog assembly. Now take the upper agitator out.
3. Unscrew the lower agitator and take it out.
4. Use a spanner wrench and hammer to tighten the drum nut clockwise.
5. Realign the plastic washer and the spacer.
6. Reposition the lower agitator and tighten the bolt to secure it.
7. Replace the bushing and realign the upper agitator. Tighten the agitator's bolt to secure it.
8. Insert the cam and cog assembly and place the retainer and spring and tighten them.
9. Now align the cover in place and secure it by snapping the dispenser on top of it.
If this does not help, then you may need to replace the suspension rods, part number FIX11703290, to fix the issue. We hope this information helps!
Pried off the agitator cap. Removed the bolt. Removed the agitator. In the process of separating the agitator from the base, a plastic tab broke off which concerned me. BUT, in the directions with the part it explains that the 2 tabs are for factory assembly and to break both of them off. Broke off the second tab and reassembled. My
... Read more18 year old Kenmore is back in action.
The instructions that came with the part were worthless. Essentially, unplug, put in new part, plug it back in. I spent a considerable amount of time on the internet and finally found a video showing how to open the top. Unlike other models, it is held down by clamps in the back rather than clips in the front. Once finding this inform
... Read moreation the installation was simple. Remove the clamps and the back of the console, slide the top forward and lift, remove and replace the lock and reassemble. You don't even have to remove the hoses.


 Diagram and Parts List for Kenmore Washer")